First off, I don’t really think that the problem is with the stepper controller. I am pretty sure this is an ID10T issue. I ran into a problem with controlling a nema 17 stepper, so I reduced the code to the absolute bare minumum and still can’t track it down. At this point, I am simply trying to turn the stepper first one way 10 steps and then the other 10 steps. No matter what I do, It will go one way, but not the other…and it will only move one step. Here’s the code…
int dirPin = 9;
int stepPin = 8;
int dirParam = 0;

void setup() {
  Serial.begin(9600);
  pinMode(dirPin,OUTPUT);
  pinMode(stepPin,OUTPUT);

}

void loop() {
    dirParam = 0; bump(10); delay(2000);
    dirParam = 1; bump(10); delay(2000);
}


void bump(int n)
{
  Serial.print("bump: "); Serial.print(n); Serial.print("    dir:"); Serial.println(dirParam);
  digitalWrite(dirPin,dirParam);
  for (int i = 1; i <= n; i++)
  {
    delay(1);
    digitalWrite(stepPin,HIGH);
    delay(1);
    digitalWrite(stepPin,LOW);
  }
}
Pretty simple.
I am using an Arduino Uno. I checked the output on pins 9 and 10 with a logic analyser and the uno is putting out exactly what it should. I switched from a a4988 unregulated to a 4988 regulated and they both do exactly the same…1 step one direction and nothing the other.
I took the a4988 and dropped it into another application that I know is performing as it should and it worked perfectly (that’s why I don’t think it’s the a4988).
My pins are as follows…
enable, ms1,ms2 and ms3 floating
reset and sleep tied together.
a4988 dir -> Arduino 9
a4988 step -> Arduino 8
logic ground -> Arduino gound
logic 5v -> Arduino 5v
A1,B1,A2, B2 to the motor (checked using the drag test and the wires are paired correctly
motor voltage to 12v lipo battery
motor ground to lipo ground.
motor + and - are coupled with a 100uf
I am not sure what to try next.
If I am posting this in the wrong place, I apologize.
Charlie
Hi Charlie!
From reading the documentation page quickly, it seems to me that you cannot leave ms1, ms2, and ms3 floating. Perhaps that offers a clue?
I have a little bit of experience with Arduino-compatible controller boards but nothing to write home about. Also zero successful experience with stepper motors or their drivers. So if my suggestion makes no sense feel free to tell me so. I had thought, in the distant past when I would try to experiment with Arduino (e.g. Atmel) and PIC devices, that I was always told one cannot leave a pin floating.
I suggest also re-reading the A4988 documentation. I am a software developer and I don’t know about others, but I’ve always benefited from re-reading IBM documentation for the nth time…to hit that one thing I didn’t “see” in my previous readings.
Thanks a ton
Best of luck to you
Bob
Bob, thank you for your suggestions. As I am in the “try anything” mode
right now, I will try pulling M1,2, and 3 low. The reason I haven’t tried
that yet is that just about every time I’ve used these carrier boards for
the a4988, I’ve used them ether floating or switched between high and
floating. I will check on the state of the enable pin as well. I will
say that almost every example circuit I’ve seen showed them floating,
including the examples that Pololu uses on their web site showed them
floating. At this point though, I have nothing to lose. I will try
rereading the docs as well. It’s been many years since I’ve read them.
From reading the documentation page quickly, it seems to me that you cannot leave ms1, ms2, and ms3 floating. Perhaps that offers a clue?
I reread both the Pololu docs and the a4988 datasheet and both indicate that there are internal pull down resisters so I don’t think that’s my problem. None the less, I will give it a go pulling Mx’s low as well as the enable pin. As I said before, I have nothing to lose.
Hi Charlie!
Good luck to you with resolving the problem. I am interested in the solution to your problem so let me know when you figure it out.
Best to you,
Bob
Hello, Charlie.
Ten steps is a pretty small angle. Can you try increasing the number of steps to 100 or 200 to see if that makes a difference? You might also try running the BasicStepperDriver example from the StepperDriver library, which is linked under the “Resources” tab on any of the A4988 product pages.
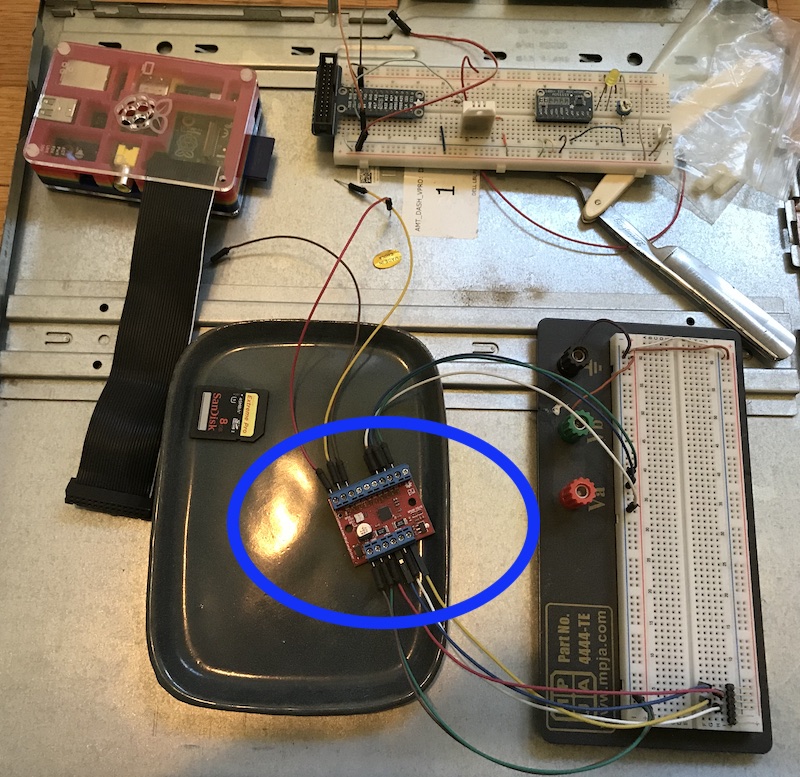
If changing the code does not help, can you posts pictures of your setup clearly showing all your connections and provide details on your stepper motor (e.g. voltage and current ratings)? What current limit did you set the A4988 to?
- Amanda
Amanda,
Ok, I don’t understand why, but the basicStepperDriver sketch worked. This
is frustrating along with the relief. The code I was trying to use was
robbed from a working application and I would think it would work the same
as it did in that app, but obviously it didn’t.
The BasicStepperDriver library seems to have some nice features, so I will
start using that. Just wish I understood why the old way doesn’t seem to
work in this instance.
Thank you very much.
Charlie
I’m glad your setup is working; thanks for letting us know.
If you want to continue troubleshooting the initial code you used, let me know.
Hi Charlie,
I’m glad the library worked for you.
Just out of my curiosity, do you keep the code that “…was robbed from a working application…” on GitHub? If you ever set up a GitHub repository containing that code, let me know. Your original post started me learning about stepper motors. Now I’m curious! I have to do some other work, which will take some time, and I’m also the official cook and grocery shopper and cleaner-upper in my home, so it may or may not take some time for me to explore these parts. When I do it would be fun cloning your code and playing with it and trying to reproduce your issue.
With that said, I want to express my pleasure that things are working for you again.
Best
Bob
I never really learned to use GETHUB. Tried once or twice but didn’t have the patience to learn yet another app that may or may not be useful to me. I will be glad to share the code that worked but it’s part of a larger app. I am (or at least was) an armature photographer and like to shoot very small stuff like insects which require some specialized techniques that are much easier if you automate the process by building a device called a stacked focus camera rail and use a stepper motor to gradually move the
camera just a few microns closer to the subject. This allows me to take maybe a hundreds or more shots and then combine them into a single focused extreme macro shot. I’ll have to look again to see if I changed how I was controlling the stepper without realizing it.
Hi Charlie,
I think you will be able to do this, with patience and persistence. I’m very interested in time-lapse and macro insect photography too. I only tried a few times with a macro lens before I gave up. I should follow my own advice, begin fresh, and keep on trying. That formula will work well for you – try, try, try again.
Feel free to post photos of your hardware setup. It will be very interesting to see a stacked focus camera rail and explore it in detail. Posting really clear photos of your hardware and then writing your specific problem can help others help you. I’m curious about what make and model of stepper motor you have exactly and how you have it set up in your application.
Just at this moment, I am starting to play around with robot kits. I worked with a Magician Chassis, but I am unhappy with that because the motor mounts on it appear to be weak, and the design of the chassis would make it hard to build in better motor mounts. So I recently purchased a Romi chassis kit and encoders. They should arrive in the mail soon – a few days perhaps? If I can get that to work I will buy a stepper motor and play with that. I think it will take a lot of try, try, try again for me to become expert with a stepper. I’m used to that – software development is all about trying again. So getting hardware to behave should not be any different when I think about it.
Good luck to you, and again, feel free to post photos of your stepper motor, controller board, and Arduino set up.
Bob
OK, that didn’t work out so well. I guess the forum converts the link to the first picture. I will try and send it another way
My Pics
1 Like
Hi Charlie!
The link you posted for your photos is showing your complete photostream, which might not be the pictures you want me or others to see. They are very interesting photos though!
Last night, I Googled to learn what stacked rail photography is about. Thank you for pointing me to an interesting new method of photography. I will learn more about these methods.
It turns out that maybe I did experiment with a stepper motor in the past. I remembered I had “something” that must be a motor driver, and it turned out to be the “BigEasy” driver from Brian Schmalz. Other people call it the “Sparkfun Driver” and indeed, I purchased this driver from Sparkfun a long while ago. I will try to post a photo of it below. I was trying to operate a scanner motor from an old computer scanner that I had taken apart. At the time I i did not really think of it as a stepper motor and I didn’t research it very well either. When nothing worked, I put it aside, and forgot it until just now. As you can see from the photo, things are a bit dusty.
Oh yah, about the motors. I just buy what I can get a good deal from Amazon or eBay usually…mostly Chinese. I use both nema 17 and nema 23. I built a 3D printer with 17s and a CNC router with 23s I am currently building a very small PCB mill that will also work as an engraver and that will be all 17s. I’ve built two camera rails, one for moving time laps video and the other for the macro stuff. The time lapse rail used a very cheap 17 that was not powerfull enough to move the camera when I had the rail in vertical position, so I built a small gear box from gears I got on eBay. Worked great. About 5:1 ratio
As you may have guessed, I seem to have ADD…can’t do just one thing at a time without getting board.
1 Like
Hi Charlie,
What I did above was: I took a photo, then imported it into my Mac. From there I resized the photo until it was pretty small, 800 X something pixels. Then I just dragged it from my Pictures folder right into this web form, and it magically uploaded and displayed when I posted the photo.
I saw two photos of what looks like an Arduino board and a PCB in your photo stream. The photos of insects and critters are quite interesting.
Bob
I see you’re a pi-guy. My 3D printer is controlled by a pi. I tried to use it for the CNC, but it didn’t have enough umph. I get a small SBC that runs Windows 10 with the intention of controlling my CNC with that, but have only managed to get it mounted on the monitor, but still using a desk top to control the machine.
Yep. I make my own PCB’s sometimes. It’s a fun process.
It’s easier to send a link to the whole photo stream since I don’t know what would interest you. I marked pictures of my friends as private, so I don’t think you would have seen them…not that it really matters.
Charlie,
Would a project like this one give you the right hardware to support a stacked focus camera?
Bob
This would probably work for moving time lapse, but not sure how it would
help you with photo stacking. Here’s a link to my device in action. I
build this from the ground up including the programming, circuit design,
making the PCB for the electronics, the controller box, the rail itself,
etc.
https://photos.google.com/photo/AF1QipP3B_ZDdnI6FxTP7v0mlZHDeFtsGDejHvfrjpU
https://photos.google.com/photo/AF1QipP3B_ZDdnI6FxTP7v0mlZHDeFtsGDejHvfrjpU
I’ve been trying to get something too you about this for a couple days but
didn’t find the better video I was looking for… Let me know if this link
does not work or does something weird (like ask for a password).
The idea behind super macro is that you are VERY close to the subject. I
have done some shots where the subject was only a millimeter or two from
the lense. This gives you and extremely shallow depth of field and that’s
why photo stacking is necessary. Any single shot will have only a small
portion of the image in focus at a time. Some of my sequences require the
camera to move only a few microns between shots
With my rig, one full step revolution of the stepper requires 200 steps. I
use quarter steps so that means 800 steps per revolution. Each full
revolution moves the camera 8 millimeters closer to the subject, so if you
devide 8mm by 800, you get 1/100 of a milimeter. Very tiny movement
indeed. (the video above was moving much further per step). If you
look at the photos on my flickr page, down below some of the pictures of
the camera with the microscope lens on it, you’ll see a composite of a bud
that I used for the pictures with the tiny spheres of mosture on it. The
bud itself was pea size and those spheres of moisture were not visible to
(my) naked eye. These shots require a couple hundred shots to get
everything in focus. Just beyond that picture there is an example of what
you get with just a single shot.
I know…too much information…but I tend to brag. One my least
endearing qualities.