Hi Charlie,
Thank you for explaining the stacked focus rail and super macro process for me. I’m learning from you. No, I do not see you as bragging in any way. You were explaining the process for me.
The photos are not available to me, it appears I did have to supply an email address and a password.
Thanks for giving me your thoughts on the Adafruit camera slider.
Bob
I will try to get the vid on my Flickr page since I know you can access that using the link I gave you before.
Please try this one. Problem is, since I am logged into the site on all of
my computers, I don’t know what anyone else sees when I give them a link.
https://photos.app.goo.gl/i5I8QOiGVwd4T1EU2
Here is the rest of the stuff. Keep in mind that I have no training in
electronics so a lot of stuff I do could probably be done much better by
someone who is trained.
CameraRailBT.ino (2.97 KB)
Ok, I uploaded the video to flickr so you should be able to use the same
link I gave you in an earlier email, so you have two options for seeing the
vid that may or may not work.
Hi Charlie!
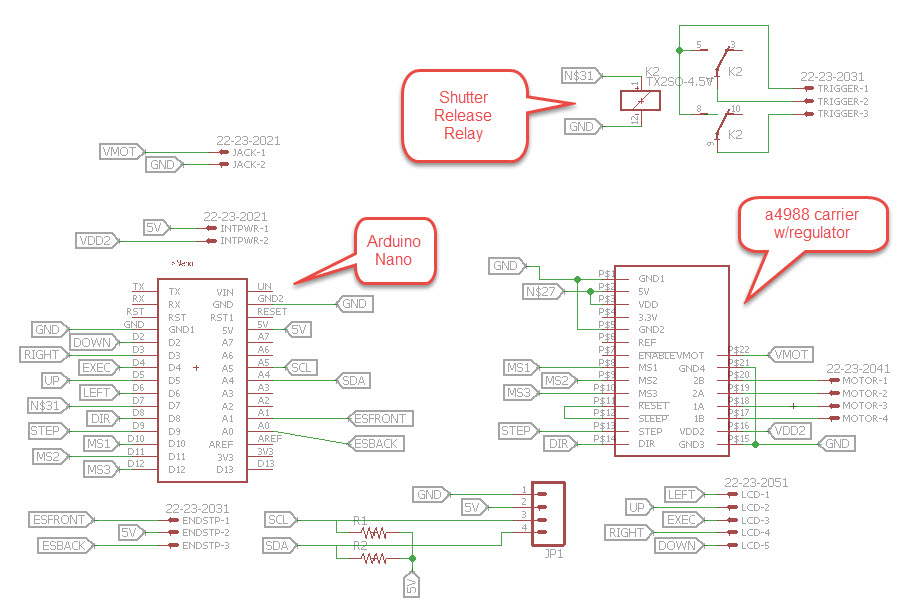
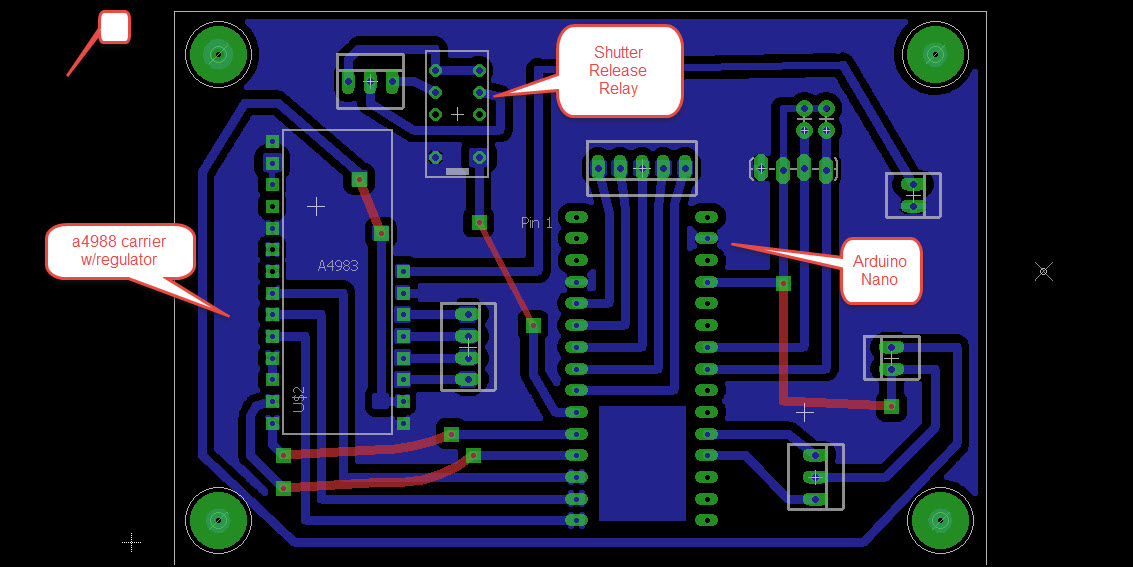
Thank you so much for posting the video – I enjoyed it. Also thank you for posting the diagrams. Can you tell me the details of the hardware? Where did you get the rails, for example? Did you have them made for you by a machine shop? How are you supporting the camera? That looks like a beautiful hardware build, and it works!
Bob
Hey Bob,
Most everything came from http://openbuildspartstore.com. They sell already assembled c-beam rail assemblies but they seemed a little expensive considering that I already had a lot of the parts from other projects.
The c-beam rail
Acme threaded rod
The platform for mounting camera and riding the c-beam
The connector that joins the acme rod to the plate
End plates for nema 17
The collars. You need two
Bearings x 2 (might need to double check me on size)
35mm Spacers for mounting motor
1/4” Connector from motor shaft to acme rod
Stuff I don’t have parts numbers for (everything except the motor and quick release is very cheep and there not that bad):
Any nema 17 motor
Various metric screws
A 5mm tap
2 end stop switches
An electrical shutter release tha fits the camera you will use.
A small quick release camera mount
Various 3D printed parts
1 Like
As I reached my seventies, my memory some times gets me into trouble, so double check me on everything.
To answer your question about how the camera is mounted, it’s mounted on the c-beam gantry plate (above) as shown below.

Hi Charlie,
Thank you so much for posting the parts source and a listing of the parts you needed. I’m also very appreciative of the the photo of the camera mounting arrangement. I’m going to start looking at some type of project like this. More for my wife than for myself. She is very heavily into photography and would really like to try focus stacking, I feel sure.
I do need to start simply. First, the Romi robot. Second, a stepper motor to play with very simply. I need to discover whether I fried my BigEasy motor driver a few years ago during my attempts to get it to work with an old scanner motor. The discussion that you and I are having in this thread has prompted me to start reading about stepper motors and how to get started with them. So this is a big bonus for me, I am learning from you and benefiting from it.
Thanks!
Bob
Cool…
Keep in mind that the stepper drivers are dirt cheap. I bought five of them for 10 bucks (China) some time ago and they seemed to work as well as the ones I got from Pololu (but I’m sure there is a difference).