
I’ve been getting acquainted with the Netduino microcontroller for about a month now and decided to start a robotics project with it. To get started I decided to use the Pololu RP5 Tracked Chassis as a base, it presented a nice ready made package, and the Qik2s9v1 motor controller. I selected the Qik2s9v1 after a conversation with a very helpful gentleman at Pololu specifically because it supported 3.3v logic - the Netduino serial ports are 3.3v output and 5 volt tolerant on input.
The Netduino itself, for those of you not familiar with it, is programmed in C# and is supported by the MS Visual Studio IDE using the .Net MF framework - a particularly nice featue is being able to test Netduino software in debug mode with tracing, break points etc. My inital goal was simply putting the whole package together and then doing some initial testing of the Netduino/Qik2sv91 interface.
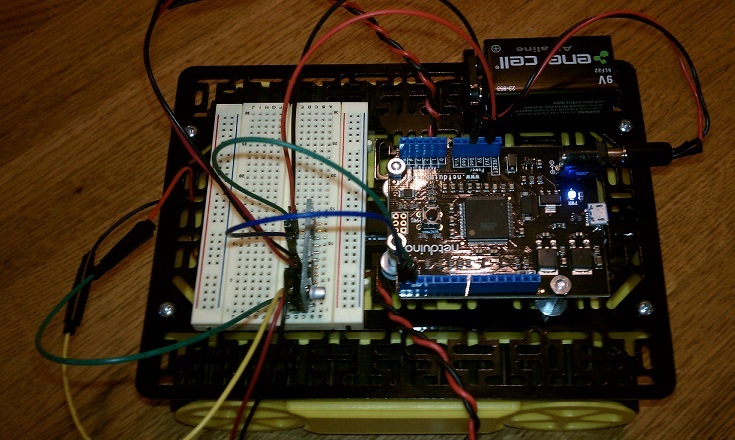
Mechanical Assembly - Along with the RP5 chassis I ordered the wide wide RP5 expansion plate and four .5 inch 4-40 threaded spacers; the spacers provided a nice means to mount the Netduino to the RP5 expansion plate. I added a small adhesive backed bread board to the RP5 expansion plate for prototyping. For the Qik2s9v1 I used the right angle header that was supplied with it. Power for the Netduino is supplied by a 9v battery. Below is an image of the whole configuration.
To actually test the configuration I created a C# class which would allow me to execute commands to move the RP5 forward, backward, and to the right. For each direction the user supplies a speed and duration, i.e. how many seconds the RP5 should move in the selected direction. Once I get an understanding ofthe dynamics of the RP5, expecially regarding turns which I execute by having one set of treads move forward and the other in reverse, I will be integrating a Maxbotix sonar unit to try having the RP5 move around autonomously using the Maxbotix for object avoidance. For reference the C# class I am using for testing is shown below.
using System;
using System.Threading;
using System.IO.Ports;
using System.Text;
using Microsoft.SPOT;
using SecretLabs.NETMF.Hardware.Netduino;

namespace PoluluRobot_010
{
    class DualSerialMotorController
    {
        static SerialPort serialPort;

        static byte[] commandBuffer = new byte[4];

        static byte[] stopCommand = new byte[4] { 0x8A, 0, 0x8C, 0 };

        static byte[] forwardCommand = new byte[4] {0x8A, 0,0x8C, 0};   // Forward speed passed by caller

        static byte[] reverseCommand = new byte[4] { 0x88, 0, 0x8E, 0 };   // Forward speed passed by caller

        static byte[] rightCommand = new byte[4] { 0x8A, 0, 0x8E, 0 };

        public DualSerialMotorController(string portName = SerialPorts.COM1, int baudRate = 9600, Parity parity = Parity.None, int dataBits = 8, StopBits stopBits = StopBits.One)
        {
            serialPort = new SerialPort(portName, baudRate, parity, dataBits, stopBits);
            serialPort.Open();
            commandBuffer[0] = 0xAA;    //Initialize Qik2s9v1
            serialPort.Write(commandBuffer, 0, 1);
        }

        //Send Robot Forward For A Specified Time
        public void Forward(int speed, int lengthOfTime)
        {
            forwardCommand[1] = Byte.Parse(speed.ToString());
            forwardCommand[3] = forwardCommand[1];
            serialPort.Write(forwardCommand, 0, 4);
            Thread.Sleep(lengthOfTime * 1000);
        }

        //Send Robot In Reerse For A Specified Time
        public void Reverse(int speed, int lengthOfTime)
        {
            reverseCommand[1] = Byte.Parse(speed.ToString());
            reverseCommand[3] = forwardCommand[1];
            serialPort.Write(reverseCommand, 0, 4);
            Thread.Sleep(lengthOfTime * 1000);
        }

        //Stop Robot
        public void Stop()
        {
            serialPort.Write(stopCommand, 0, 4);
        }

        //Turn Right
        public void TurnRight(int speed)
        {
            rightCommand[1] = Byte.Parse(speed.ToString());
            rightCommand[3] = rightCommand[1];
            serialPort.Write(rightCommand, 0, 4);
            Thread.Sleep(1500);
        }
    }
}