PID Line Following of Original 3pi

Hi! I have been trying to learn PID over the following weeks, I already understand the concept behind PID, but I’m still confused about how to balance the numbers or something. I really have a hard time understanding how to program it, so maybe can someone give me tips or advice?

Other than that, can I also ask if it is possible in Atmel studio to have a specific program to run through a specific time, then that program would stop in order for the robot to follow another program?

It would be a huge help for someone to give me some guidance here. Thank you so much.

Hello.

It is not clear to me if you are having problems with tuning the PID values or with uploading the program to the 3pi, but the user’s guide for the original 3pi robot has some information about both of those topics (in the “Advanced Line Following with 3pi: PID Control” and “Programming Your 3pi” sections, respectively), so I suggest starting there. If you continue to have problems, could you be more specific with your questions?

You can only have one program uploaded to the 3pi at a time. However, you can write your program in a way that once it finishes one part of the program it moves on to the next. If you can give a more specific example of what you’re trying to do, I might have more suggestions.

Brandon

Hello! Thank you so much for the guides!! I still don’t understand on how to tune my PID values. Can I have help with that or maybe some tips?

For the program moving to another program, I’m trying to run the line following program then it would stop, then would just turn, then the line following program would run again. Is that possible?

The values used in the example code should work fairly well, but if you want to go through tuning it yourself (or just learn more about PID tuning), there are various methods for doing so. One tuning method I’ve had success with in the past in the Ziegler-Nichols method, and I think that is generally a good starting point. After you’ve tuned PID coefficients a few times, you might also start getting a feel for what to adjust based on the performance characteristics (especially if you use similar hardware).

As I mentioned before, it can only have one program uploaded at a time, but you can combine the functions you described into a single program. The Example Project #2: Maze Solving example in the 3pi user’s guide does something similar to what you are describing; it essentially puts the line following portion of the code in a function called follow_segment() and breaks out of that function to do something else (identify the intersection found and turn accordingly in this case) before calling the follow_segment() function again to return to following the line.

Brandon

1 Like

Thank you so much!! I’ve somehow got an idea of how to PID tuning works.

But I’m still having difficulty with my program. I’m really sorry if I’m asking too much.
What I need in my program is to have my main loop work for a few seconds, then it would pause in order for the 3pi to turn, then the loop would work again after the turn is completed.

Should I use a break statement? Or maybe time_t? I’m not really sure how those works.

Hello.

There are a number of ways you could go about doing something like that, but I would not recommend using a break statement to exit the main loop of your program.

Since what you are trying to do (i.e. stop following the line and turn) is so simple, you probably don’t even need a separate function to handle it. The first thing you will need is some kind of trigger condition to tell your main loop when to call it. If you want it to trigger after a set amount of time, you can use the millis() command, which returns the amount of time the program has been running in milliseconds.

You can declare a global variable (at the top of your program, before setup()):

unsigned long time;

then set it equal to millis() at the end of setup():

time = millis();

then use it to see how long your main loop has been running by subtracting it from millis() inside of your main loop. Using an if statement, you can check to see if that value is higher than some threshold, and if it is, have the robot turn and reset the variable before continuing to follow the line:

unsigned long threshold = 10000;	// set the threshold in milliseconds, so 5000 is 5 seconds
if(millis() - time => threshold)		// if the robot has been following the line for 5 seconds or more
{
  set_motors(0,0);  	//stop motors
  delay_ms(50);		//small delay
  set_motors(-80,80); 	//set motors to go in opposite directions so the robot turns
  delay_ms(200); 	//delay to let the robot finish turning
  set_motors(0,0);  	//stop motors
  time = millis();		// reset the time variable so this only happens again after 5 more seconds
}

Brandon

Hi! What does it mean when it says " unused variable ‘threshold’ “, and " ‘time’ may be used uninitialized in this function”. Did I arrange it wrong?

I’m really sorry, there isn’t really someone here who could teach me this and I’m trying to learn it the best way I can.

Could you post your code here so I can take a look at what you have right now?

Brandon

#include <pololu/3pi.h>
#include <avr/pgmspace.h>

const char welcome_line1[] PROGMEM = " Pololu";
const char welcome_line2[] PROGMEM = "3\xf7 Robot";
const char demo_name_line1[] PROGMEM = "PID";
const char demo_name_line2[] PROGMEM = "follower";

// A couple of simple tunes, stored in program space.
const char welcome[] PROGMEM = ">g32>>c32";
const char go[] PROGMEM = "L16 cdegreg4";

// Data for generating the characters used in load_custom_characters
// and display_readings.  By reading levels[] starting at various
// offsets, we can generate all of the 7 extra characters needed for a
// bargraph.  This is also stored in program space.
const char levels[] PROGMEM = {
	0b00000,
	0b00000,
	0b00000,
	0b00000,
	0b00000,
	0b00000,
	0b00000,
	0b11111,
	0b11111,
	0b11111,
	0b11111,
	0b11111,
	0b11111,
	0b11111
};

// This function loads custom characters into the LCD.  Up to 8
// characters can be loaded; we use them for 7 levels of a bar graph.
void load_custom_characters()
{
	lcd_load_custom_character(levels+0,0); // no offset, e.g. one bar
	lcd_load_custom_character(levels+1,1); // two bars
	lcd_load_custom_character(levels+2,2); // etc...
	lcd_load_custom_character(levels+3,3);
	lcd_load_custom_character(levels+4,4);
	lcd_load_custom_character(levels+5,5);
	lcd_load_custom_character(levels+6,6);
	clear(); // the LCD must be cleared for the characters to take effect
}

// This function displays the sensor readings using a bar graph.
void display_readings(const unsigned int *calibrated_values)
{
	unsigned char i;

	for(i=0;i<5;i++) {
		// Initialize the array of characters that we will use for the
		// graph.  Using the space, an extra copy of the one-bar
		// character, and character 255 (a full black box), we get 10
		// characters in the array.
		const char display_characters[10] = {' ',0,0,1,2,3,4,5,6,255};

		// The variable c will have values from 0 to 9, since
		// calibrated values are in the range of 0 to 1000, and
		// 1000/101 is 9 with integer math.
		char c = display_characters[calibrated_values[i]/101];

		// Display the bar graph character.
		print_character(c);
	}
}

// Initializes the 3pi, displays a welcome message, calibrates, and
// plays the initial music.
void initialize()
{
	unsigned int counter; // used as a simple timer
	unsigned int sensors[5]; // an array to hold sensor values

	// This must be called at the beginning of 3pi code, to set up the
	// sensors.  We use a value of 2000 for the timeout, which
	// corresponds to 2000*0.4 us = 0.8 ms on our 20 MHz processor.
	pololu_3pi_init(2000);
	load_custom_characters(); // load the custom characters
	
	// Play welcome music and display a message
	print_from_program_space(welcome_line1);
	lcd_goto_xy(0,1);
	print_from_program_space(welcome_line2);
	play_from_program_space(welcome);
	delay_ms(1000);

	clear();
	print_from_program_space(demo_name_line1);
	lcd_goto_xy(0,1);
	print_from_program_space(demo_name_line2);
	delay_ms(1000);

	// Display battery voltage and wait for button press
	while(!button_is_pressed(BUTTON_B))
	{
		int bat = read_battery_millivolts();

		clear();
		print_long(bat);
		print("mV");
		lcd_goto_xy(0,1);
		print("Press B");

		delay_ms(100);
	}

	// Always wait for the button to be released so that 3pi doesn't
	// start moving until your hand is away from it.
	wait_for_button_release(BUTTON_B);
	delay_ms(1000);

	// Auto-calibration: turn right and left while calibrating the
	// sensors.
	for(counter=0;counter<80;counter++)
	{
		if(counter < 20 || counter >= 60)
			set_motors(40,-40);
		else
			set_motors(-40,40);

		// This function records a set of sensor readings and keeps
		// track of the minimum and maximum values encountered.  The
		// IR_EMITTERS_ON argument means that the IR LEDs will be
		// turned on during the reading, which is usually what you
		// want.
		calibrate_line_sensors(IR_EMITTERS_ON);

		// Since our counter runs to 80, the total delay will be
		// 80*20 = 1600 ms.
		delay_ms(20);
	}
	set_motors(0,0);

	// Display calibrated values as a bar graph.
	while(!button_is_pressed(BUTTON_B))
	{
		// Read the sensor values and get the position measurement.
		unsigned int position = read_line(sensors,IR_EMITTERS_ON);

		// Display the position measurement, which will go from 0
		// (when the leftmost sensor is over the line) to 4000 (when
		// the rightmost sensor is over the line) on the 3pi, along
		// with a bar graph of the sensor readings.  This allows you
		// to make sure the robot is ready to go.
		clear();
		print_long(position);
		lcd_goto_xy(0,1);
		display_readings(sensors);

		delay_ms(100);
	}
	wait_for_button_release(BUTTON_B);

	clear();

}

// This is the main function, where the code starts.  All C programs
// must have a main() function defined somewhere.
int main()
{
	unsigned int sensors[5]; // an array to hold sensor values
	unsigned int last_proportional=0;
	unsigned long time;
	long integral=0;

	
	// set up the 3pi
	initialize();

	// This is the "main loop" - it will run forever.
	while(1)
	{


		// Get the position of the line.  Note that we *must* provide
		// the "sensors" argument to read_line() here, even though we
		// are not interested in the individual sensor readings.
		unsigned int position = read_line(sensors,IR_EMITTERS_ON);

		// The "proportional" term should be 0 when we are on the line.
		int proportional = ((int)position) - 2000;

		// Compute the derivative (change) and integral (sum) of the
		// position.
		int derivative = proportional - last_proportional;
		integral += proportional;

		// Remember the last position.
		last_proportional = proportional;

		// Compute the difference between the two motor power settings,
		// m1 - m2.  If this is a positive number the robot will turn
		// to the right.  If it is a negative number, the robot will
		// turn to the left, and the magnitude of the number determines
		// the sharpness of the turn.
		int power_difference = proportional/3 + integral/50000 + derivative*4/1;

		// Compute the actual motor settings.  We never set either motor
		// to a negative value.
		const int max = 100;
		if(power_difference > max)
			power_difference = max;
		if(power_difference < -max)
			power_difference = -max;

		if(power_difference < 0)
			set_motors(max+power_difference, max);
		else
			set_motors(max, max-power_difference);
			

	unsigned long threshold = 10000;
	if(millis() - time => threshold)
		{
		set_motors(0,0);
		delay_ms(50);
		set_motors(-80,80);
		delay_ms(200);
		set_motors(0,0);
		time = millis();		
		}
	}
	

	// This part of the code is never reached.  A robot should
	// never reach the end of its program, or unpredictable behavior
	// will result as random code starts getting executed.  If you
	// really want to stop all actions at some point, set your motors
	// to 0,0 and run the following command to loop forever:
	//
	// while(1);
}

// Local Variables: **
// mode: C **
// c-basic-offset: 4 **
// tab-width: 4 **
// indent-tabs-mode: t **
// end: **

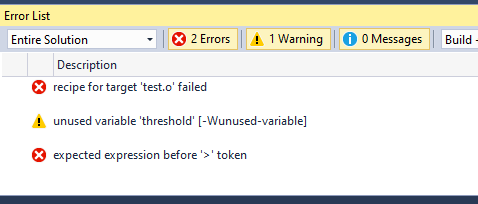
It looks like you are not giving time an initial value. Could you try changing unsigned long time; to unsigned long time = millis(); to see if that helps?

Brandon

image

I changed it, did I type in something wrong?

I just noticed that I had a typo in the if statement that is probably causing a problem; => should be >= (or just > would work too).

If that does not fix the problem, can you post a complete copy of your updated code?

Brandon

Hi! I can upload the program just fine, but the bot turned right immediately instead of the line following program first. Is what I’m asking for not possible?

It is certainly possible, and I suspect the code is working, but not entirely how we intended.

After uploading the code on my 3pi, I realized what was happening. The initial value for time is being set before the initialize() function is called, so whatever time you take to press the button after calibration (to start following the line) is counting toward the 10 second timer. Luckily, this is an easy fix! You can just move unsigned long time = millis(); to just after initialize();.

Brandon

OMG, I’m really really thankful for this, thank you so much!!

This is really the last thing I’m asking, is what you helped me with is within a time interval? And I can’t change it to multiple types of time? For example, the first is for 5 seconds, then the next would be for 7 seconds.

I am not entirely sure I understand what you’re asking, but if you just want to trigger that same code at different time intervals, then you can modify the code so the threshold value is adjusted each time the if statement we added gets triggered.

If you can post a more detailed breakdown of how you want it to work (i.e. how many time intervals and how long they are), I can probably give more specific advice on how to go about doing that.

Brandon

Line following program - would run for 5 seconds
The bot would turn right
line following program - will run again for 7 seconds
the bot would turn left
line following program - will run for 5 seconds

That kind of flow is what I am aiming for

There are a lot of ways you could go about doing that kind of thing. For example, you could use a counter or some kind of state variable to track how many times the if statement has triggered.

If you only want it to go back and forth between a 5 second run followed by a right turn and then a 7 second run followed by a left turn, then you could probably just use the threshold variable as your state variable. For example:

if(millis() - time => threshold)
{
  set_motors(0,0);
  delay_ms(50);

  if(threshold == 5000)
  {
    //turn right
    set_motors(80,-80);
    //update threshold
    threshold = 7000;
  }else
  {
    //turn left
    set_motors(-80,80);
    //update threshold
    threshold = 5000;
  }

  delay_ms(200);
  set_motors(0,0);
  time = millis();		
}

Brandon

1 Like

Thank you so much!! You’ve really helped me here

1 Like

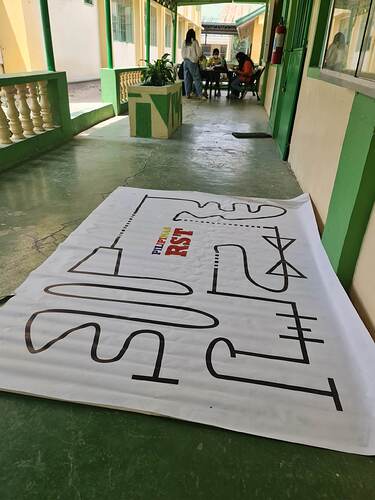
Hi! I know it’s been long but I’m trying to compete again. I haven’t used your latest program since it was quite confusing. What I’m trying to do is to have multiple turns with different time intervals. This is the track I’m trying to complete

I hope you guys reply, thank you!