I am using a Tic500 to control a stepper with an Arduino. I would like it to turn the stepper, wait 3 seconds, and turn it again inside a loop on Arduino. But it only turns once. Can this be fixed?
Here is the loop:
void loop()
{
  buttonWait(3); // wait for button press on pin 10
  tic.haltAndSetPosition(0);
  tic.exitSafeStart();
  resetCommandTimeout();
  tic.setTargetPosition(160.6667);
  waitForPosition(3000);
  //the Mega board rotates the stepper properly the first time, then stops
  //here and does nothing more.
  delay(3000);
    tic.haltAndSetPosition(0);
  tic.exitSafeStart();
  resetCommandTimeout();
 delayWhileResettingCommandTimeout(1000);
  tic.setTargetPosition(-160.6667);
  waitForPosition(2000);
}
The ‘waitForPosition’ loop got stuck, so I removed it and instead inserted a delay of 800 and a reset of the CommandTimeout over and over again as many times as it took for the stepper to finish turning.
Neanderthal fixes are also effective…in fact, a lot of our life is probably Neanderthal. As an inventor, I always go back to basics!
I am glad you were able to get something working. However, I wanted to point out a couple of problems with the code you posted. First, the position is a 32-bit signed integer, so if you try to use a floating point number as the position, any digits after the decimal point will get truncated. The position is in units of microsteps, so there are no fractional position values. Then, for your waitForPosition() command, you should use the same value that you just set the target to, or it will not work as intended. For example, your code commands the Tic to set the target at 160, then tries to wait for it to reach 3000 (which it will never reach, since it is stopping at 160).
Wow thank you Brandon. In fact I had figured out that the waitForPosition() was getting stuck and hanging, so I erased it and replaced it with 6 delays of less than 1000 microseconds, very goofy but it worked fine. I can go back now and redo it with the right command.
I am amazed at how difficult programming is. I’ve never done real programming, only Excel spreadsheets which are very very easy compared to this.
Could you post the simplest complete version of your code that demonstrates the problem, as well as a copy of your Tic settings file? You can save your settings file from the “File” drop-down menu of the Tic Control Center.
Thank you so much, you are really going the extra mile for me!
Here’s the sketch:
#include <Tic.h>
#ifdef SERIAL_PORT_HARDWARE_OPEN
#define ticSerial SERIAL_PORT_HARDWARE_OPEN
#else
#include <SoftwareSerial.h>
SoftwareSerial ticSerial(10, 11);
#endif
TicSerial tic(ticSerial);
int buttonState = 0;
//this is the button function
void buttonWait(int buttonPin) {
//int buttonState = 0;
while (1) {
buttonState = digitalRead(buttonPin);
if (buttonState == LOW) {
return;
}
}
}
void setup()
{
pinMode(3, INPUT_PULLUP);
// Set the baud rate.
ticSerial.begin(9600);
delay(20);
// Set the Tic's current position to 0, so that when we command
// it to move later, it will move a predictable amount.
tic.haltAndSetPosition(0);
// Tells the Tic that it is OK to start driving the motor. The
// Tic's safe-start feature helps avoid unexpected, accidental
// movement of the motor: if an error happens, the Tic will not
// drive the motor again until it receives the Exit Safe Start
// command. The safe-start feature can be disbled in the Tic
// Control Center.
tic.exitSafeStart();
}
// Sends a "Reset command timeout" command to the Tic. We must
// call this at least once per second, or else a command timeout
// error will happen. The Tic's default command timeout period
// is 1000 ms, but it can be changed or disabled in the Tic
// Control Center.
void resetCommandTimeout()
{
tic.resetCommandTimeout();
}
// Delays for the specified number of milliseconds while
// resetting the Tic's command timeout so that its movement does
// not get interrupted by errors.
void delayWhileResettingCommandTimeout(uint32_t ms)
{
uint32_t start = millis();
do
{
resetCommandTimeout();
} while ((uint32_t)(millis() - start) <= ms);
}
// Polls the Tic, waiting for it to reach the specified target
// position. Note that if the Tic detects an error, the Tic will
// probably go into safe-start mode and never reach its target
// position, so this function will loop infinitely. If that
// happens, you will need to reset your Arduino.(This does not work it freezes)
//instead I just add a bunch of delays with resetCommandTimeouts every less
//than a second.
void waitForPosition(int32_t targetPosition)
{
do
{
resetCommandTimeout();
} while (tic.getCurrentPosition() != targetPosition);
}
void loop()
{
buttonWait(3); // wait for button press on pin 10
tic.energize();
tic.haltAndSetPosition(0);
tic.exitSafeStart();
resetCommandTimeout();
tic.setTargetPosition(409);
delayWhileResettingCommandTimeout(409);
//the Mega board rotates the stepper properly the first time, then stops
//here and does nothing more on any button press.
delay(3000);
buttonWait(3); // wait for button press on pin 10
tic.haltAndSetPosition(0);
tic.exitSafeStart();
resetCommandTimeout();
delayWhileResettingCommandTimeout(1000);
tic.setTargetPosition(-409);
delayWhileResettingCommandTimeout(-409);
}
It looks like you are calling delayWhileResettingCommandTimeout() instead of waitForPosition() after setting the target position with tic.setTargetPosition().
Well, professor, I’m afraid I’m not going to pass your course! I seem to be getting something wrong and I cannot find what it is.
This code waits for the first button push, rotates exactly the right amount and stops – but won’t do anything on the second button push!
I tried adding “tic.energize()”, but it did not help. I tried changing “waitForPosition” to a lower number than the TargetPosition, but that did not work.
This is important for me because I have a lot more programming to do, and the goofy solution I made of putting in four or five less-than-a-second delays with a resetCommandTimeout in them will not always work.
I hate to bother you, but do you have any other suggestions? Thanks so much!
Aryeh
#include <Tic.h>

#ifdef SERIAL_PORT_HARDWARE_OPEN
#define ticSerial SERIAL_PORT_HARDWARE_OPEN
#else
#include <SoftwareSerial.h>
SoftwareSerial ticSerial(10, 11);
#endif

TicSerial tic(ticSerial);

int buttonState = 0;
//this is the button function
void buttonWait(int buttonPin) {
//int buttonState = 0;
while (1) {
buttonState = digitalRead(buttonPin);
if (buttonState == LOW) {
return;
}
}
}
void setup()
{

pinMode(3, INPUT_PULLUP);
// Set the baud rate.
ticSerial.begin(9600);

delay(20);

// Set the Tic's current position to 0, so that when we command
// it to move later, it will move a predictable amount.
tic.haltAndSetPosition(0);

// Tells the Tic that it is OK to start driving the motor. The
// Tic's safe-start feature helps avoid unexpected, accidental
// movement of the motor: if an error happens, the Tic will not
// drive the motor again until it receives the Exit Safe Start
// command. The safe-start feature can be disbled in the Tic
// Control Center.
tic.exitSafeStart();
}

// Sends a "Reset command timeout" command to the Tic. We must
// call this at least once per second, or else a command timeout
// error will happen. The Tic's default command timeout period
// is 1000 ms, but it can be changed or disabled in the Tic
// Control Center.
void resetCommandTimeout()
{
tic.resetCommandTimeout();
}

// Delays for the specified number of milliseconds while
// resetting the Tic's command timeout so that its movement does
// not get interrupted by errors.
void delayWhileResettingCommandTimeout(uint32_t ms)
{
uint32_t start = millis();
do
{
resetCommandTimeout();
} while ((uint32_t)(millis() - start) <= ms);
}

// Polls the Tic, waiting for it to reach the specified target
// position. Note that if the Tic detects an error, the Tic will
// probably go into safe-start mode and never reach its target
// position, so this function will loop infinitely. If that
// happens, you will need to reset your Arduino.(This does not work it freezes)
//instead I just add a bunch of delays with resetCommandTimeouts every less
//than a second.
void waitForPosition(int32_t targetPosition)
{
do
{
resetCommandTimeout();
} while (tic.getCurrentPosition() != targetPosition);
}

void loop()
{
buttonWait(3); // wait for button press on pin 10
tic.energize();
tic.haltAndSetPosition(0);
tic.exitSafeStart();
resetCommandTimeout();
delayWhileResettingCommandTimeout(50);
tic.setTargetPosition(409);
waitForPosition(409);

//the Mega board rotates the stepper properly the first time, then stops
//here and does nothing more on any button press.

buttonWait(3); // wait for button press on pin 10
tic.energize();
tic.haltAndSetPosition(0);
tic.exitSafeStart();
resetCommandTimeout();
delayWhileResettingCommandTimeout(50);

tic.setTargetPosition(-409);
waitForPosition(-409);

}
Thank you for posting your updated code. I tried it here to see if I could reproduce the problem, but it seemed to work fine for me. I noticed that your comments refer to the button being on pin 10, but the code specifies it as pin 3, but if it works the first time you press it, I suspect you have it connected correctly.
Are you sure your program is hanging on the second button press? You might try adding some debugging code that prints to the Serial Monitor to troubleshoot exactly where the code is sticking. Also, is the Tic reporting an error (i.e. is the red LED on the board lit), and if so, could you check the Tic Control Center while it is indicating the error to see which one(s) it is?
You are so nice Brandon, thank you. Yes, I am using pin 3 and the button works fine the first time. Does it help you help me, if you know that this code works great on both button presses if I replace the waitForPosition with a few delays with resetCommandTimeout 's after them? This seems to point the finger directly at the waitForPosition.
I will check for the LED. I do not know how to add “debugging code that prints to the Serial Monitor”
thks
I agree that it sounds like your waitForPosition function is what is hanging. Could you add Serial.begin(9600); to your setup() function, and then change your waitForPosition command to print the current position to the Serial Monitor like this?
void waitForPosition(int32_t targetPosition)
{
  do
  {
    Serial.print("Current: "); Serial.print(tic.getCurrentPosition());
    Serial.print("\t Target: "); Serial.println(targetPosition);
    resetCommandTimeout();
  } while (tic.getCurrentPosition() != targetPosition);
}
After you make those modifications, you should be able to see the current position variable being printed to the Serial Monitor when your code is in the waitForPosition while loop. You can open the Serial Monitor with the button in the upper right-hand corner of the Arduino IDE that looks like a magnifying glass. Can you post a screenshot of the output after you press the button and describe what you see?
If you are getting errors on the Tic (indicated by the red LED), that could be what is stopping it from continuing correctly, so you should still check that as well.
I made it half-half to test, and indeed the red light is different.
On the first button push I replaced the waitForPosition with a series of delay, delay, delay and reset the command timeout all the time. And I made the SECOND button push waitForPosition. The red light on the Tic500 goes off as soon as you make the first button push, and it STAYS OFF until the number of seconds in those delays. Then it goes back on. But on the second button push, although the stepper does move, the red light goes back on in the middle of the stepper’s movement (one second, which is what the command timeout automatically does), and stays on. Then the next button push does nothing.
So what’s happening is that the waitForPosition is not executing the resetCommandTimeout. Could this be because the tic.getCurrentPosition() is not working with Nano? Maybe I have a library problem?
About the serial monitor, I do not understand how the serial monitor on the IDE can ever update with my Nano. If I leave the Nano plugged into the computer and push the button, I get no readout on the serial monitor on the IDE. If I pull the Nano out of the computer and plug it into the stepper, of course the IDE knows nothing.
I am not sure I understand your confusion with the Serial Monitor. From your description, it sounds like you are taking the Nano out of your system to program it; you should be able to have the Arduino connected to your Tic and connected to USB at the same time. Being able to see the data being received would be very useful for troubleshooting, so I highly recommend getting it working with Serial Monitor.
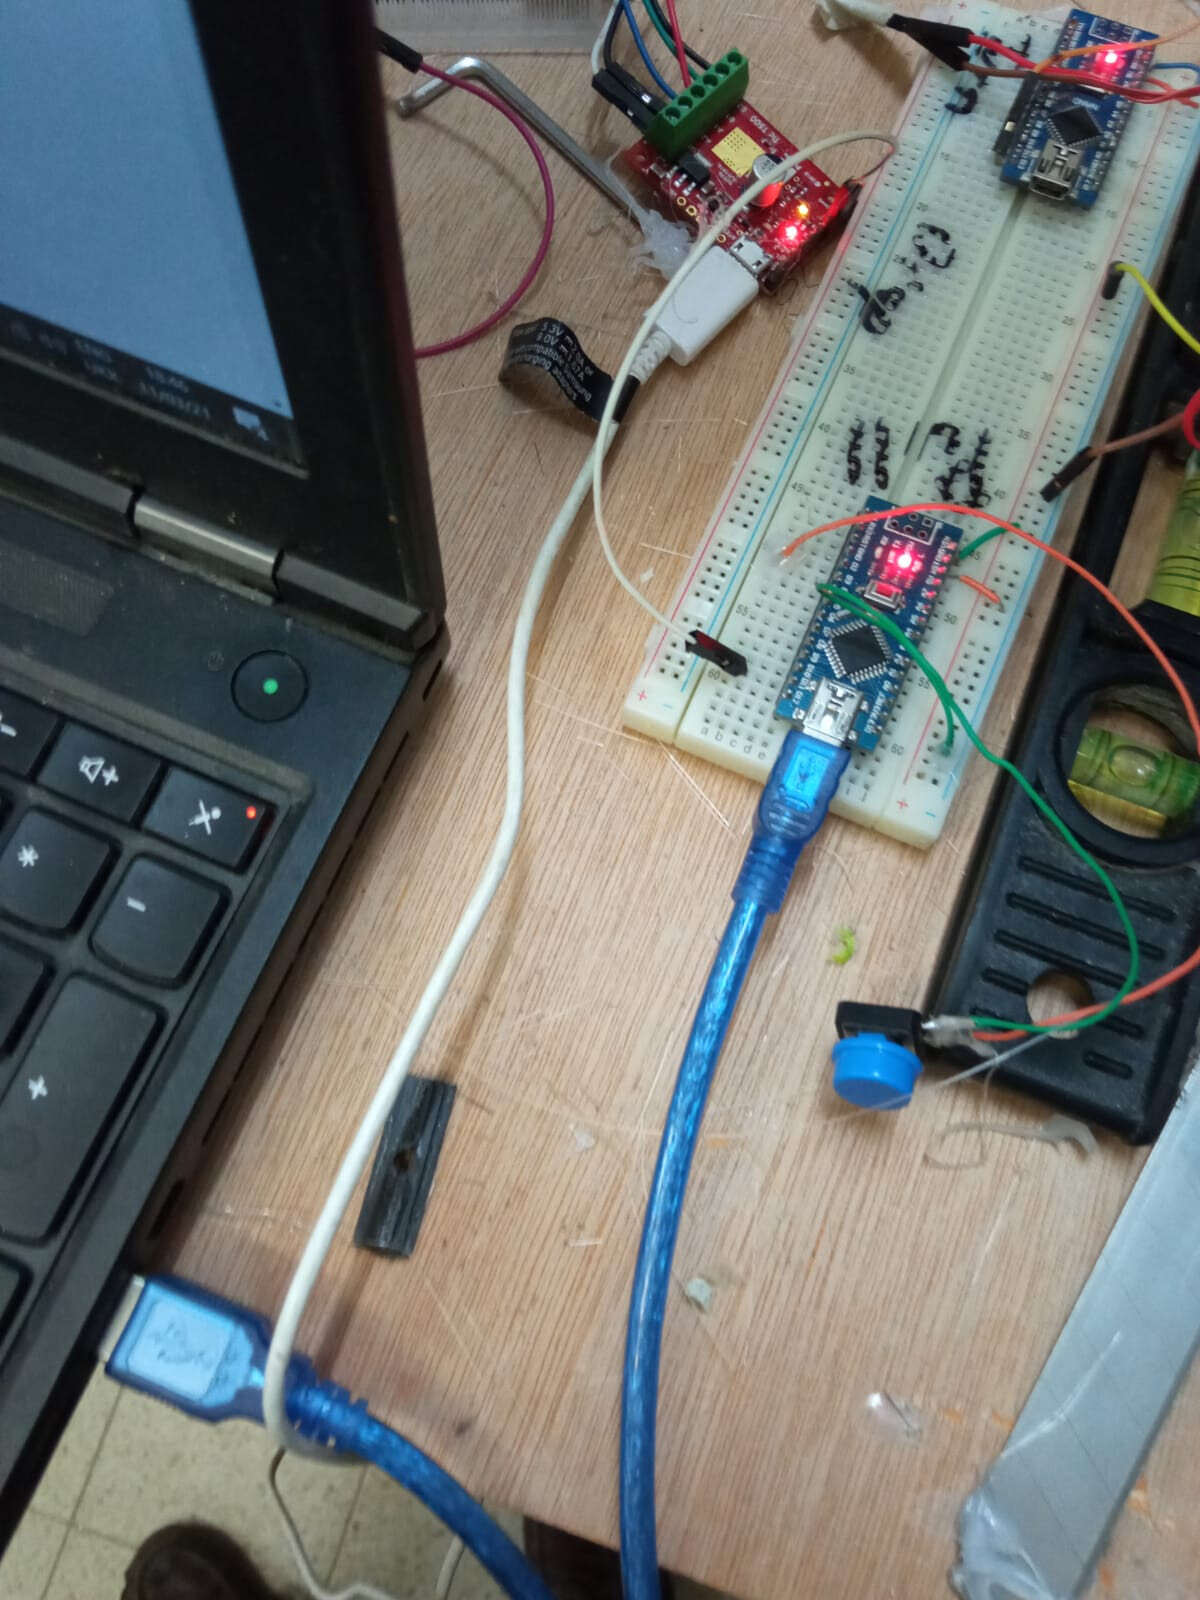
Thank you for all the attention. I connected to the serial monitor, and ran the code, but the monitor was empty. I am not so good, please excuse me! Here are photos:
Here’s the code. I stuffed in “Serial.print” all over the place, none of them showed up in the screen. Have a wonderful day, Brandon, maybe we can rescue this somehow!
Aryeh
#include <Tic.h>

#ifdef SERIAL_PORT_HARDWARE_OPEN
#define ticSerial SERIAL_PORT_HARDWARE_OPEN
#else
#include <SoftwareSerial.h>
SoftwareSerial ticSerial(10, 11);
#endif

TicSerial tic(ticSerial);

int buttonState = 0;
//this is the button function
void buttonWait(int buttonPin) {
//int buttonState = 0;
while (1) {
buttonState = digitalRead(buttonPin);
if (buttonState == LOW) {
return;
}
}
}
void setup()
{
Serial.print("Current: ");
pinMode(3, INPUT_PULLUP);
// Set the baud rate.
ticSerial.begin(9600);

delay(20);

// Set the Tic's current position to 0, so that when we command
// it to move later, it will move a predictable amount.
tic.haltAndSetPosition(0);

// Tells the Tic that it is OK to start driving the motor. The
// Tic's safe-start feature helps avoid unexpected, accidental
// movement of the motor: if an error happens, the Tic will not
// drive the motor again until it receives the Exit Safe Start
// command. The safe-start feature can be disbled in the Tic
// Control Center.
tic.exitSafeStart();
}

// Sends a "Reset command timeout" command to the Tic. We must
// call this at least once per second, or else a command timeout
// error will happen. The Tic's default command timeout period
// is 1000 ms, but it can be changed or disabled in the Tic
// Control Center.

void resetCommandTimeout()
{
tic.resetCommandTimeout();
}

// Delays for the specified number of milliseconds while
// resetting the Tic's command timeout so that its movement does
// not get interrupted by errors.
void delayWhileResettingCommandTimeout(uint32_t ms)
{
uint32_t start = millis();
do
{
resetCommandTimeout();
} while ((uint32_t)(millis() - start) <= ms);
}

// Polls the Tic, waiting for it to reach the specified target
// position. Note that if the Tic detects an error, the Tic will
// probably go into safe-start mode and never reach its target
// position, so this function will loop infinitely. If that
// happens, you will need to reset your Arduino.(This does not work it freezes)
//instead I just add a bunch of delays with resetCommandTimeouts every less
//than a second.
void waitForPosition(int32_t targetPosition)
{
do
{
Serial.print("Current: "); Serial.print(tic.getCurrentPosition());
Serial.print("\t Target: "); Serial.println(targetPosition);
resetCommandTimeout();
} while (tic.getCurrentPosition() != targetPosition);
}

void loop()
{
Serial.print("Current: ");
buttonWait(3); // wait for button press on pin 10
tic.energize();
tic.haltAndSetPosition(0);
tic.exitSafeStart();
resetCommandTimeout();
delayWhileResettingCommandTimeout(50);
tic.setTargetPosition(455);
//waitForPosition(455);
delay(800);
resetCommandTimeout();
delay(800);
resetCommandTimeout();
delay(800);
resetCommandTimeout();
delay(800);
resetCommandTimeout();

//the Mega board rotates the stepper properly the first time, then stops
//here and does nothing more on any button press.

buttonWait(3); // wait for button press on pin 10
tic.energize();
tic.haltAndSetPosition(0);
tic.exitSafeStart();
resetCommandTimeout();
delayWhileResettingCommandTimeout(50);

tic.setTargetPosition(-455);
waitForPosition(-455);

}
It looks like you only have 1 wire connected from your Arduino to the Tic. You should have at least 3 connections. For the Arduino Nano, you should have pin 11 connected to the Tic’s RX pin, pin 10 connected to the Tic’s TX pin, and a ground connection between the two devices.
For the serial communication, could you try putting the following lines of code at the start of your setup() function?
Please note that while(!Serial); will make it so the Arduino does not proceed with the rest of your code until the serial port is opened. So if you want to run it without the USB serial connection, you should remove or comment this out.