Hello Pololu team,I like to refer to a post of KrisLung on March 25, 2021.
With similar conditions (drv8711-36v4, Arduino UNO, NEMo17 1,7A ,wiring and code) I reported success on Apr 4.
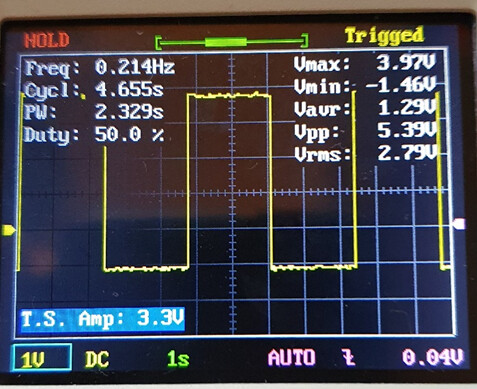
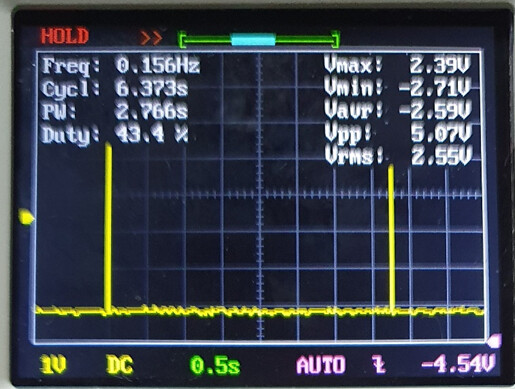
After months with another setup I now doesn’t get the undamaged stepper running in a basic setup. Oscilloscoop measurements show:
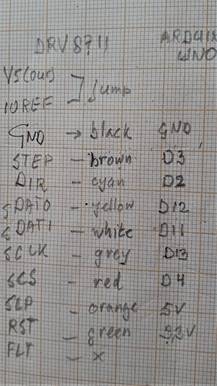
DIR STEP (irregular)
Motor power, 10,9V; Arduino UNO on USB 5VDC.
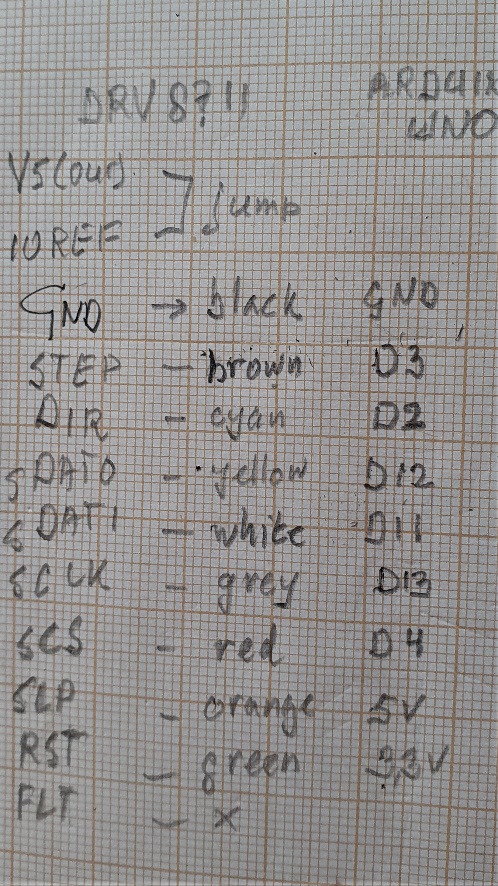
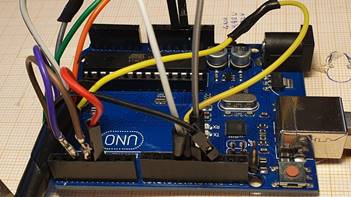
Setup: DRV 8711 connected with Arduino UNO
Multimeter on DIR. Voltage on both the stepper coils = 0 V
My question is: do the StEP and DIR test results show a defect DRV 8711-36v4? In that case, what are the test data when using an undamaged DRV8711 ?
Thanks for your consideration in advance. Leo van Nassau, Netherlands
Hello.
The STEP and DIR signal comes from your Arduino, so you will not be able to make any determinations about the stepper motor driver by looking at those. What program are you running on your Arduino? Can you try one of the examples from our High-Power Stepper Motor Driver Arduino library?
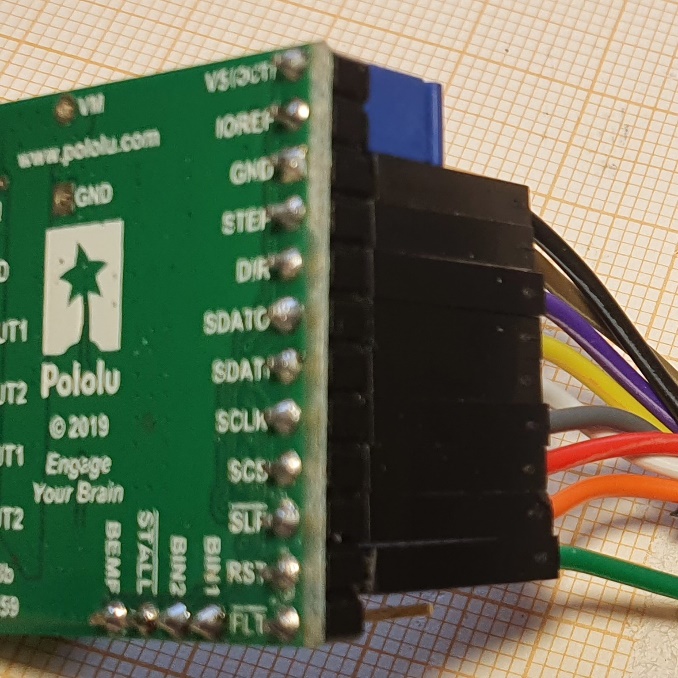
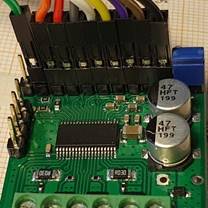
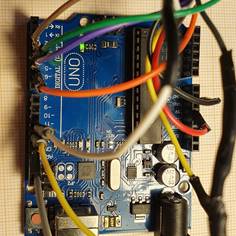
It is very difficult to make out any of your connections from the picture you posted. Can you post more pictures that clearly show all of your connections, as well as some close-up pictures of both sides of your High-Power Motor Driver 36v4?
Brandon
Hi Brandon, many thanks for the reply.
I used the program “basic stepping code” with the intro:
#include <SPI.h>

#include <HighPowerStepperDriver.h>

const uint8_t DirPin = 2;

const uint8_t StepPin = 3;

const uint8_t CSPin = 4;

// This period is the length of the delay between steps, which controls the

// stepper motor's speed. You can increase the delay to make the stepper motor

// go slower. If you decrease the delay, the stepper motor will go faster, but

// there is a limit to how fast it can go before it starts missing steps.

const uint16_t StepPeriodUs = 2000;

HighPowerStepperDriver sd;.
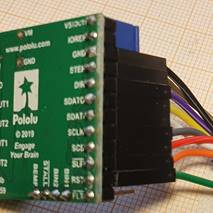
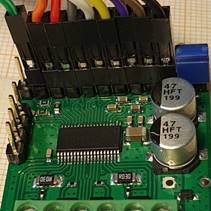
Additionally I send you some detailed pictures as requested.
Furthermore I tried to install the code “This example shows basic use of the DRV8711 sd motor driver” with SPI communication butt got the message “DRV8711.h No such file in directory” How to manage?
In addition the code asks “const uint8_t slaveSelectPin = 2;” and also “const uint8_t chipSelectPin = 2;” Which is the SelectPin and and how to understand both on 2 ?
I would appreciate you professional assistance to get the system working.
Kind regards,
Leo van Nassau

Thank you for the additional information. It looks like those variables (slaveSelectPin and chipSelectPin) are only named that way in some old pre-release versions of the code, so somehow you do not seem to be using the latest version of the library and examples. How did you install the library?
Could you try reinstalling the library using the Arduino Library Manager by following the instructions in the [readme][0] and try one of the examples unmodified after doing that?
It sounds like you mentioned having it working before; can you post more details about what changed between then and now?
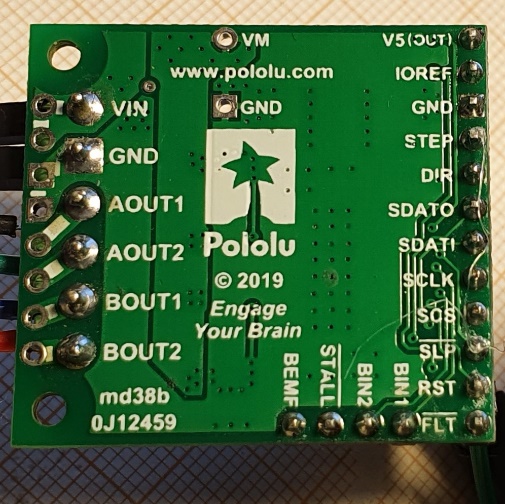
By the way, I am still having trouble making out the connections from your pictures, so I could not verify them, but the proper connections for using our examples with the Arduino Uno should be:
| Arduino Uno |
High-Power Stepper Motor Driver |
| Digital pin 2 |
DIR |
| Digital pin 3 |
STEP |
| Digital pin 4 |
SCS |
| SCK (digital pin 13) |
SCLK |
| MOSI (digital pin 11) |
SDATI |
| MISO (digital pin 12) |
SDATO |
| GND |
GND |
Please double check that these are the connections you are making.
Brandon
Once again thanks!
Via the Library Manager I downloaded the program BasicSteppingSPI.ino.
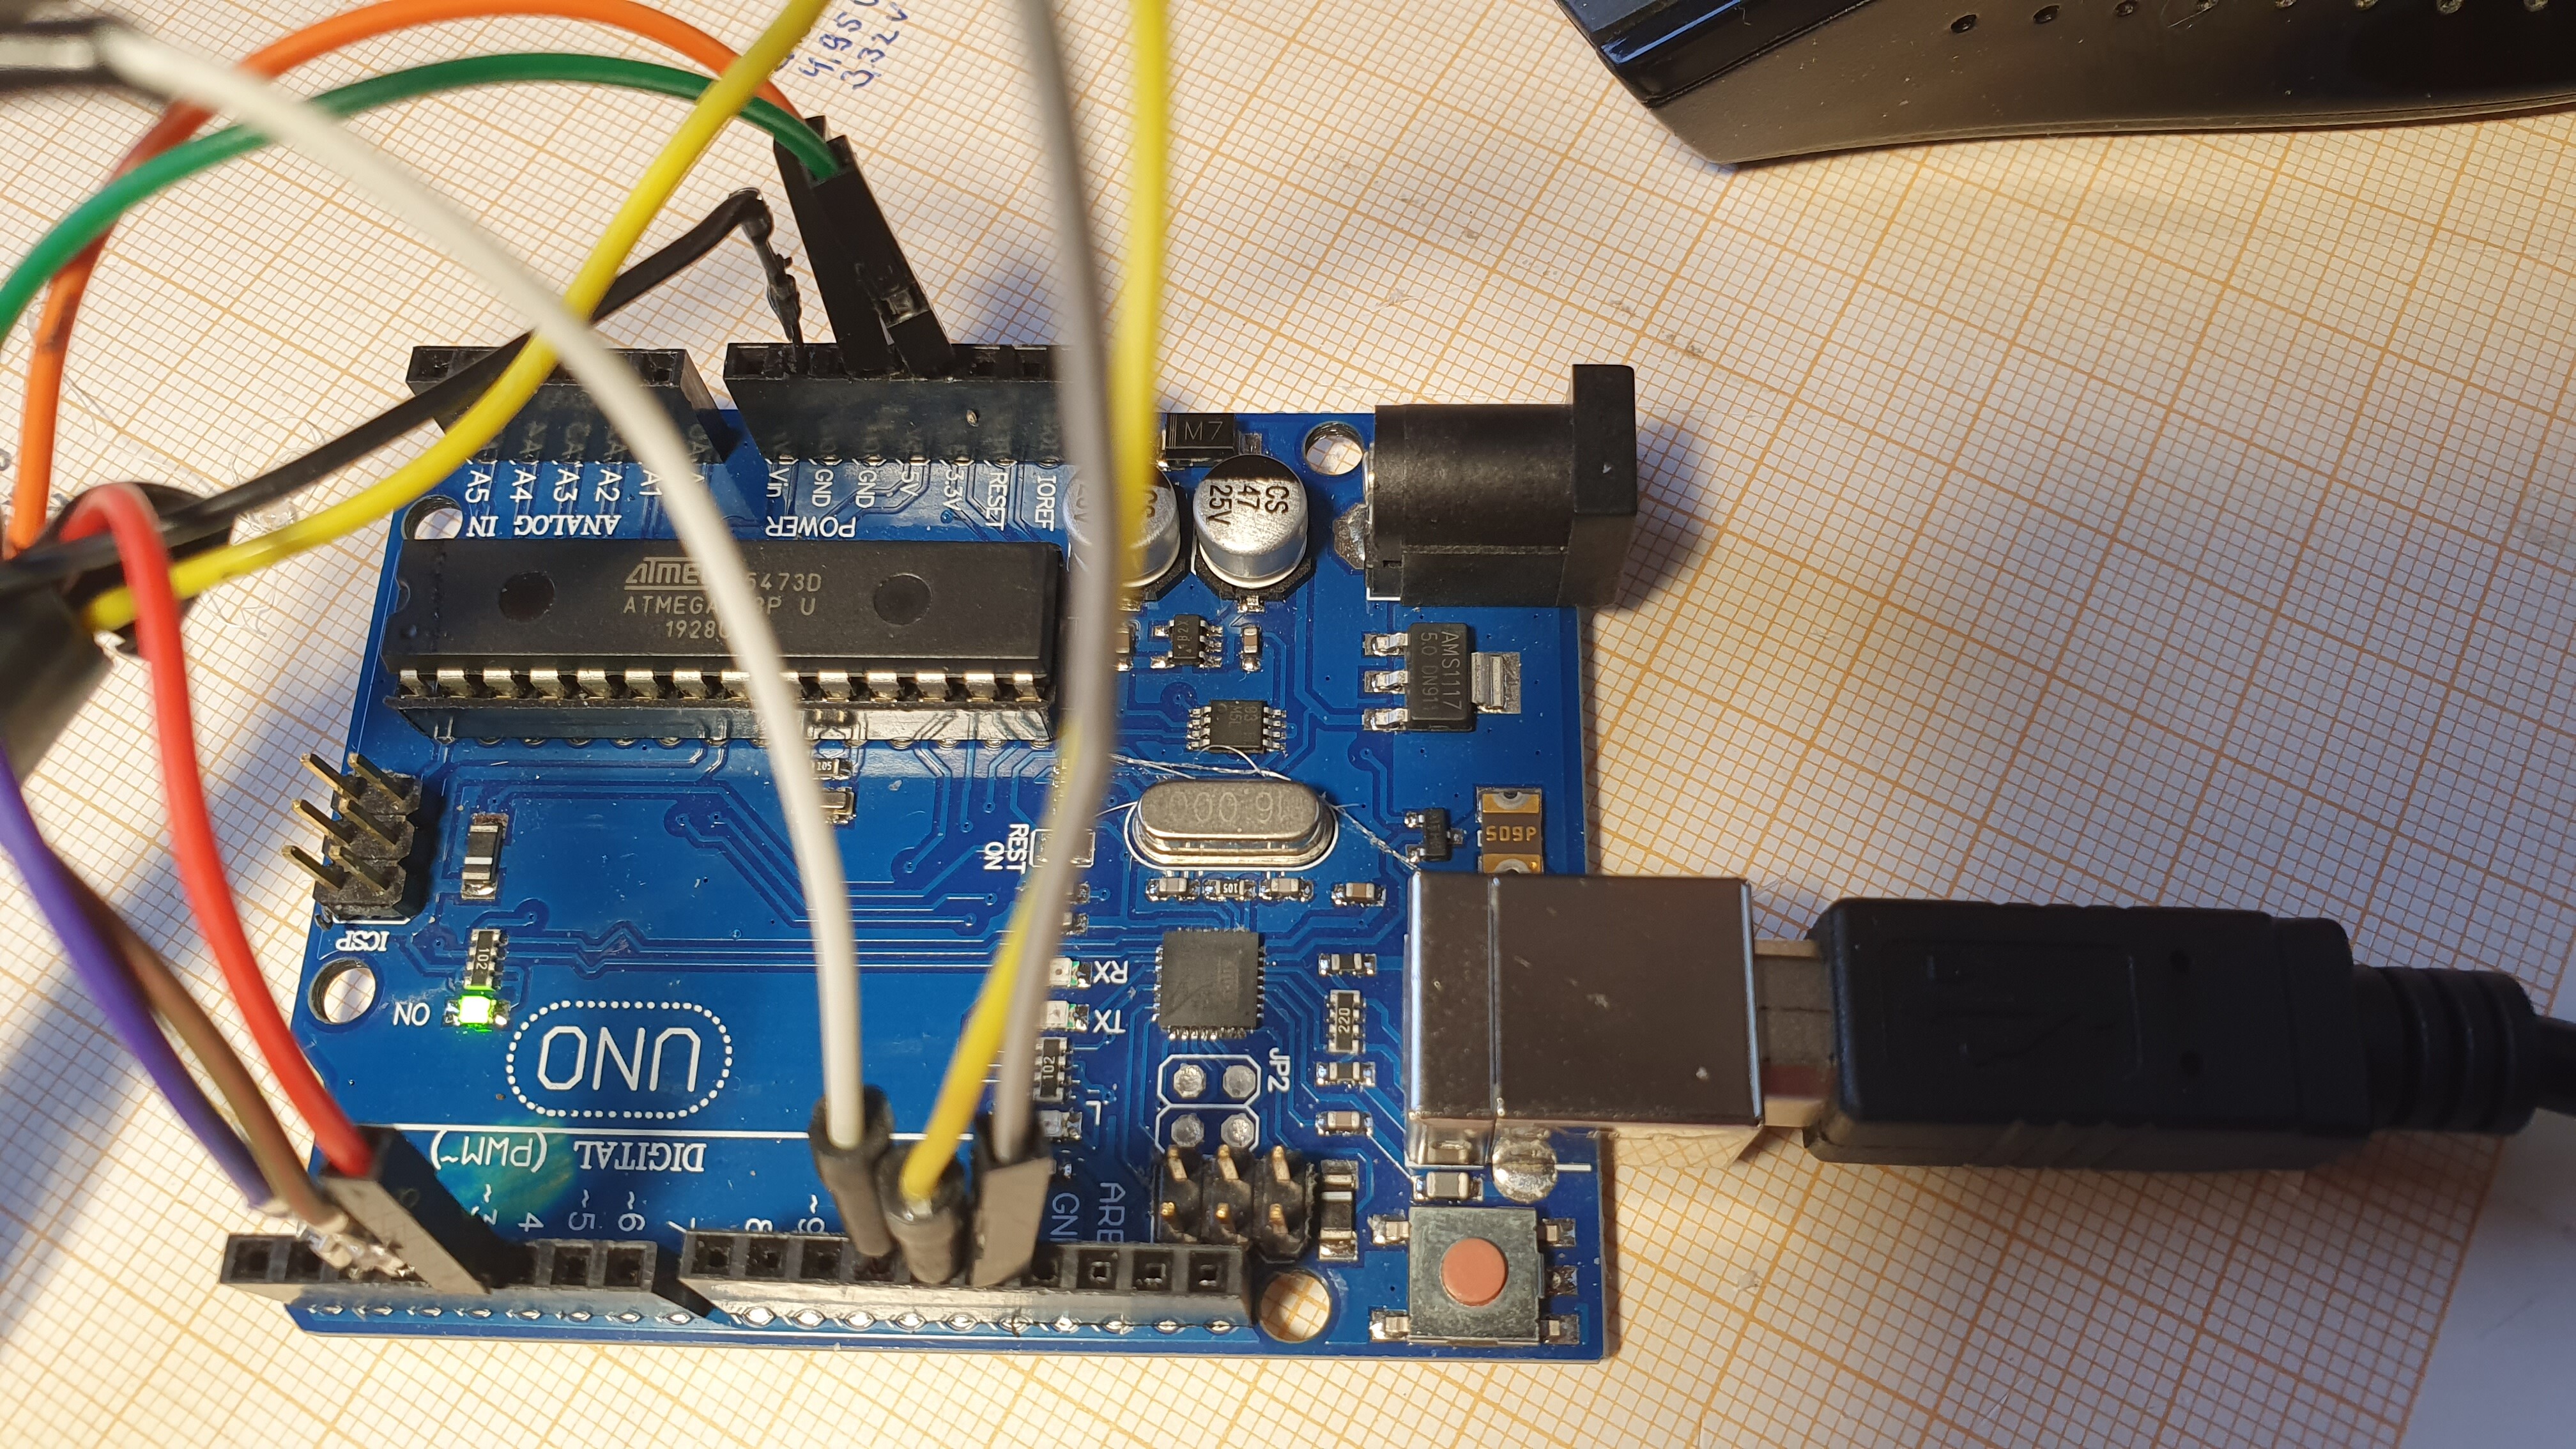
 Pictures show the wiring; motor power 12VDC; Arduino UNO on USB
If the code is the one I should use and if the connections are OK, then I must conclude that the driver has been damaged in earlier trials (incorrect disconnecting) because the motor doesn’t react at all…
Question: is the code”BasicSteppingSPI.ino indeed the latest and correct one?
I am curious to see your reply.
Thanks in advance, Leo van Nassau
Hello Bandon,
I regret to inform you that the latest wiring is here. Please do not study the former picture.
Sorry,
Leo
I do not suspect that the board is damaged yet. Was there something in particular that happened between when it worked and now that makes you think it might be damaged?
It looks like you are connecting 3.3V to the RST pin. Please note that a logic high on this input resets all internal logic, including the indexer and device registers, and disables the driver outputs. Holding it high prevents the driver from operating normally. By default, this input is low, so you should not need to make any connection to it.
The “BasicSteppingSPI.ino” is a good program to run as a test, but I cannot tell if you are using the latest version (since it has always gone by that name). If you installed the library with the Library Manager following the instructions and opened the program via the Examples menu in the Arduino IDE, you should have the latest version.
Are you still receiving errors when you try to upload to code (e.g. “DRV8711.h No such file in directory”)? If removing the connection to the RST pin does not fix the problem, can you post a copy of the full “BasicSteppingSPI.ino” code you are using?
Brandon
Hi Brandon,
I regret to report that the wiring with RST disconnected had no positive result. I measured Vin=10,5V-V5(out0=1,5V-DATI=4,9V and SLP=4,9V; the other points are 0V.
Here follows a copy of the latest code obtained via library manager on my Arduino Agent:
// HighPowerStepperDriver - Version: Latest SENT to Pololu Forum 9-12-2021

#include <HighPowerStepperDriver.h>

// This example shows basic use of a Pololu High Power Stepper Motor Driver.

//

// It shows how to initialize the driver, configure various settings, and enable

// the driver. It shows how to step the motor and switch directions using the

// driver's SPI interface through the library's step() and setDirection() member

// functions.

//

// Since SPI is used to trigger steps and set the direction, connecting the

// driver's STEP and DIR pins is optional for this example. However, note that

// using SPI control adds some overhead compared to using the STEP and DIR pins.

// In addition, since the library caches SPI register values, SPI control is

// more likely to re-enable the driver with the wrong settings (e.g. current

// limit) after a power interruption, although using the verifySettings() and

// applySettings() functions appropriately can help prevent this.

//

// Before using this example, be sure to change the setCurrentMilliamps36v4 line

// to have an appropriate current limit for your system. Also, see this

// library's documentation for information about how to connect the driver:

// http://pololu.github.io/high-power-stepper-driver

#include <SPI.h>

#include <HighPowerStepperDriver.h>

const uint8_t CSPin = 4;

// This period is the length of the delay between steps, which controls the

// stepper motor's speed. You can increase the delay to make the stepper motor

// go slower. If you decrease the delay, the stepper motor will go faster, but

// there is a limit to how fast it can go before it starts missing steps.

const uint16_t StepPeriodUs = 2000;

HighPowerStepperDriver sd;

void setup()

{

SPI.begin();

sd.setChipSelectPin(CSPin);

// Give the driver some time to power up.

delay(1);

// Reset the driver to its default settings and clear latched status

// conditions.

sd.resetSettings();

sd.clearStatus();

// Select auto mixed decay. TI's DRV8711 documentation recommends this mode

// for most applications, and we find that it usually works well.

sd.setDecayMode(HPSDDecayMode::AutoMixed);

// Set the current limit. You should change the number here to an appropriate

// value for your particular system.

sd.setCurrentMilliamps36v4(1000);

// Set the number of microsteps that correspond to one full step.

sd.setStepMode(HPSDStepMode::MicroStep32);

// Enable the motor outputs.

sd.enableDriver();

}

void loop()

{

// Step in the default direction 1000 times.

sd.setDirection(0);

for(unsigned int x = 0; x < 1000; x++)

{

sd.step();

delayMicroseconds(StepPeriodUs);

}

// Wait for 300 ms.

delay(300);

// Step in the other direction 1000 times.

sd.setDirection(1);

for(unsigned int x = 0; x < 1000; x++)

{

sd.step();

delayMicroseconds(StepPeriodUs);

}

// Wait for 300 ms.

delay(300);

}
Perhaps we have to conclude that the Arduino UNO microcontroller is defect. I will buy anew one and also try a Leonardo.
I am very sorry for the lengthy conversation. That is what happens with a newbie.
Regarsd, Leo
Thank you for the additional information. That example code looks correct.
To clarify, was this driver ever working properly for you? If so, what (if anything) changed between the last time it worked and now?
The V5(out) pin measuring 1.5V is concerning. Can you try removing the jumper between IOREF and V5(out), connect IOREF to your Arduino’s 5V pin, and try re-measuring the V5(out) pin with nothing connected to it?
Brandon
Hello Brandon:
I cannot recall what happened in the past months in trials with DRV 8711.
Current information: Stepper via DRV8711 connected with Arduino UNO after disconnecting jump on DRV8711 and only connecting IOREF on 5V: V5(OUT)=1,5V; IOFEF=4,9V; STEP=0V; DIR=0V; SDATO=4,9V; SDATI=4,9V; SCLK=0,04V; SCS=0<>0,09V; SLP=4,9V; RST=0V; FLT=4,9V. No tension on stepper.
The intended use of the DRV8711 is to power a high power stepper (replacing DRV 8825) and to use the option of DRV8711 to utilising a stall detection.
Should I conclude that the current driver is defect, consequently purchasing a new one from the Pololu subsidiary in the Netherlands?
Leo
Since the V5(out) pin is only measuring 1.5V, it was likely damaged in some way. For reference, that pin is directly tied to the driver’s internal 5V regulator and should output 5 V as long as the driver is powered and the nSLEEP pin is high (the driver is not sleeping). It’s not clear what might have damaged it, but if you ever connected anything to it, it’s possible that it drew more current than it could handle, or it could have been something as simple as an electrostatic zap.
Brandon
Many thanks for your patient study of my extensive information, eventually leading to the conclusion that I have damaged the driver in earlier trials. I will purchase a new DRV 8711 and will make soldered connections.
Kind regards, Leo