The recommended input voltage range for an Arduino Uno Rev3 is 7-12V, so you will need to replace the 5V regulator you mentioned in your proposal with something in that range. Otherwise, the solution you suggested would probably be okay.
I suspect a 1000ms delay might be overkill, but that depends on details specific to each application. You should be able to experiment with that if it if minimizing that is a concern. Alternatively, instead of to just using a delay, you might consider adding something to monitor the motor voltage (e.g. an appropriate voltage divider) or a user button (maybe the same footswitch you already have) and programming your Arduino to wait until you detect the desired state from those before it tries to configure the driver. You might also consider using our library’s verifySettings() command to check whether the driver has been configured properly before enabling it and leaving setup().
I’ll play with having both driver and Arduino powered off the same input. I think I’ll need this regardless of the solution, as in the current configuration it’ll get powered on, go through setup correctly, and then stay on even if the driver is powered down. Once the driver is powered back up the Arduino will still be in loop() and never return to setup() without putting something in loop() to send it back to setup() which doesn’t seem like a very clean solution (not sure if this would even work, I tried something like this to no avail). I’d like to make it as idiot proof as possible (me being the idiot) so I don’t run into issues or hassle long term.
I played around and the solution that I’m going to stick with is:
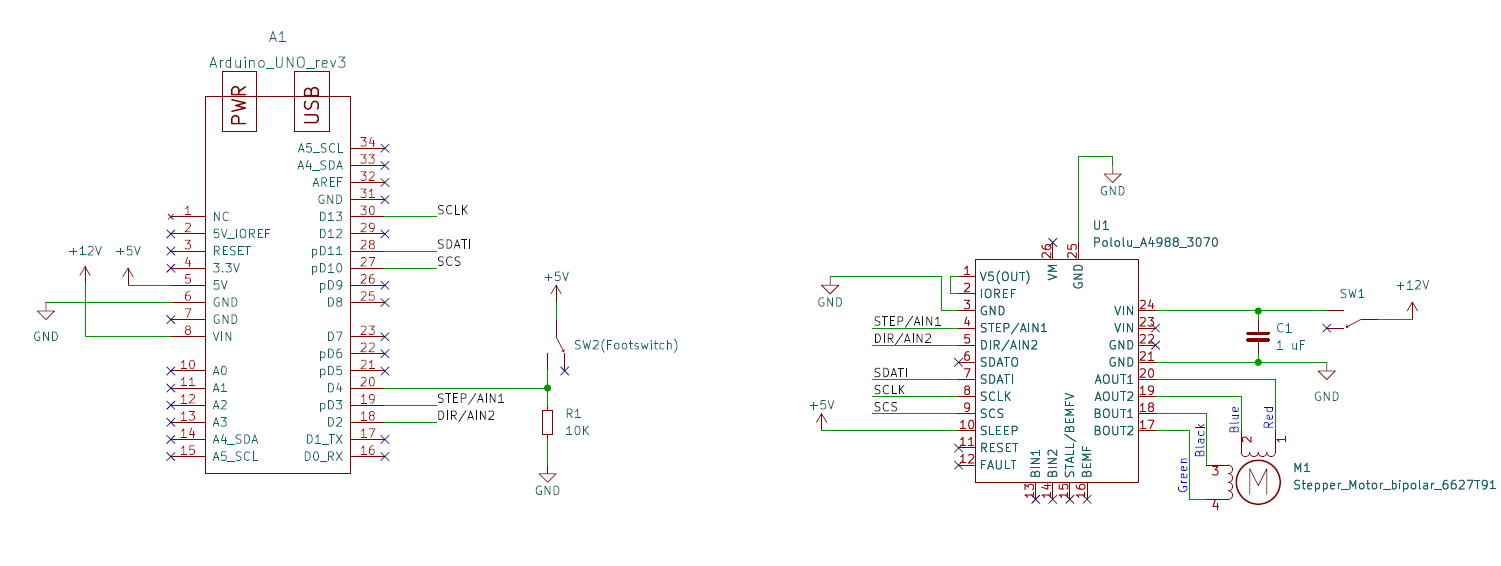
Power both the Arduino (using the Vin pin) and driver off of a single 12V power supply (no regulation needed). This is drawing about 250 mA from the power supply and allows both devices to power on at the same time.
A 1ms delay in setup() to power up the driver seems to be sufficient.
In this configuration the device is current limited by the driver and works reliably when power is cycled without any hacky nonsense in the code. Additionally, there is no whining while the hold torque is active. The driver is also not getting too warm (stays around 35C or so). The final code and schematic are below.
//This code is for use with the Arduino IDE application to upload to the Arduino board.
//Copy and paste into Arduino IDE and upload to Arduino Uno via USB-A port.

#include <SPI.h>
#include <HighPowerStepperDriver.h>

// Define stepper motor connections and steps per revolution:
//These "pins" are the Arduino electrical connect pins
#define dirPin 2
#define stepPin 3
#define buttonPin 4
#define SCPin 10
//These "pins" are solder cup pins on the connector being assembled
#define microSteps 16
#define outerPins 5 		//Number of pins on the outer circumfrance of the terminal
#define stepsPerRotation 200 	//Number of steps for 1 full rotation of the stepper motor
#define fullStepsPerPin stepsPerRotation/outerPins
#define microStepsPerPin fullStepsPerPin*microSteps

//Set buttonState to 0
int buttonState = 0;
int buttonPrevious = 0;
int offTime = 500;
unsigned long previousTime = 0;

HighPowerStepperDriver sd;
float currentLimit = 0;

void setup() {
  SPI.begin();
  sd.setChipSelectPin(SCPin);

  // Declare motor pins as output and button pin as input:
  pinMode(stepPin, OUTPUT);
  pinMode(dirPin, OUTPUT);
  pinMode(buttonPin, INPUT);

  // Give the driver some time to power up.
  delay(1);

  // Reset the driver to its default settings and clear latched status
  // conditions.
  sd.resetSettings();
  sd.clearStatus();

  // Select auto mixed decay.  TI's DRV8711 documentation recommends this mode
  // for most applications, and we find that it usually works well.
  sd.setDecayMode(HPSDDecayMode::AutoMixed);

  // Set the current limit. You should change the number here to an appropriate
  // value for your particular system.
    sd.setCurrentMilliamps36v4(500);

  // Set the number of microsteps that correspond to one full step.
  sd.setStepMode(HPSDStepMode::MicroStep16);

  // Enable the motor outputs.
  sd.enableDriver();

  // Set direction to clockwise
  sd.setDirection(0);
}

void loop() {
  // Check if button is pressed
  buttonState = digitalRead(buttonPin);
  unsigned long currentTime = millis();

  // Read button press and rotate to next pin location
  if (buttonState == HIGH && buttonPrevious == LOW && (currentTime - previousTime) > offTime) {
   for (int i = 0; i < microStepsPerPin; i++) {
      // These four lines result in 1 step:
      sd.step();
      delayMicroseconds(1000);
      previousTime = currentTime;
    }
  }
  buttonPrevious = digitalRead(buttonPin);
  delay(10);
}