Arduino + Pololu Micro Serial 8 Servo Controller

Adam,

Pololu does not have a user-friendly interface. Am I wrong? I want to use pololu controller only instead of having combinations( pololu + arduino ). Any suggestions? Especially after initial setting of the servos, because that can be handled not difficult. How about when I am ready to load the walking code for a biped?
Thanks,
Fred

Hi Fred,

Pololu does not supply a terribly user friendly (i.e. intuitive GUI) for their servo controllers, but several other groups have written pay or free software with the ability to command Pololu servo controllers. Whether its user-friendly or not is a matter of opinion, the freebies tend to be buggy. Some examples are…

Free:
GPSBots VB: Pololu Controller - Example VB application with source code for a simple mouse-slider servo control program.
RoboRealm - Mainly a computer vision program, but with a Pololu servo controller “filter”.
Animaltronicks - Lets you program and play back servo motions, meant to synchronize with an mp3, very buggy.

Other:
VSA - Servo motion programming and playback with support for the Pololu servo controllers. Free demo version won’t let you save motion sequences, pay version is $59.95.

Do you have experience with any particular programming languages? In the long run you’re probably going to need to write your own control program to get your biped walking, but you could use anything from application programming languages like C or C++ to analysis/control programs like Matlab to LabView (::shudder::). Also, are you satisfied to have your servo controller tethered to a computer, or are you going to eventually want it to walk around autonomously? You might want to start thinking about what kind of microcontroller you would move your code to when you’re ready to make the autonomous jump.

Good luck,

-Adam

Hi Adam,

First, I need to set the positions and speed of the servos to protect the mechanical joints. Then I can send several commends for walking. However, pololu serial transmitter version 1.3 is the one I am using and it is so complicated. So far, I have not been able to get any servo movement. I sent several commands but I do not know if they were correct. But, when each time I remove the servo plug and put it back servo moves. I am planning to use C as I believe a structured language can handle this kind of application better. Am I correct? Also as you mentioned for autonomous walking I need to have a embedded system so no connection to PC is needed. My question is that; what else I need to program this pololu controller and also what I need for autonomous application? Actually I want to ask about power supply for servos. Rechargable battery or a computer power supply?

Thanks,
Fred

Yes, you will be able to do a whole lot more from a C program you write yourself than from any free or commercially available software for the Pololu servo controllers. It will be easier to start your development by controlling the servos directly from your computer, but whether you want to eventually move your walking program to a microcontroller that could sit on your biped is your choice. You could also just run the robot from your computer on a long wire.

If you do decide to switch to a microcontroller there are a lot of development boards that can be programmed in C or a C-like language (Pololu Orangutans, Arduinos, OOPics to name a few) so you would be able to copy and paste some of your code. Pretty much any microcontroller will be able to command the Pololu servo controller. The microcontroller will either need to have a hardware serial UART port, or be able to emulate one in software (which is just a matter of timing).

As to your power question, I would start with a computer power supply, just because you’re going to be developing for a while and you can probably scrounge one up for free. Obviously if you want the biped to walk around tether-less you’ll need to switch to batteries down the road.

-Adam

Hi! this is my first post here.

I recently purchased the micro serial servo controller, and now I am trying to understand how to put it working with an arduino.

The first question is… what is meaning of each one of the leds?

another question :blush:

how do you guys connect the servo controller to the arduino?

this is how I am connecting both devices, is this correct?

I apologize, a closer look into the guide and the color codes are there well explained… still unable to make a servo move …

Your wiring looks good, what code are you trying to run on the Arduino?

The code on this thread uses the Pololu serial protocol, so if your servo controller has the blue mode jumper on (as in your picture) you should remove it.

-Adam

Hi nexisnet, thanx for replying!
Finally I am able to get it working, and with the servoSetSpeed() function too.

Do you know any kind of ramp I can use to slow down the servo movement while he reaches destination?

Glad to hear you got it working.
I don’t think there’s anything you can do to slow down a servo based on the actual proximity to the commanded location, since hobby servos don’t feed their actual locations back to the servo controller.

-Adam

And I thought that with the servo controller I would be able to smooth movements of my servos… :laughing:

I’ve been working on this for a while and finally I have the courage to post the results.

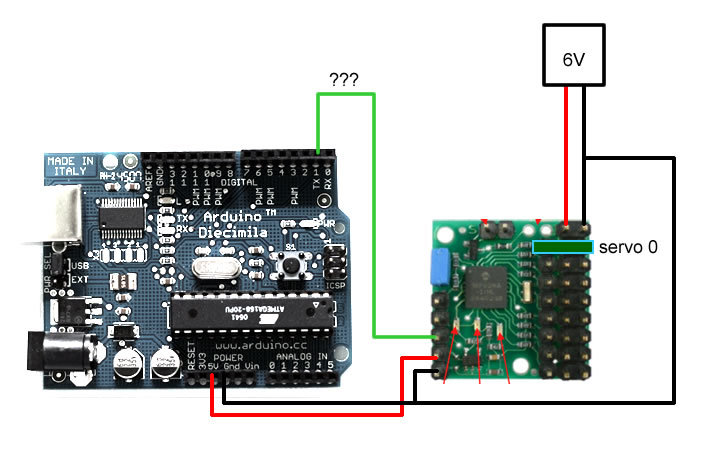
I’m also testing the pololu micro serial servo controller in the hope I could achieve better results. One good thing the pololu controller has, is the ability to set the speed of the movement, I guess it is a good plus to have this extra control. And using this feature together with the filter you get really cool and smooth movements, check the end of the video.

The point I don’t like in this experience is that the robot shakes a lot, but that is due to the weak support. I will have to arrange a solution to void so much shakiness.

The low pass filter below is what makes the desaceleration while the value reaches the destination point. I’ve posted the full code below the video.

filter: 0.05;
destinationValue = 1000;
destinationValueFiltered = destinationValueFiltered * (1.0-filter) + destinationValue * filter;


Code to move one servo directly connected to the Arduino:

// easing servo movements with low pass filter
// the servo signal must be connected directly to the arduino pin 2 

// Time interval, this executes one piece of code from time to time
// Download Metro lybrary and instructions:
// http://www.arduino.cc/playground/Code/Metro
#include <Metro.h>
int duration = 3500; // duration of the interval in miliseconds
Metro intervaller = Metro (duration);

// MegaServo library
// download and instructions: 
// http://www.arduino.cc/playground/Code/MegaServo
#include <MegaServo.h>
MegaServo servos;

// servos minimum and maximum position
#define MIN_POS 800 // the minuimum pulse width for your servos
#define MAX_POS 2200 // maximum pulse width for your servos

// servo pin
#define s0_pin 2

// variables to hold new destination positions
int d0; // destination0
int d0_sh; // destination0 to be smoothed

// the filter to be aplied
// this value will be multiplied by "d0" and added to "d0_sh"
float filtro = 0.05; // 0.01 to 1.0

// setup runs once, when the sketch starts
void setup() {
  // initialize serial comunication
  Serial.begin(9600);
  
  // set servo pin
  servos.attach(s0_pin);
}

// main program loop, executes forever after setup()
void loop() {
  
  // check the time interval, if it reaches limit "duration" goes back to one 
  // and runs the code
  if (intervaller.check() == 1) {
    
    // calculate a new random position between max and min values
    d0 = random(MIN_POS, MAX_POS); 
    
    // resets interval with a new random duration
    intervaller.interval(random(500,2000));
   }
  
  // smooth the destination value
  d0_sh = d0_sh * (1.0-filtro) + d0 * filtro;
  
  // assign new position to the servo
  servos.write(d0_sh);
  
  // delay to make the servo move
  delay(25);
} 

And this is the code to use with the pololu micro serial servo controller:

// easing servo movements with a low pass filter and Pololu Micro Serial Servo Controller

// Time interval, this executes one piece of code from time to time
// Download Metro lybrary and instructions:
// http://www.arduino.cc/playground/Code/Metro
#include <Metro.h>
int duration = 3500; // duration of the interval in miliseconds
Metro intervaller = Metro (duration);

// servos minimum and maximum position
#define MIN_POS 500 // the minuimum pulse width for your servos
#define MAX_POS 5500 // maximum pulse width for your servos

// variables to hold new destination positions
int d0; // destination0
int d0_sh; // destination0 to be smoothed

// the filter to be aplied
// this value will be multiplied by "d0" and added to "d0_sh"
float filtro = 0.05;   // 0.01 to 1.0

// set servo speed, goes from 1 to 127
int servoSpeed = 120;

// setup runs once, when the sketch starts
void setup() {
  // initialize serial comunication
  Serial.begin(9600);
  
  // set servo pin and speed
  servoSetSpeed(0, servoSpeed);
}

// main program loop, executes forever after setup()
void loop() {
  
  // check the time interval, if it reaches limit "duration" goes back to one 
  // and runs the code
  if (intervaller.check() == 1) {
    
    // calculate a new random position between max and min values
    d0 = random(MIN_POS, MAX_POS);
    
    // resets interval with a new random duration
    intervaller.interval(random(500,3000));
  }
  
  // smooth the destination value
  d0_sh = d0_sh * (1.0-filtro) + d0 * filtro;
  
  // assign new position to the servo
  put(0,d0_sh);
  
  // delay to make the servo move
  delay(25);
}


// functions from this forum topic:
// https://forum.pololu.com/t/arduino-pololu-micro-serial-8-servo-controller/613

void put(int servo, int angle)
{
  //servo is the servo number (typically 0-7)
  //angle is the absolute position from 500 to 5500

  unsigned char buff[6];

  unsigned int temp;
  unsigned char pos_hi,pos_low;

  //Convert the angle data into two 7-bit bytes
  temp=angle&0x1f80;
  pos_hi=temp>>7;
  pos_low=angle & 0x7f;

  //Construct a Pololu Protocol command sentence
  buff[0]=0x80; //start byte
  buff[1]=0x01; //device id
  buff[2]=0x04; //command number
  buff[3]=servo; //servo number
  buff[4]=pos_hi; //data1
  buff[5]=pos_low; //data2

  //Send the command to the servo controller
  for(int i=0;i<6;i++){
    Serial.print(buff[i],BYTE);
  }

}

void servoSetSpeed(int servo, int speed){
  //servo is the servo number (typically 0-7)
  //speed is servo speed (1=fastest, 127=slowest)
  //set speed to zero to turn off speed limiting

  unsigned char buff[5];
  unsigned char speedcmd;

  speedcmd=speed&0x7f;//take only lower 7 bits of speed

  buff[0]=0x80;//start byte
  buff[1]=0x01;//device id
  buff[2]=0x01;//command number
  buff[3]=servo;//servo number
  buff[4]=speed;//data1

  for(int i=0;i<5;i++){
    Serial.print(buff[i],BYTE);
  } 
}

hi guys, ive been working on using a Wiichuck ,arduino and pololu servo controller and for stabilisation system for a uav project of mine, and after hours trying ive finally managed to get it working, now I just need to figure out how to smooth out the data .

But here is the basic code :

It borrows from chad phillips and todbot’s work.i’ve tried to look for this code online for day, to no avail! anyway here it is , and remember to modify your twi.h
in the hardware/libraries/wire/utility/twi.h

and ensure that #define TWI_FREQ 100000L

here is the code:

///////////////////////////////////////////////////

#include <Wire.h>
#include <string.h>

#undef int
#include <stdio.h>

uint8_t outbuf[6];		// array to store arduino output
int cnt = 0;
int ledPin = 13;
int xacc = 0;
int yacc = 0;
int zacc = 0;

void
setup ()
{
Serial.begin(19200);
 // Serial.print ("Finished setup\n");
  Wire.begin ();		// join i2c bus with address 0x52
  nunchuck_init (); // send the initilization handshake
}

void
nunchuck_init ()
{
  Wire.beginTransmission (0x52);	// transmit to device 0x52
  Wire.send (0x40);		// sends memory address
  Wire.send (0x00);		// sends sent a zero.  
  Wire.endTransmission ();	// stop transmitting
}

void
send_zero ()
{
  Wire.beginTransmission (0x52);	// transmit to device 0x52
  Wire.send (0x00);		// sends one byte
  Wire.endTransmission ();	// stop transmitting
}

//pololu
void put(int servo, int angle)
{//servo is the servo number (typically 0-7)
//angle is the absoltue position from 500 to 5500

   unsigned char buff[6];

   unsigned int temp;
   unsigned char pos_hi,pos_low;
   
   temp=angle&0x1f80;
   pos_hi=temp>>7;
   pos_low=angle & 0x7f;

   buff[0]=0x80;//start byte
   buff[1]=0x01;//device id
   buff[2]=0x04;//command number
   buff[3]=servo;//servo number
   buff[4]=pos_hi;//data1
   buff[5]=pos_low;//data2

   for(int i=0;i<6;i++){
      Serial.print(buff[i],BYTE);
   }
}

void
loop ()


{
  Wire.requestFrom (0x52, 6);	// request data from nunchuck
  while (Wire.available ())
    {
      outbuf[cnt] = nunchuk_decode_byte (Wire.receive ());	// receive byte as an integer
      digitalWrite (ledPin, HIGH);	// sets the LED on
      cnt++;
    }

  // If we recieved the 6 bytes, then go print them
  if (cnt >= 5)
    {
      print ();
    }

  cnt = 0;
  send_zero (); // send the request for next bytes
  delay (100);
}

// Print the input data we have recieved
// accel data is 10 bits long
// so we read 8 bits, then we have to add
// on the last 2 bits.  That is why I
// multiply them by 2 * 2
void
print ()
{
  int joy_x_axis = outbuf[0];
  int joy_y_axis = outbuf[1];
  int accel_x_axis = outbuf[2] * 2 * 2; 
  int accel_y_axis = outbuf[3] * 2 * 2;
  int accel_z_axis = outbuf[4] * 2 * 2;

  int z_button = 0;
  int c_button = 0;
  
  xacc=(((accel_x_axis-255)*9.9)+550);
  yacc=(((accel_y_axis-255)*9.9)+550);
  zacc=(((accel_z_axis-255)*9.9)+550);
 // byte outbuf[5] contains bits for z and c buttons
 // it also contains the least significant bits for the accelerometer data
 // so we have to check each bit of byte outbuf[5]
  if ((outbuf[5] >> 0) & 1)
    {
      z_button = 1;
    }
  if ((outbuf[5] >> 1) & 1)
    {
      c_button = 1;
    }

  if ((outbuf[5] >> 2) & 1)
    {
      accel_x_axis += 2;
    }
  if ((outbuf[5] >> 3) & 1)
    {
      accel_x_axis += 1;
    }

  if ((outbuf[5] >> 4) & 1)
    {
      accel_y_axis += 2;
    }
  if ((outbuf[5] >> 5) & 1)
    {
      accel_y_axis += 1;
    }

  if ((outbuf[5] >> 6) & 1)
    {
      accel_z_axis += 2;
    }
  if ((outbuf[5] >> 7) & 1)
    {
      accel_z_axis += 1;
    }

{
   put(0,xacc);
    put(1,yacc);
     put(2,zacc);
       }
 // Serial.print (joy_x_axis, DEC);
 // Serial.print ("\t");

  //Serial.print (joy_y_axis, DEC);
//  Serial.print ("\t");

 // Serial.print (accel_x_axis, DEC);
 // Serial.print ("\t");

  //Serial.print (accel_y_axis, DEC);
  //Serial.print ("\t");

 // Serial.print (accel_z_axis, DEC);
 // Serial.print ("\t");

 // Serial.print (z_button, DEC);
//  Serial.print ("\t");

//  Serial.print (c_button, DEC);
//  Serial.print ("\t");

//  Serial.print ("\r\n");
}

// Encode data to format that most wiimote drivers except
// only needed if you use one of the regular wiimote drivers
char
nunchuk_decode_byte (char x)
{
  x = (x ^ 0x17) + 0x17;
  return x;


}

I read and set up the code called “And this is the code to use with the pololu micro serial servo controller:” from this discussion, but I’m having a few issues where it says things are not declared. I’m getting that message for: Serial, servoSetSpeed, random, put, delay, Serial, and BYTE. Is there something i need to set so these terms can be declared?

-Matt

Hi Matt,

Are you using an Arduino to communicate with your servo controller? I thought you were using your Mac. The code you are saying isn’t working is for the Arduino.

- Ryan

Ryan,
Yes you’re completely right I am on my Mac. I must have thought that the second code posted by guibot was not only for Arduino. I’m sure you’ve been able to figure out that I’m a beginner probably in a little over my head. Basically, I’m just looking for a code that I can use to connect to and control servo motion. Which leads me back to my other comment on https://forum.pololu.com/t/very-lost/1594/1. If anyone has basic guidelines or maybe a website that I could do a little research on, it would be much appreciated. Thanks

-Matt

hi !

sorry to Hijack this topic regarding my next guestion, but it seems this is a good topic for me to found and read which i did.

my project target and my guestion:

Story/description of my Device

  • I have a servo controlled valve on my device… (5Kohm 12V servo)
  • servos range is clockwise and anti clocwise but never 360 around and servo has a 1 solid regular 0-position or homebase where it sits/rests during siesta.
    *a ECU or computer unit (if i call it with such name…) follows a timing impulse/rpm signal from 3rd party and when timing pulse/rpm is 7250, the ECU makes the Servo to rotate…

My project is to make my own ECU with various rpm options or even adjustable option, compered to the 1 only solid 7250rpm command.

My guestion:
can somebody recommend me a needed Arduino microprosessor i-o board model and needed exstras on hardware like Pololu (if i understood this topic correctly…)
Also a advice or help reagrding my project would be wanted as i am a nooby on Microprosessor controller world but i have been studying Arduino for past 2 weeks to get somesorta idea about it.
For my helper i would be paying money, if wanted so, as im already used/mentally depressed to being alone without anykind of help what so ever in my hobbyes to make them happen from zero to finish only by my self (my country aint socially very open minded…towards helping strangers and i unfortunately know this too well as a native)

Bye:)
m

hey
i followed the thread downloaded the github files and followed the instructions.
The library folder is called CwPololuSerialServo and if i open the test file and when i compile it i get the following error

CwPololuSerialServoTest:5: error: ‘TestSuite’ does not name a type
CwPololuSerialServoTest:6: error: ‘Serial1’ was not declared in this scope
CwPololuSerialServoTest.ino: In function ‘void setup()’:
CwPololuSerialServoTest:9: error: ‘Serial2’ was not declared in this scope
CwPololuSerialServoTest.ino: At global scope:
CwPololuSerialServoTest:14: error: expected constructor, destructor, or type conversion before ‘(’ token

any suggestions on what to change

thanks

It is probably a little too late but I tried to use the CwPololuSerialServoTest sketch too and had the same errors! I stumbled upon the solution by pure chance while looking in the Arduino playground.
First, go to the Arduino playground -> software -> libraries then search for the ArduinoUnit library. Follow the links and download version 1.7. Version 2 removes the TestSuite class so it will not work. Here is a direct link:
https://github.com/mmurdoch/arduinounit/releases
Next, the errors pertaining to the Serial1 and Serial2 ports are easy to fix! Just change your arduino board to the “Mega” which supports all of those extra ports.

The sketch should compile and work.

I think there maybe away to start a new test sketch without using any of that funky testsuite stuff but I have not had time.