Glad to hear your servo controller hasn’t started smoking yet!
You can use that same pack for both still, you’ll want to wire it to the servo power pins and the VIN pin (so it will go through the regulator). I don’t imagine it will drop much below 5V while you’re using it, but things might start acting oddly at that point.
Yeah, that should be just fine. In your pictures it looks like you’re using Hitec servos, and they’re generally good at dealing with higher-than-advertised voltages (plus your batteries will drop really quickly from that just-charged peak as you use them).
Hey Phil, the Arduino manual says you need 6V minimum for everything to run right, but I suspect it would work fine on slightly lower voltages too. Did you ever have trouble with it dropping out due to low battery power? Was a 5-cell NiMH pack always enough for it?
Sorry for the late response but for some reason I don’t receive emails from this forum when a reply is posted.
I haven’t had any problems using the 5 cell battery pack but I haven’t had much luck with the Easy Radio modules. I should have tried the two way version like you’re using. I’ve been taking pictures, improving the programming and will look into the wireless again soon. I might try using bluetooth and control everything from a cell phone.
Sorry to hear you’re having trouble with the easy radios Phil, I’ve had nothing but fun with them. A bluetooth setup from your phone sounds cool though, would it have enough range?
My panobot has been working flawlessly until Sunday. I was working on completing the menu programming for the controller when the servos stopped moving. Looking at the servo controller I see that the green light flashes when it is sent a new position from the Arduino but nothing moves and the camera shutter won’t fire. The volt meter confirmed that the servos have power but I don’t think the signal is getting out of the servo controller board.
What’s my next trouble shooting step?
Thanks,
Phil
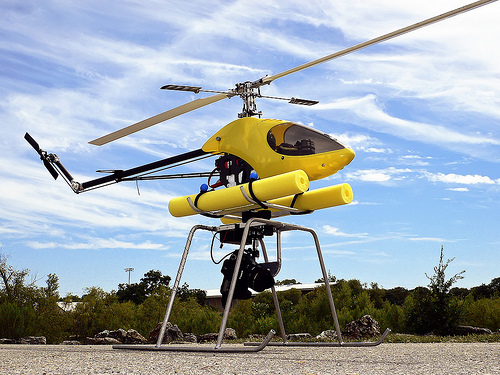
P.S. Here’s my latest pano mount for aerial pictures.
That panorama looks fantastic! I know you’re doing this for the sheer awesomeness of it, but with quality like that I bet you could sell panoramas to people like realters and golf-course owners and such. Wow.
It sucks that it stopped working, but since all you changed was software, software is a good place to start looking for the problem. Do you have an old version of your code saved that you can load to see if it still works?
Oh yeah…I went back and tried code that I know works. Should I order a new board? I’m thinking that something has failed on the board and it isn’t sending a signal out any more but I’m hoping you have a trick up your sleeve to get it working.
I’ve thought the same thing when I look at the quality of what some businesses are selling. My quality is good enough now but do I want an second job as a salesman looking for customers? I may put up a website and focus at the higher end of the local market. For now I’m having fun experimenting with photography, rc helicopters & electronics.
It is possible that something has failed on your board, but unless you had some killer event the odds are that the board is working fine (for example, I once accidentally hooked my 14.8V battery pack to the 5V serial input pin and POOF). If there really is something wrong with the board Pololu is very good about diagnosing and repairing problems, but I don’t think it’s time to ask for an RMA just yet.
A really simple way to test the servo controller is to put it in MiniSSCII mode (put the blue mode-select jumper on) and send it a single 0xFF byte at 9600 bps. If I remember correctly, this should set all servos (and all possible servo numbers) to their neutral positions. I could be wrong about this though, I’ll check on mine tomorrow.
What I mean by all possible servo numbers is that, since you’re using Pololu mode, there is the possibility that the servo number range was magically changed by interference and/or garbage bytes (its been known to happen). Detailed instructions are in the manual, but basically you can check the servo number range by putting the servo controller in Pololu mode and sending the byte string {0x80, 0x02, 0x10}. The red and yellow LEDs should turn on, and the green led should flash a number of times over and over again with a 1 second pause in between. If the green LED flashes just once that’s not the problem, but if it flashes any other number of times the servo number range has been changed. To reset it to normal (servos 0-7) reset the servo controller and send it the byte string {0x80, 0x02, 0x00}. You should now see the green LED flash just once every second. You’ll need to reset the servo controller again before it will move any servos.
Other than that I don’t have any great ideas beyond checking for wiring faults and testing bits of your system individually. I’m not saying you shouldn’t order a spare servo controller, but it would suck to get it and plug it in only to still have this problem!
-Adam
P.S. Whats new with my quadrotor is that it earned me a master’s degree! I also seem to have proven quite conclusively that webcam-grade computer vision is not nearly sufficient for autonomous control of a helicopter. It remains to be seen if we’ll pursue the project further with better equipment. Lots of people have already shown that helicopter control is totally doable if you have $50,000-$100,000 to spend on a Vicon motion capture camera system with sub-milimeter position and orientation readings at 120Hz!
With my experimenting trying to learn how to use pointers I wouldn’t be surprised if the servo controller choked on the garbage I gave it.
Is this Arduino code correct for a reset?
/* Reset Pololu micro servo controller to normal (servos 0-7)
   Send it the byte string {0x80, 0x02, 0x00}
   The green LED should flash just once every second
*/

    void setup()
   {
      Serial.begin(9600);
   }


    void put(unsigned char servo, unsigned int angle){

       //Send a Pololu Protocol command
       Serial.print(0x80,BYTE); //start byte
       Serial.print(0x02,BYTE); //device id
       Serial.print(0x00,BYTE); //command number
       Serial.print(servo,BYTE); //servo number
       //Convert the angle data into two 7-bit bytes
       Serial.print(((angle>>7)&0x3f),BYTE); //data1
       Serial.print((angle&0x7f),BYTE); //data2
    }
/* Reset Pololu micro servo controller to normal (servos 0-7)
Send it the byte string {0x80, 0x02, 0x00}
The green LED should flash just once every second
*/

void setup()
{
	Serial.begin(9600);
}

void loop()
{
	Serial.print(0x80,BYTE); //start byte
	Serial.print(0x02,BYTE); //configuration command
	Serial.print(0x00,BYTE); //servo number range

	while(1);//stop here
}
When you run this code, do you see the servo controller’s red and yellow LEDs come on, and the green LED flash once each second? If so, try an old program you know works.
In my Arduino Code i’ve tried to do exactly this.
But the changes concerning servospeed only take effect at the second movement.
Example:
I set Servo 1 to speed 40.
Then Delay 2 seconds.
I give Servo 1 the command to drive to its center position. So the servo drives with full speed.
Then I give the Servo the command to drive at 90° in its range and the servo does with the selected speed of 40.
Is there any possibility to let the servo drive the selected speed immediately for the “first drive command” after the set speed command??
Thanks a lot
Andy
In general, standard servos don’t support the ability to move at variable speeds. You send them a position and they move to that position as quickly as possible. The way the servo controller gets around this is to send a series of position commands that are changing over time, which moves the servo from its current position to its final position more slowly than it otherwise would. Unfortunately, before you send the first position command, the servo controller has no way of knowing where the servo is, so it cannot generate a sequence of position commands that transition it from this current position to the final position you’re requesting.
There are two tricks you can use to get around this if speed is a huge problem for you:
Start your servos at their neutral positions (either command them there as part of a shutdown routine, or manually move them there before you start up your controller). This is where the servo controller assumes they’re starting anyway.
Figure out some other “home” position for your servos that you manually move them to before turning the controller on. Then command this home position through the servo controller first (which will just make the servo stay put where it already is) and then set the servo speed lower.
For a school project I am planing to use 8 Servos with this magical controller from pololu and Arduino. I read the entire thread it is really good and quite easy to understand. I will build my prototype in a few days when my Micro Serial Controller arrives in 1-2 days.
I have two questions, first can I control the motors from the commands I send via Python ( fetching some data from a www site and sending them to arduino with serial protocol) and is there compilation of the stuff here with the codes and schematics that I can download ?
My email is: tolgainam {at} gmail {put dot here} com
I have little experience with Python, so I don’t have any example code to post, but I know you can access serial ports with it, which is really all you need to do to control the serial servo controller. Actually, if you want to you can command the serial servo controller directly from your computer, without using the Arduino. If your computer has a serial port (less and less common these days) you can cut up a serial cable and wire it to the COM pins on the micro serial servo controller. You could also use a USB to Serial adapter (which the USB Arduino boards have built-in) like this one.
Sorry, there isn’t much of a compilation of this thread yet, although at one point Zagrophyte was talking about making it into an Arduino playground page.