As you can see, it’s a breadboard and a Tamaya treadkit, taped/screwed into a couple of pieces of balsa wood. There are a couple of circuitboards (an Arduino Mini and a Pololu LVMC) stuck into the breadboard. IR sensor held above it all by a piece of coat-hanger. Hardly elegant.
Any thoughts on what I could use instead that would be more sturdy and look nicer? I guess I could just try to find a standard Radio Shack box enclosure, but am not sure how all the parts would fit in it. How could I even get all the bits to connect properly without using a breadboard?
I’m still quite a noob and don’t really know what I’m doing. So any advice would be appreciated.
Thank you for sharing the video of your robot; very cool! Have you taken a look at the chassis we sell?
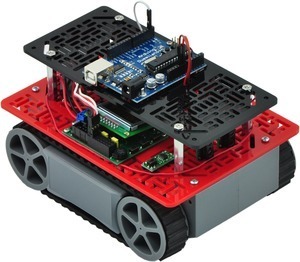
If you want to make something with a more polished look, you could go with our RP5 tracked chassis and a laser-cut expansion plate for mounting your electronics. You can stack the plates in tiers to acheive a multi-level design.
You could also have us laser-cut a custom chassis for your robot. I don’t really have a suggestion for something that will fully-enclose your electronics, though.
The RP5 chassis has a gearbox and motors built in, so you wouldn’t need to use the Tamiya Twin-Motor Gearbox Kit. The slot size and spacing of the RP5 expansion plate is compatible with the Tamiya Universal Plate Set.
Any thoughts on what kind of hardware to use to connect the two levels? Does Pololu sell something, or should I just grab some dowels from a hardware shop?
We sell aluminum standoffs. You can see these in the multi-tiered RP5 photos on the RP5 product page:
Note that the RP5 includes a 6-AAA battery holder, which will produce voltages that exceed what the low-voltage dual serial motor controller can handle. You will need to use your own battery holder/pack if you want to use the LVDSMC, or you can go with another motor controller. I would recommend this latter option. For example, you could use a TReX Jr to make a bot that can be both autonomous and manually controlled via RC, depending on the state of one of your RC channels, or you could use our new Orangutan SVP-324 to replace both your Arduino and LVDSMC as the brains and motor driver of your bot. Programming our Orangutans is very similar to programming the Arduino since both are based on AVR microcontrollers, and like the Arduino, the SVP doesn’t require an external programmer. The SVP has extensive library support and a lot of sample programs, so it’s quite easy to use all of the integrated hardware (such as the motor drivers, servo outputs, LCD, buzzer, pushbuttons, etc) to make a fun robot that responds to sensors, uses servo-driven mechanisms, plays music, and features custom user interfaces that use the LCD and pushbuttons.
This was really helpful, thanks! The “standoffs” are perfect. I went ahead and purchased some new chassis materials. I’m hoping to avoid switching out any of the actual microcontrollers for now, but may explore that in the future.
Will post the refurbished bot here when it’s finished. Someday.