Just received my Pololu Micro Maestro 6-Servo Controller. Plugged it into USB port on my W10 update 1809 system. Green USB light on PCB is on, Status light is flashing. (I haven’t tried plugging in a servo yet. I don’t think that is necessary yet.)
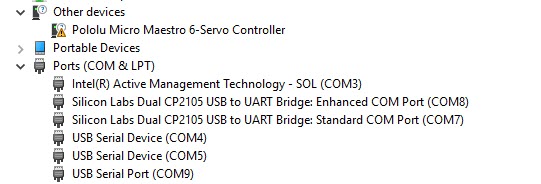
Device manager shows no driver for the Maestro.
Com Ports 4 & 5 appear under Comm Ports but the Controller under Other appears to be broken.
How can I fix this or if the above looks correct, how do I interface to this device? I’ve tried connecting via COM4 and COM5 with no response. Is there a Baud Rate I need to select?
Please help.
Thanks in advance.
P.S. I downloaded Maestro Control Center. It doesn’t see the Micro Maestro 6-Servo Controller in the Connected to: dropdown window. Therefore, to me this confirms that the driver is not installed and the device can’t be seen.
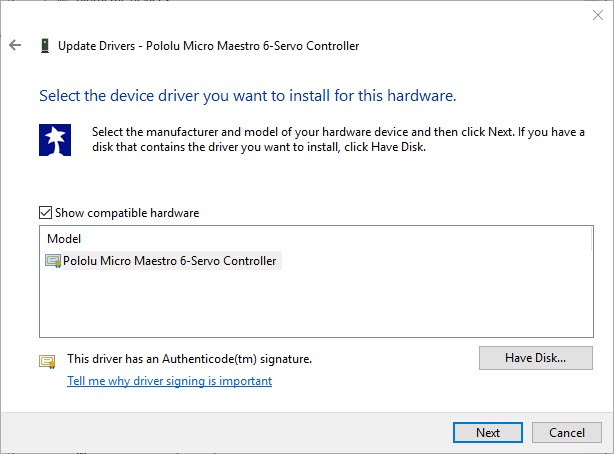
OK. Finally made it work. Had to go through “Browse my computer for the Driver” then selected “Let me pick from a list . . .” and then I think I told it to look for USB Controllers and then it found this.
I think you should update your documentation somewhere showing how to do this for W10.
I am sorry you had trouble with the Maestro. Thanks for telling us what you did to get it working. Normally the Windows installation instructions in the Maestro user’s guide work fine.
Your first screenshot most likely indicates that Windows did not find any driver for the Maestro’s native USB interface when you plugged it in, since that interface is shown in “Other devices”. In the future, you can also double-click on devices in with a yellow triangle to see an error message.
When you plug in a device that Windows has not found drivers for yet, it triggers Windows to look for drivers for that device and start using any relevant ones that it finds. We therefore recommend installing the drivers before plugging in the device–is that what you did?
However, if you plugged in the Maestro before installing its drivers, when you subsequently install the drivers Windows 10 will usually detect the driver for the Maestro’s native USB interface right away and start using it. I am not sure why that did not happen here. One thing to try in that situation is to unplug the Maestro from USB and plug it back in, to trigger Windows to look for drivers again.
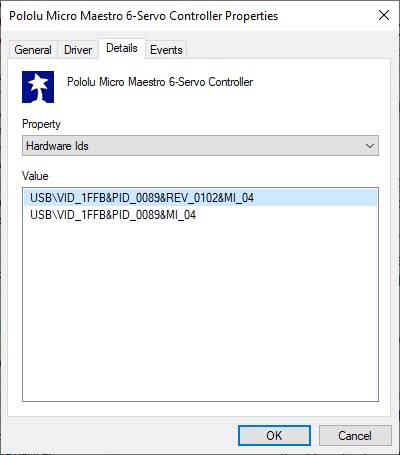
To help us troubleshoot more, could you double-click on the “Pololu Micro Maestro 6-Servo Controller” entry in the “Pololu USB Devices” category, and then tell us what Hardware Ids are listed in the “Details” tab?
Here’s the info you asked for.
As for installing drivers before plugging in Maestro, there was no documentation sent with the hardware nor any sort of instructions. At the very least you should have a small Quick Start Guide card sent with all Maestro Controllers with the link to the Maestro User Guide saying it contains installation instructions.
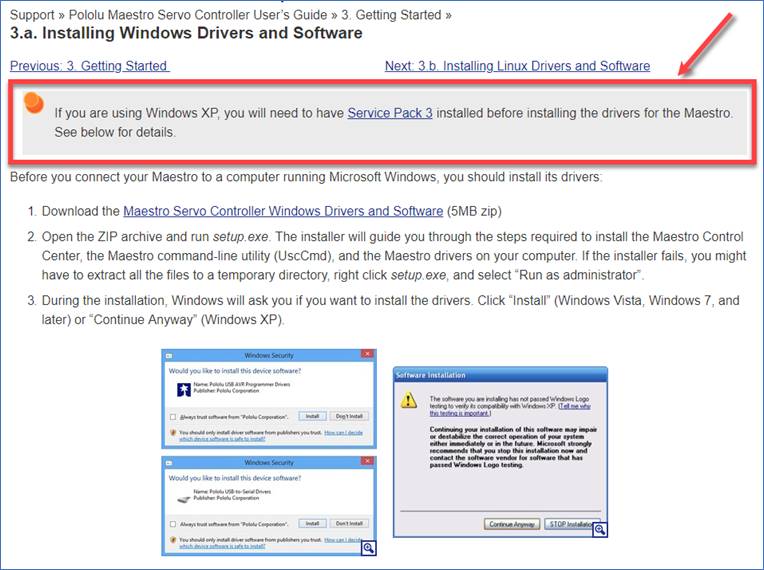
I began by looking at those instructions in the Maestro user guide and misunderstood those directions. The paragraph shown in the black square is what I was confused by.
When I saw that shaded paragraph at the beginning, I distinctly (but incorrectly) got the impression that Steps 1 - 3 were ONLY for XP installations. Now that I read it closer, I see how I misinterpreted what you were saying.
As a result, I first plugged in the Maestro thinking that W10 would automatically find the drivers up on the Windows Update pages and just install them automatically. When that didn’t work, I then saw the problems in Device Manager, I realized I needed something else including the Maestro Servo Controller Windows Drivers and Software so I installed it so I could at least run Maestro Control Center. When I ran it, it couldn’t see anything. At that point I went back to Device Manager trying to solve the driver problem which I ultimately did. The bottom line was that I did everything out of order.
My suggestions is (as someone that has done a lot of tech writing) that you need to reorganize the text to completely separate all OS version installation instructions from the others. That way you can not confuse W10 with XP instructions as I did when I was misled by the shaded initial paragraph. I highly suggest you remove that paragraph and move it to under the section on XP installation only. That will avoid people in a hurry (like apparently I was) getting confused.
Thanks for your help. I hope this suggestion helps you to rewrite the installation instructions so that others avoid my problem. However, I would also include what I did as a solution to correcting the driver issue if you get things out of order as I did.
Thank you for explaining your interpretation. Our paragraphs with gray backgrounds are not intended to be section headings; they are just notes that we want to call more attention to.
In the “Installing Windows Drivers and Software” section of the Maestro user’s guide, after step 4, the user’s guide said:
Windows 10, Windows 8, Windows 7, and Windows Vista users: Your computer should now automatically install the necessary drivers when you connect a Maestro. No further action from you is required.
Windows XP users: Follow steps 5-9 for each new Maestro you connect to your computer.
I have edited that part to help avoid the confusion you described.
To locate user’s guides for our products, I recommend looking on the product page, and also checking the “Resources” tab of the product page. Here is the product page of assembled Micro Maestro:
You can also click on the “Support” link at the top of our website, then click on “Documentation for Pololu Products and Services”, which brings you here:
I’m sorry but it looks exactly the same as before and I don’t see any edits that fix the issue and it doesn’t really help to avoid the confustion. You need to rearrange and move that shaded paragraph at the top of the Maestro user’s guide to a space down under the Windows XP users: Follow steps 5-9 … . section.
Left as is, you can easily still have people misunderstand what the installation process is for W10 because that shaded paragraph implies (unless read very carefully) that the first steps are for XP7.
Moving the shaded paragraph avoids that and there is no down side to moving it as I have said. Failure to do so is just asking for the same error that I made to be made by others due to unclear installation instructions.
An even better way to do this is to have a complete section for each OS instead of mixing OS installation instructions in a single section.
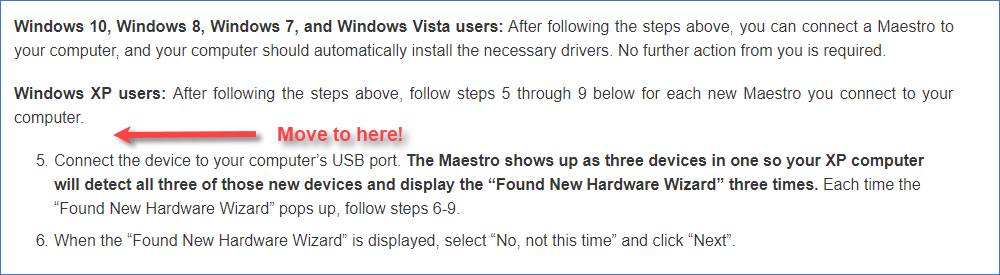
You might have looked before my change to the user’s guide had finished propagating to our website. If you look again, you should see that the wording of the part I quoted has changed, and it now refers to the steps above:
Again, you should move the paragraph in the Red Square and with the Red Arrow to under the XP7 section in order to avoid what happened to me. Yes, it was my fault from misreading your instructions but I feel that it is easy to do as it is easy to think you are looking at the XP7 Installation due to that paragraph. Just move it to here under Windows XP users section. I think that avoids the problem.
I can see from your second screenshot that the user’s guide has in fact changed in the way I described, and the changes are visible on your screen. A Windows 10 user whose eyes are immediately drawn to that area of the page will now be informed that there are steps above that they need to follow.