Dont know if this is the right spot for this thread… but heres the plan made possible by that little Maestro.
I am constructing a vehicle uniting a few technologies I have in the house and brought together by the Maestro.
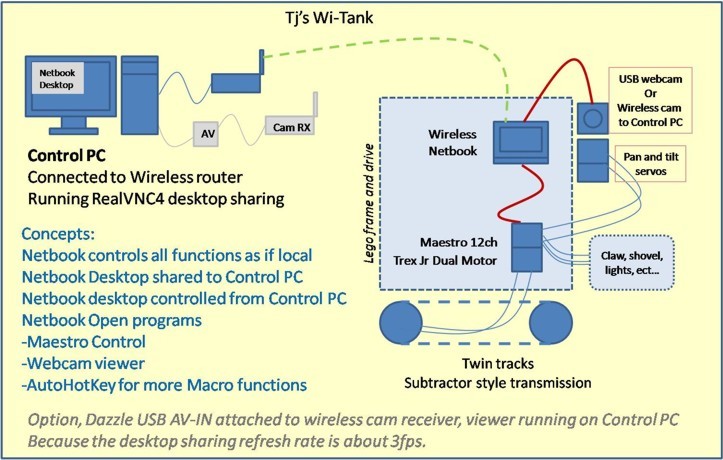
I am building a track vehicle from Lego, lego motors and all. The track platform will house a subtractor transmission for less drive battery usage. A webcam, but more than likely a mini wireless camera. and the base will hold my little Netbook. Various other RC components.
If sitting at the Netbook, I would be able to contol the Maestro and thereby all the functions of the vehicle. While scripting autonomous functions would be fun (all props to those who can make those machines), I dont have sensors and such… yet…
So the best sensor is Me. And I got one of those SO since my netbook has wireless capability and my internet router too, I have an old program called VNC for desktop sharing via IP. So I will open Maestro in the netbook, then control it live on the remote desktop emulation on my big PC.
Then just do what I want to do with the vehicle…
I have a Dazzle USB AV input and a few 2.4GHz mini cameras which I can ‘link’ to my PC vor a better live view from the vehicle which I think I will use because the remote desktop emulation runs at about 3fps. Plus if I use the wireless cam, I can record better on the big PC.
1 problem… Im getting battery heavy. Netbook, Cam battery (mini 2c LiPo), Track motor battery (7 AAA pack), Servo batteries (4x AA)… Is it recommended to link the USB +5v to the servo power if I am only running servos or will this mess with the Maestro?
Cool project. Can you post any pictures of the robot?
The Maestro is okay with a 5V supply shared between the servos and Vin. However, the +5V(out) pin on your Maestro is probably not a good place to get it. You might be able to get enough power from USB to move one servo at a time, as long as it is never straining too hard, but neither USB or our power supply circuit are designed to handle more than about 500 mA - and the limit might be as low as 100 mA, depending on how your laptop works. If you tried to power multiple servos at the same time, the USB port would probably disconnect the Maestro, and it could potentially even be damaged. Also, you would have to be careful to never power the Maestro from a battery if you are using the 5V output in this way.
A slightly better way to do it would be to get the 5V directly from the USB cable or by soldering wires to the USB connector, so that the limitations of the Maestro would not affect you, but you would still be limited by the laptop.
Overall, I would say that you should keep using the extra battery!
drats!.. but good to know! I just started on the chassis last night, I’ll let this be my build thread. who knows, I might just have it mobile today less accessories. To be continued…
Well, due to the strength limitations on the links and strain to move the treads, I opted for a different drive method, I am still using the subtractor transmission, but I am going to use 2 drive wheels and two free pivot wheels in the back. It seems to be working fine…
I have also added at twist.
I will enter a ‘How To’ video contest featuring this build, but I wanted to be a bit original. I will use the Wi-Tank as a platform to carry a smaller 6 channel purpose built vehicle. which will be used together to complete a mission of turning off my basement light from my little office on the 3rd floor… Because of the Mini Maestro and the motor controller plus my 6ch remote, I will be able to control a total of 9 channels and 2 cameras across 2 vehichles for 1 big ‘adventure’. Should be cool! More soon!
Here is the video I made for the contest. I hope I do well!!! Unfortunately I didnt have much time in the video to focus on the build itself… only had 5 minutes to work with and alot to show. I will be making a second video a little more build oriented.
That was quite entertaining! Can your system really do everything the video implies it can? For instance, it looks like there might be a missing section between phases 5 and 6: can the rover reconnect to the cable just with remote control?
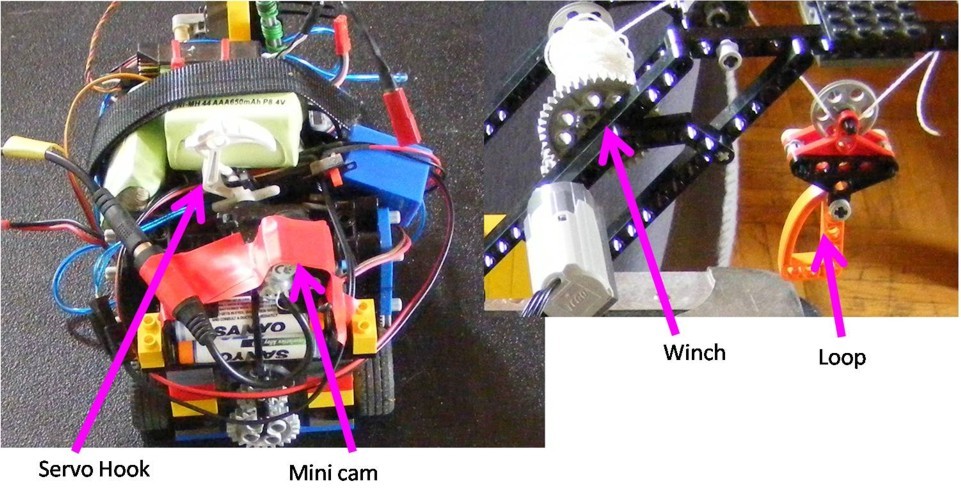
If you look in the ‘rover’ images you will see a big white lego hook. I used 3 small zip ties to fix that to a servo, then zip tied that servo to a very sturdy cross support build from the bottom of the chassis (the blue triangles seen from the side). I set that for channel 5 on my remote (the dial channel) so that there was not a chance for me to dumb-thumb it and release my rover when half way up the stairwell. Then when I… well… taped the mini wireless cam to the rover, I did it so that I could see the hook and allow me to connect and disconnect. I didnt use that video in the contest vid because it was hard to make out what you were seeing so I just left it out.
Another problem I ran into with the ‘transport’ was I started to run out of resources… specifically motor controllers… I already used my ESC’s on my rover, and I got the TRex Jr here… but I needed full control over 3 motors on the transport. The TRex has 2 forward and reverse and 1 single direction channel. 2 motors for the motion and 1 for the winch was required. I came up with 2 solutions. First was to use the 3rd channel, through a directional switch from Lego, then use a servo off the Maestro to mannually switch its direction. The second solution was to have the cable length millimeter exact for the mission. that way when I got to the bottom, I stop the winch… then when I wanted to come back up, I just turned the winch back on in the same direction which would now coil the cable back up, a Yo Yo if you will… This was only good for 1 down and 1 up, so I used both solutions.
Since many here are robot builders… Let me disclaim something. the filming of the video was not actually of me running the mission… I was alone so I had to run the stuff and film at the same time. some of the filming was actually the testing of the functionality of everything… I had a mini mission control in my basement and from there ran my vehicles. You WILL most likely notice in the drop phase of the video, the lack of a few components on the rover (mini cam, light cord, and minicam battery) they had not yet been installed but it was getting dark so I had to film. Oh, and the hanging pico switch servo connector… how embarassing
I have however ran 2 100% sucessful missions from my PC area upstairs. (and 1 unsucessful, steering wheel came off) so the rig works, I just have to harden the turning wheel on the rover and make the axle wells on the transport about 4 bricks wide to take the bend out of the main drive wheels. the whole setup is quite heavy when all is on board and the 2 main drive wheels on the transport carry nearly all of it.
Like I promised, I will do a build video to better show the unpleasantries of the whole process. Love that Maestro and TRex though!!
Well the camera I have I bought from hobbywireless.com a few years back for my RC planes… however he stopped carrying the little cheap guy that I have, but a similar one you can get on Amazon. amazon.com/Wireless-Motion-C … 637&sr=8-9
easy to use and comes with everything you need for wireless video… Normally the cam uses an adaptor for a 9V battery, I switched the head out and use a small 2c LiPo battery pack because charging a 9V takes forever. A fully charged little 7.4v Lipo will give you about 4 hours of great performance.
Webcam is loosely stated, I use a Dazzle USB DC90 (or DV90) AV input connected to the cam’s receiver for recording on the computer.