I’m trying to put together a script that’s a bit more advanced than a beginner like me can accomplish.
The script has four buttons; the first button operates a simple servo movement for the length of time the button is pressed, then returns to it’s original point when the button is released.
The second and third buttons operate different values on the same servo along with two different audio clips from an Adafruit Audio FX board. These ones wouldn’t need to be momentary buttons like the first since they’re playing set sounds, but it might be preferable for more control as long as releasing the button doesn’t also cut the audio in the middle.
The fourth button would move the same servo, delay slightly, then operate a second servo. I’d like this button to be momentary too, but the first servo would have to be delayed until after the second servo has moved back, reversing the process.
Essentially, I’m puppeting a jaw movement with various hisses, growls, screams, etc, and the fourth button opens the jaw and sticks out a tongue.
I’ve looked at the example script for multiple buttons but can’t find a way to make the buttons hold opposed to a single click. Can anyone help me get a script going?
For the first button, it sounds like you can use a simple if/else statement (see the example at the end of the post)
For buttons 2 and 3, it sounds like you should use set sequences as shown in the “Using multiple buttons or switches to control servos” example script (and not worry about doing something different when the button getting released).
Button 4 sounds a bit more complicated. If you don’t need the other buttons to work while button 4 is being held, the simplest solution would probably be to use a while loop.
So, your script might look something like this:
#this example assumes the "jaw" servo is on channel 0, the "tongue" servo is channel 5, and the buttons are on their corresponding channels.
#also, 8000 is being used as a stand-in for the "jaw open/tongue out" position and 4000 is being used as a stand-in for the "jaw closed/tongue in" position

begin

  button_1 if 8000 else 4000 endif 0 servo

  button_2 if sequence_2 endif

  button_3 if sequence_3 endif

  button_4 if sequence_4 endif

repeat


sub button_1
  1 get_position 500 less_than
return

sub button_2
  2 get_position 500 less_than
return

sub button_3
  3 get_position 500 less_than
return

sub button_4
  4 get_position 500 less_than
return

sub sequence_2
  #insert sequence for button 2 here

return

sub sequence_3
  #insert sequence for button 3 here

return

sub sequence_4
  8000 0 servo #e.g. open jaw
  500 delay #delay 500ms
  8000 5 servo #e.g. stick out tongue
  begin button_4 while 10 delay repeat #stay in loop until button 4 is released
  4000 5 servo #e.g. return tongue
  500 delay #delay 500ms
  8000 0 servo #e.g. close mouth
return
Cool, that’s getting me closer. I’m getting a 0x0040 error when trying to run sequence 4. The error kicks in when I hold the button but not when I press it once.
If you would like help troubleshooting the error, you can post a copy of your Maestro settings file, and I would be glad to take a look. You can save a copy of your settings file from the “File” drop-down menu of the Maestro Control Center while the controller is connected.
Sorry, I had a typo in the code I posted: in sequence_4, button_4 begin while 10 delay repeat should be begin button_4 while 10 delay repeat instead. I have updated my previous post to correct the error.
Could you try that change and see if it works for you now?
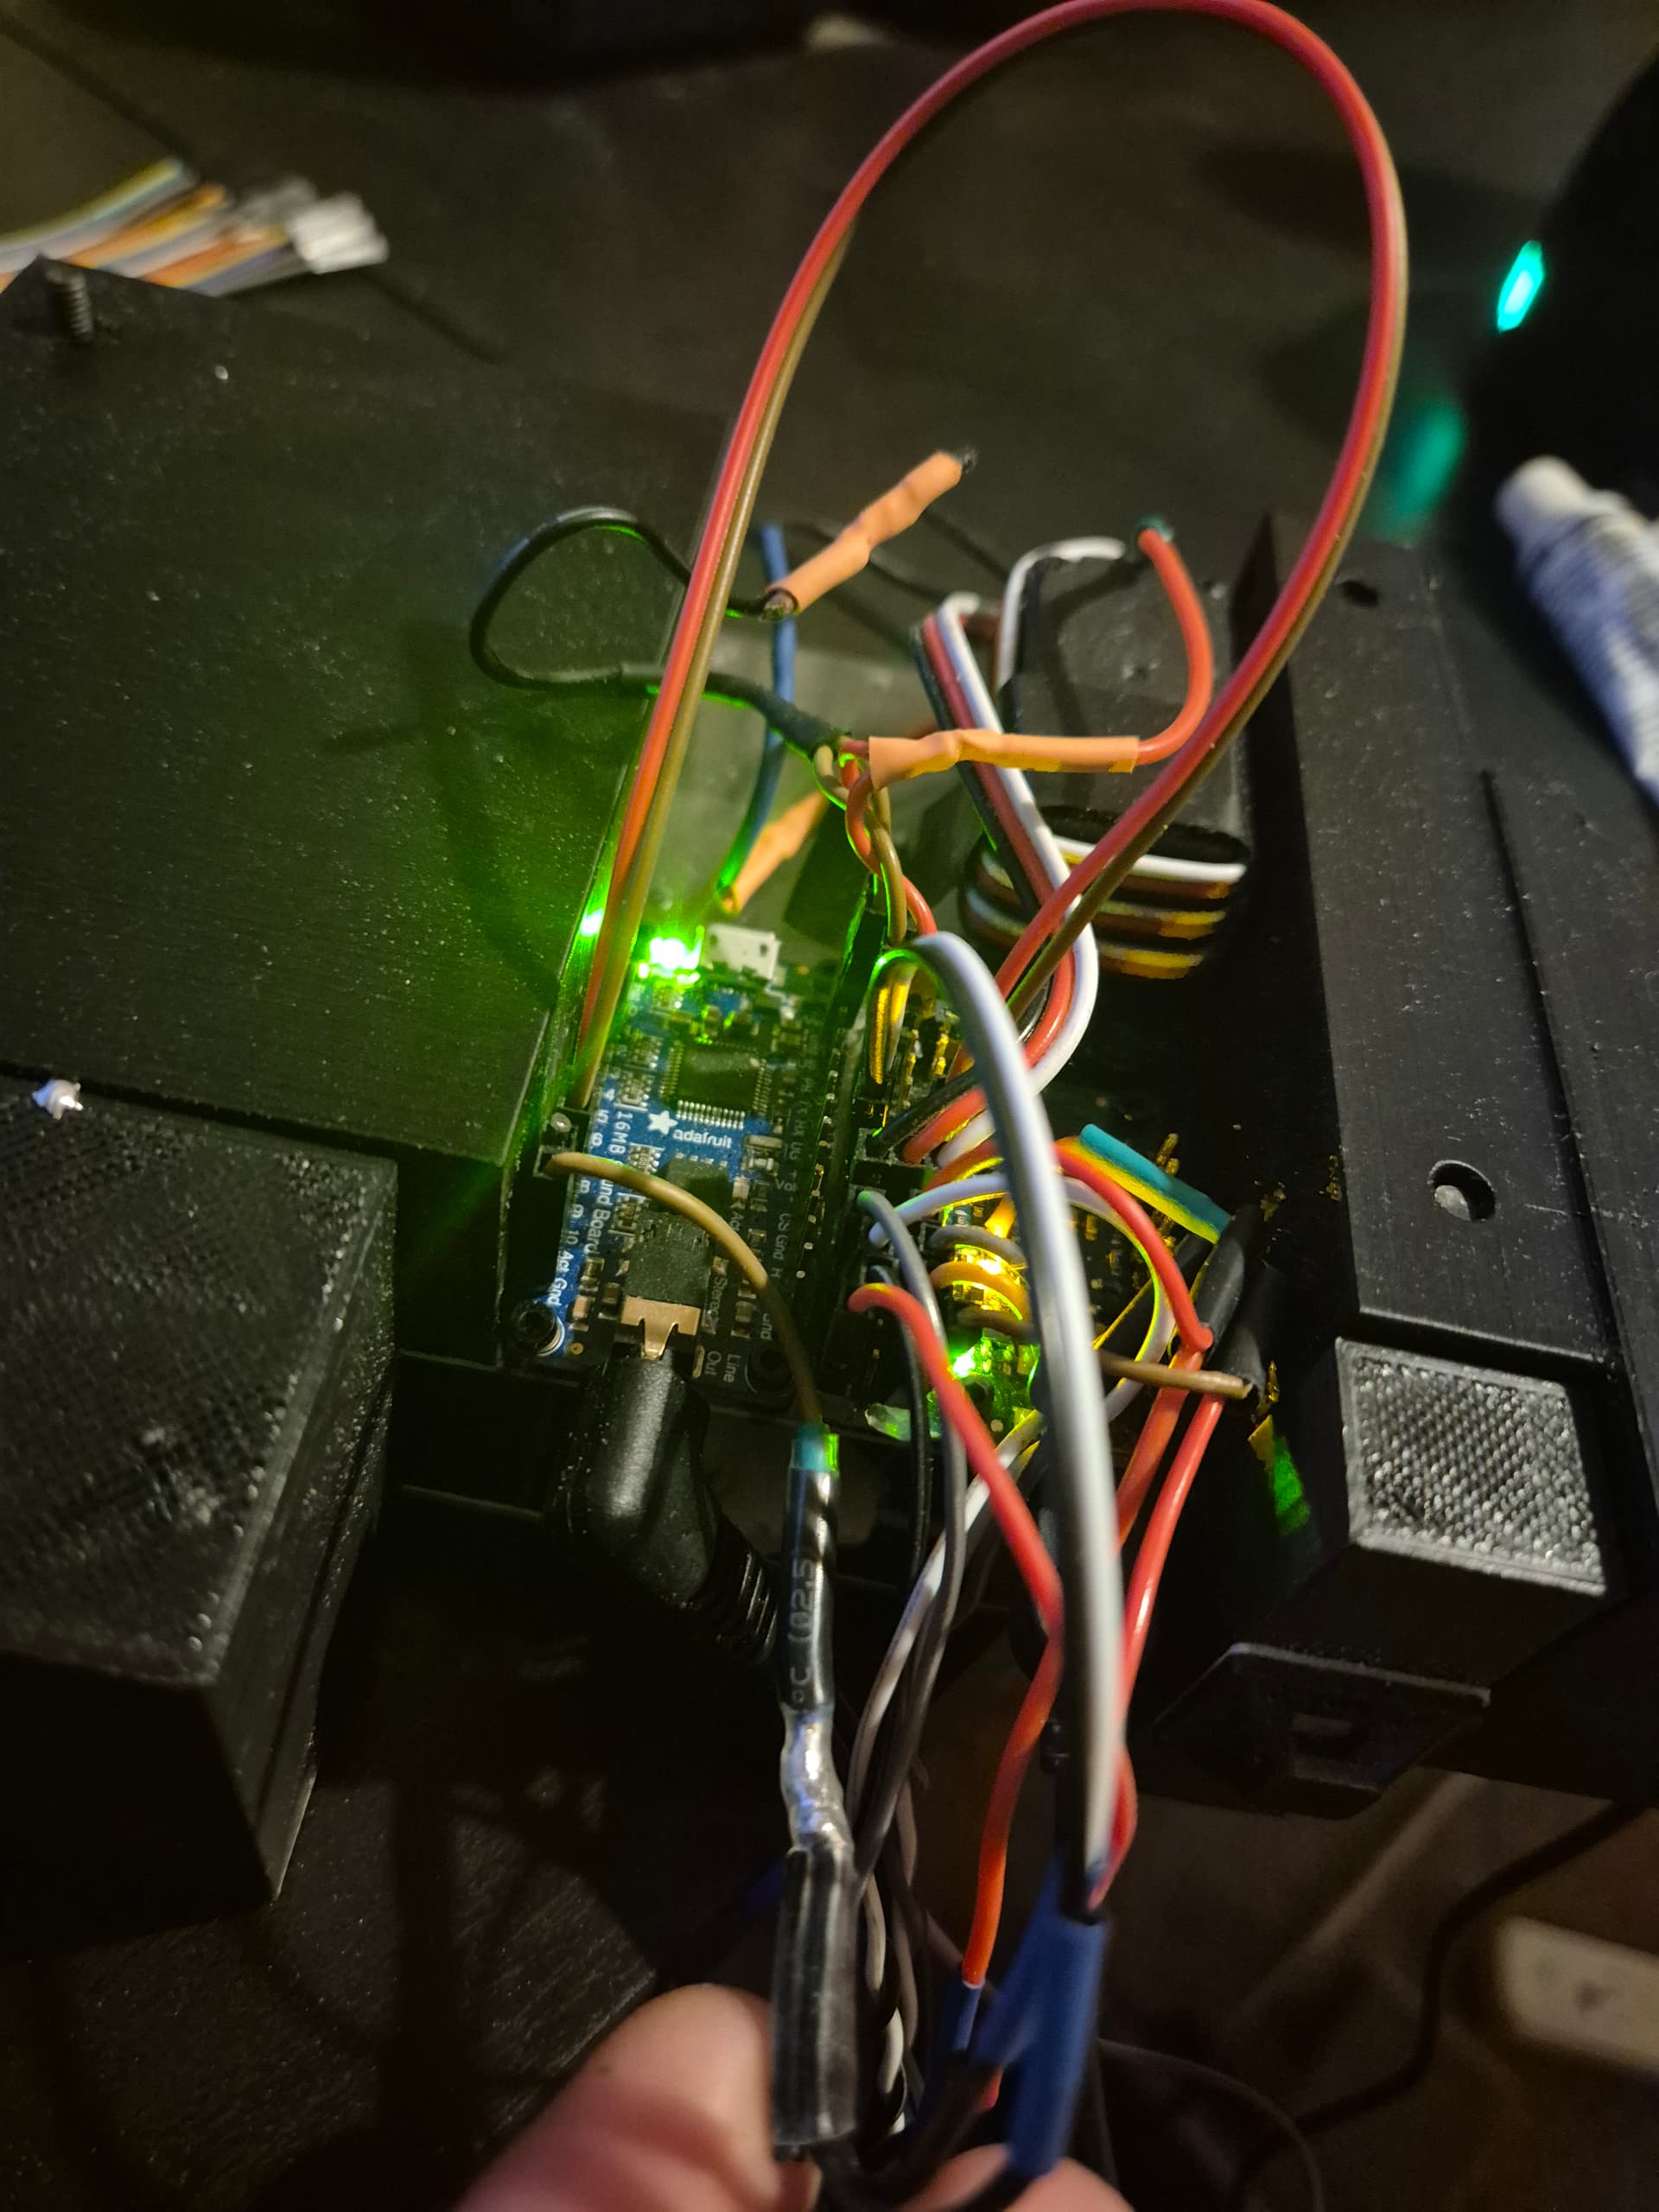
Now I’m having trouble with my soundboard. I can run the AudioFX board independently, but I can’t get the audio to trigger from the Maestro. I’ve treated it like an LED in the user guide (minus adding the resistor) by attaching the shared ground wires from the soundboard to the ground channel of the Maestro, and the signal wires to the signal channels 6 and 7. I’ve also changed 6 and 7 channel to output, yet going above a 1500 target on the status tab doesn’t trigger anything.
Could you post a link to the AudioFX board are you using as well as some pictures showing your connections?
Also, can you provide more details about how you tested the audio board separately from the Maestro? For example, did you trigger it through the same signal pins you’re connecting to the Maestro but manually connect them to 5V/GND?
In addition to the sounds that play in conjunction with the jaw/servo motion, I have a breathing track which is not connected to the maestro, whose signal line instead goes directly to a button, bypassing the maestro entirely. But also, yes, I have triggered audio from the maestro signal pins if I plug them into the maestro’s ground channel instead of the signal channel (but I’m obviously getting a constant loop of sounds in doing this).
I have a breathing sound effect on the soundboard’s channel 8 (which bypasses the maestro completely), some hisses/growls on the soundboard’s channel 9 which will coincide with sequence 2 on the maestro, and scream sound effects on the soundboard’s channel 10 which will be connected to sequence 3 on the maestro.
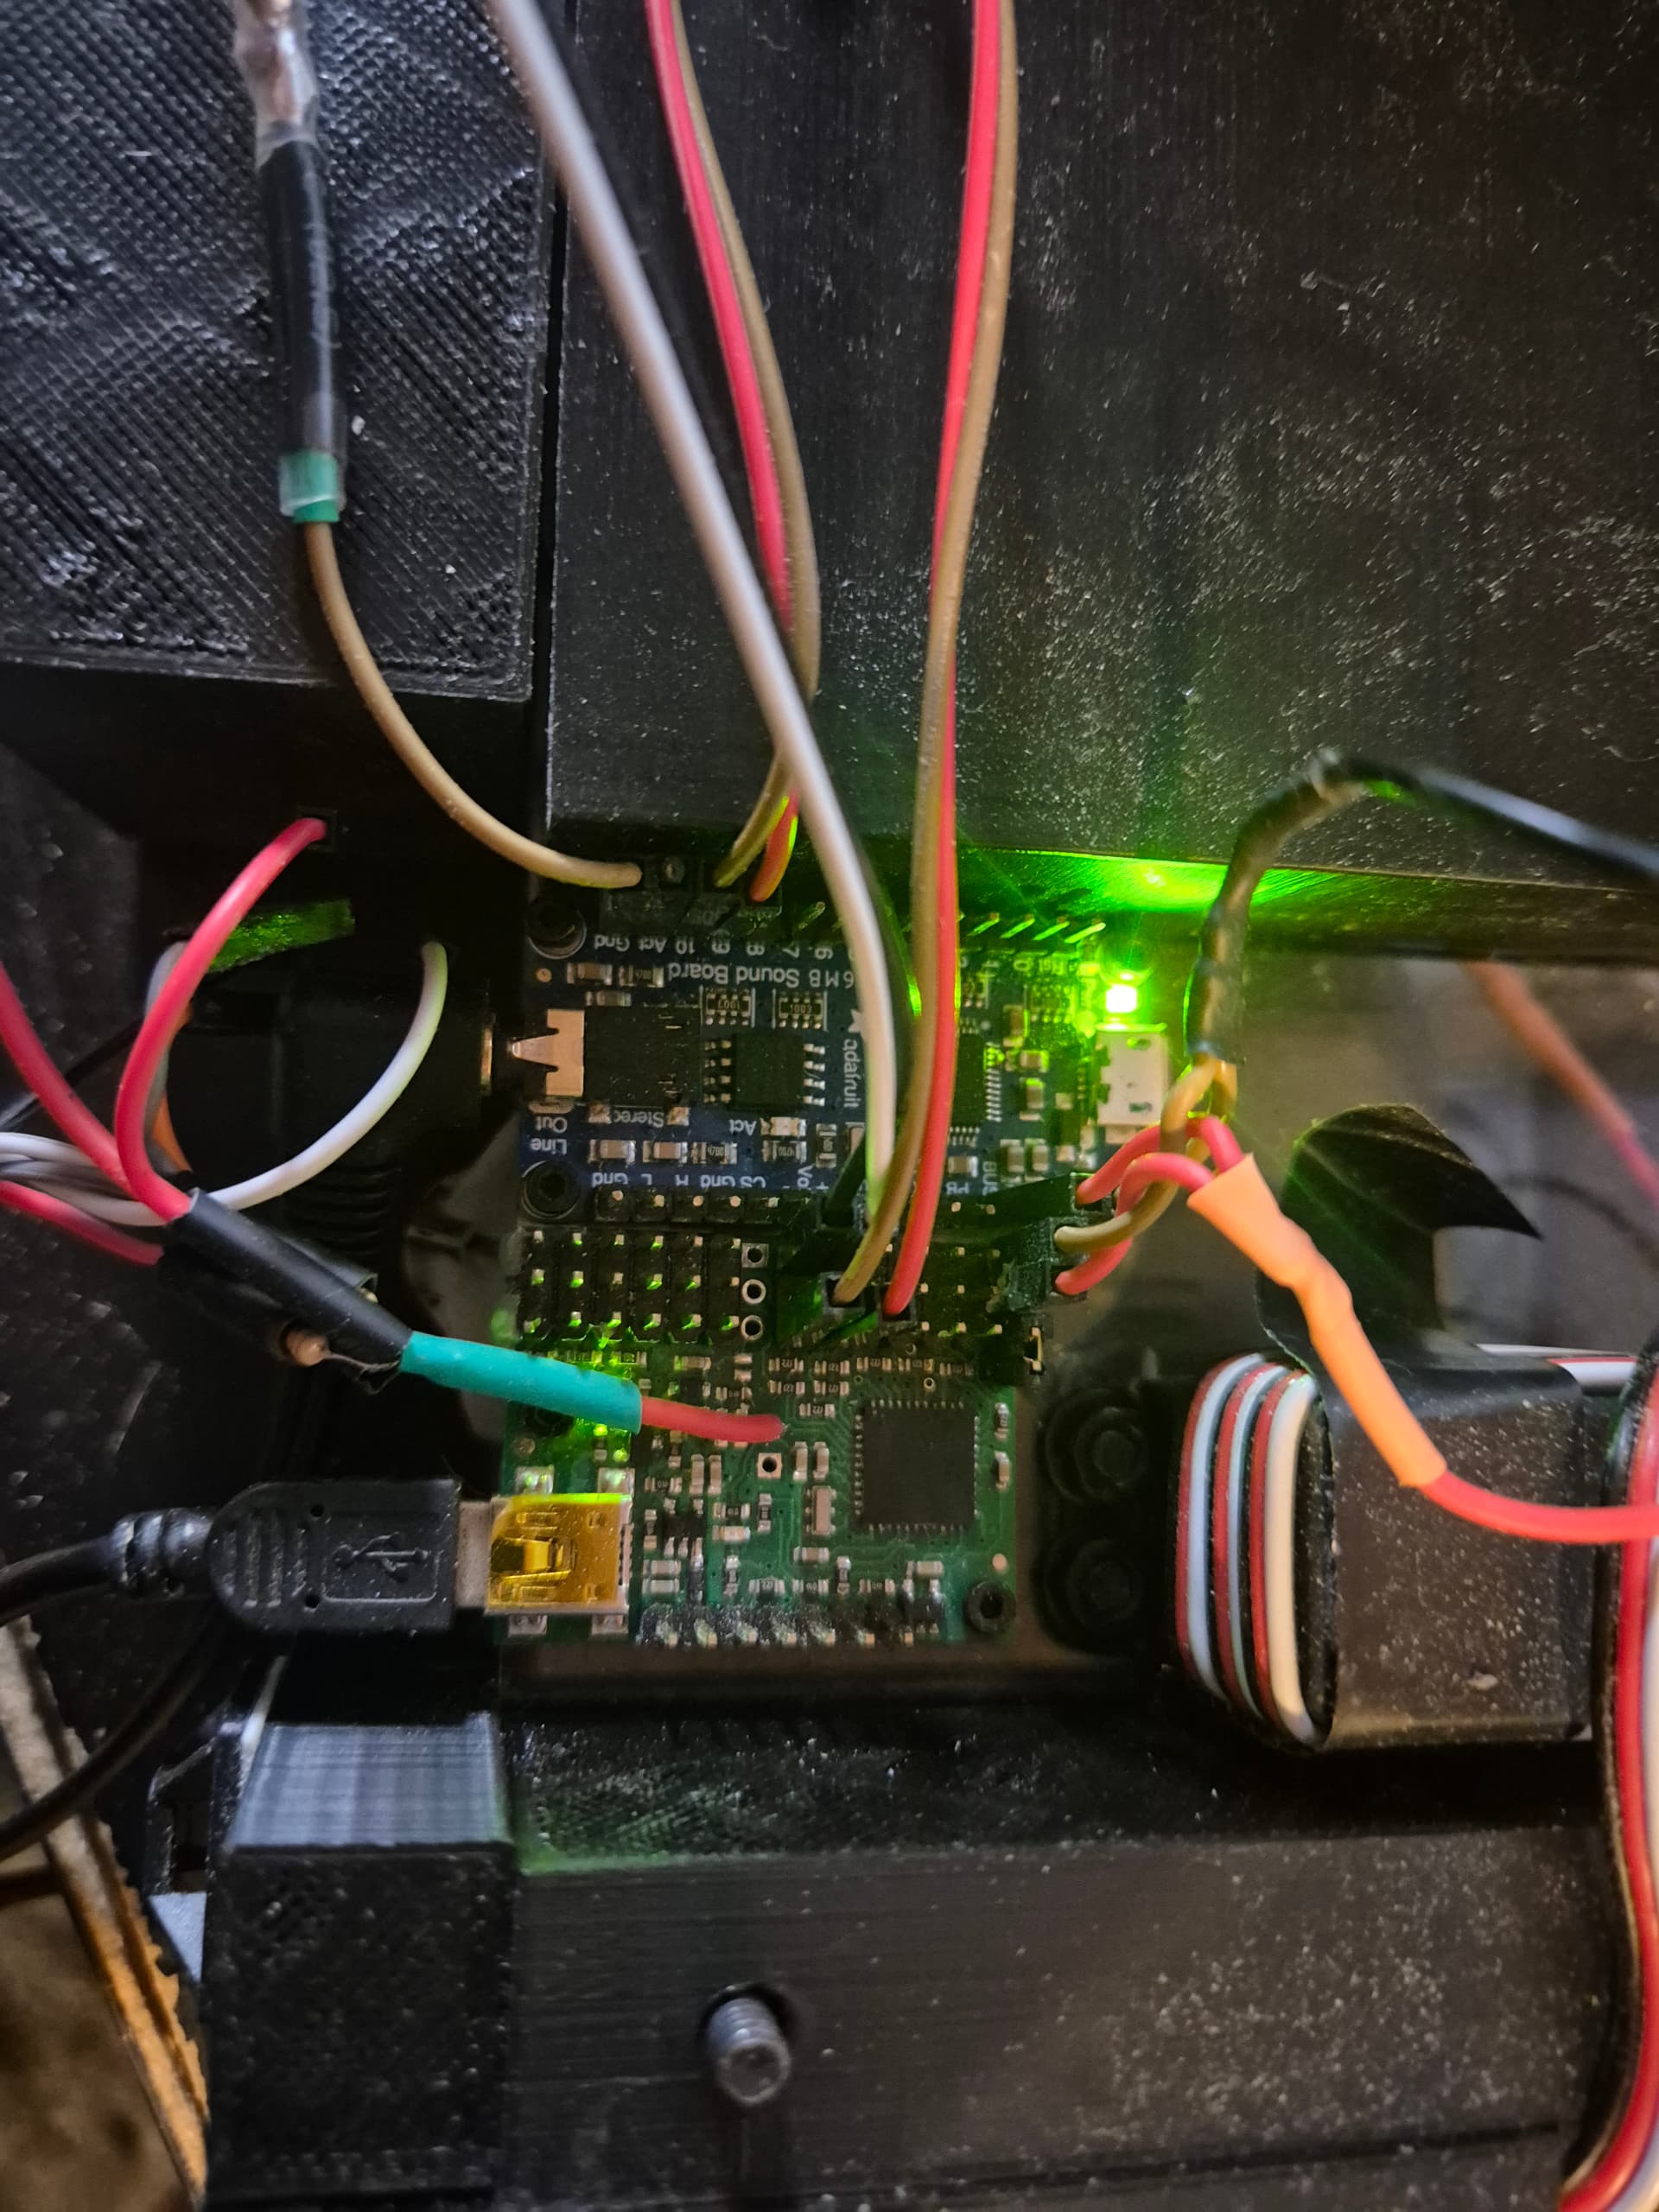
The photo is a bit cluttered with all the button inputs and servos into the maestro, but the soundboard is a little simpler. I’ve only attached the power (top right), the signal pins connect from soundboard signal 9 and 10 to maestro signal channel 6 and 7 respectively and the soundboard single ground pin (bottom left) is split between maestro ground channel 6 and 7.
Unfortunately, I cannot tell much from that picture, but from your description it sounds like you have channels 6 and 7 on the Maestro connected to the sound board’s pin 9 and 10 inputs respectively, and you have a common ground between the two, which all seems correct.
Please note that the Audio FX board should play the corresponding track when the input is driven low (the quote above from your previous post makes it sound like you were expecting it to play when you drive the line high). So, if you have everything connected correctly, it should be easy to test:
With your script not running, double check that Maestro channels 6 and 7 are configured as outputs in the “Channel Settings” tab.
Enable Maestro channels 6 and 7 and make sure to set the position for both of them to above 1500µs (to drive them high) using the sliders.
Drag the channel 6 slider under 1500µs and see if the associated track plays.
Return the channel 6 slider above 1500µs to drive it high again.
Repeat steps 3 and 4 for channel 7.
If that does not work, you should double check that directly connecting the associated Audio FX inputs to ground plays the tracks as expected (which verifies that the Aduio FX board is working and that your audio files are named correctly).
I disconnected everything except the power pins and the problematic sound files.
The ground wire on the soundboard (wire furthest top left) splits into the ground for maestro channel 6 and 7 (black and white wires). The brown wire on the soundboard’s channel 10 connects to channel 6’s input and the red wire on the soundboard’s channel 9 connects to channel 7 on the maestro.
I have removed the script for now until I solve this issue, I’ve changed the channel mode to output for channel 6 and 7, applied settings (it shows up as an output on the status page) and ticked the checkboxes on the channels to enable them. Dragging the slider all the way from 2000 to 992 yields no results from the soundboard, yet if I connect channel 6 and 7 inputs to the maestro’s ground channel, I get the correct sound playing.
The soundboard is confirmed working since I can connect the inputs to the maestros ground channel and get the correct sound playing. For now, I’ve also removed the script completely to problem solve this issue and I’ve changed the modes of channel 6 and 7 to output in channel settings, along with ticking the checkbox. But I still can’t get any sound to play once I drag the slider below 1500.
Thank you for the additional information. The ground pins on the Maestro are all connected internally, so you do not need to split the connection to use the GND pins on each Maestro channel. It might be possible that a faulty ground connection could cause a problem like you’re describing, so you might try replacing that split wire with a single ground-to-ground connection.
If that doesn’t change anything, could you try removing the connection to your sound board’s input pins and measuring the voltage at each of the Maestro’s output pins with the Maestro sliders set to 2000 and then again with the sliders set to 1000? After that, you can reconnect the pins to the sound board and measure the voltage at the sound board’s input pins with Maestro sliders set to 2000 and then again with them set to 1000.
By the way, what is the “5V (out)” pin on the Maestro connecting to?
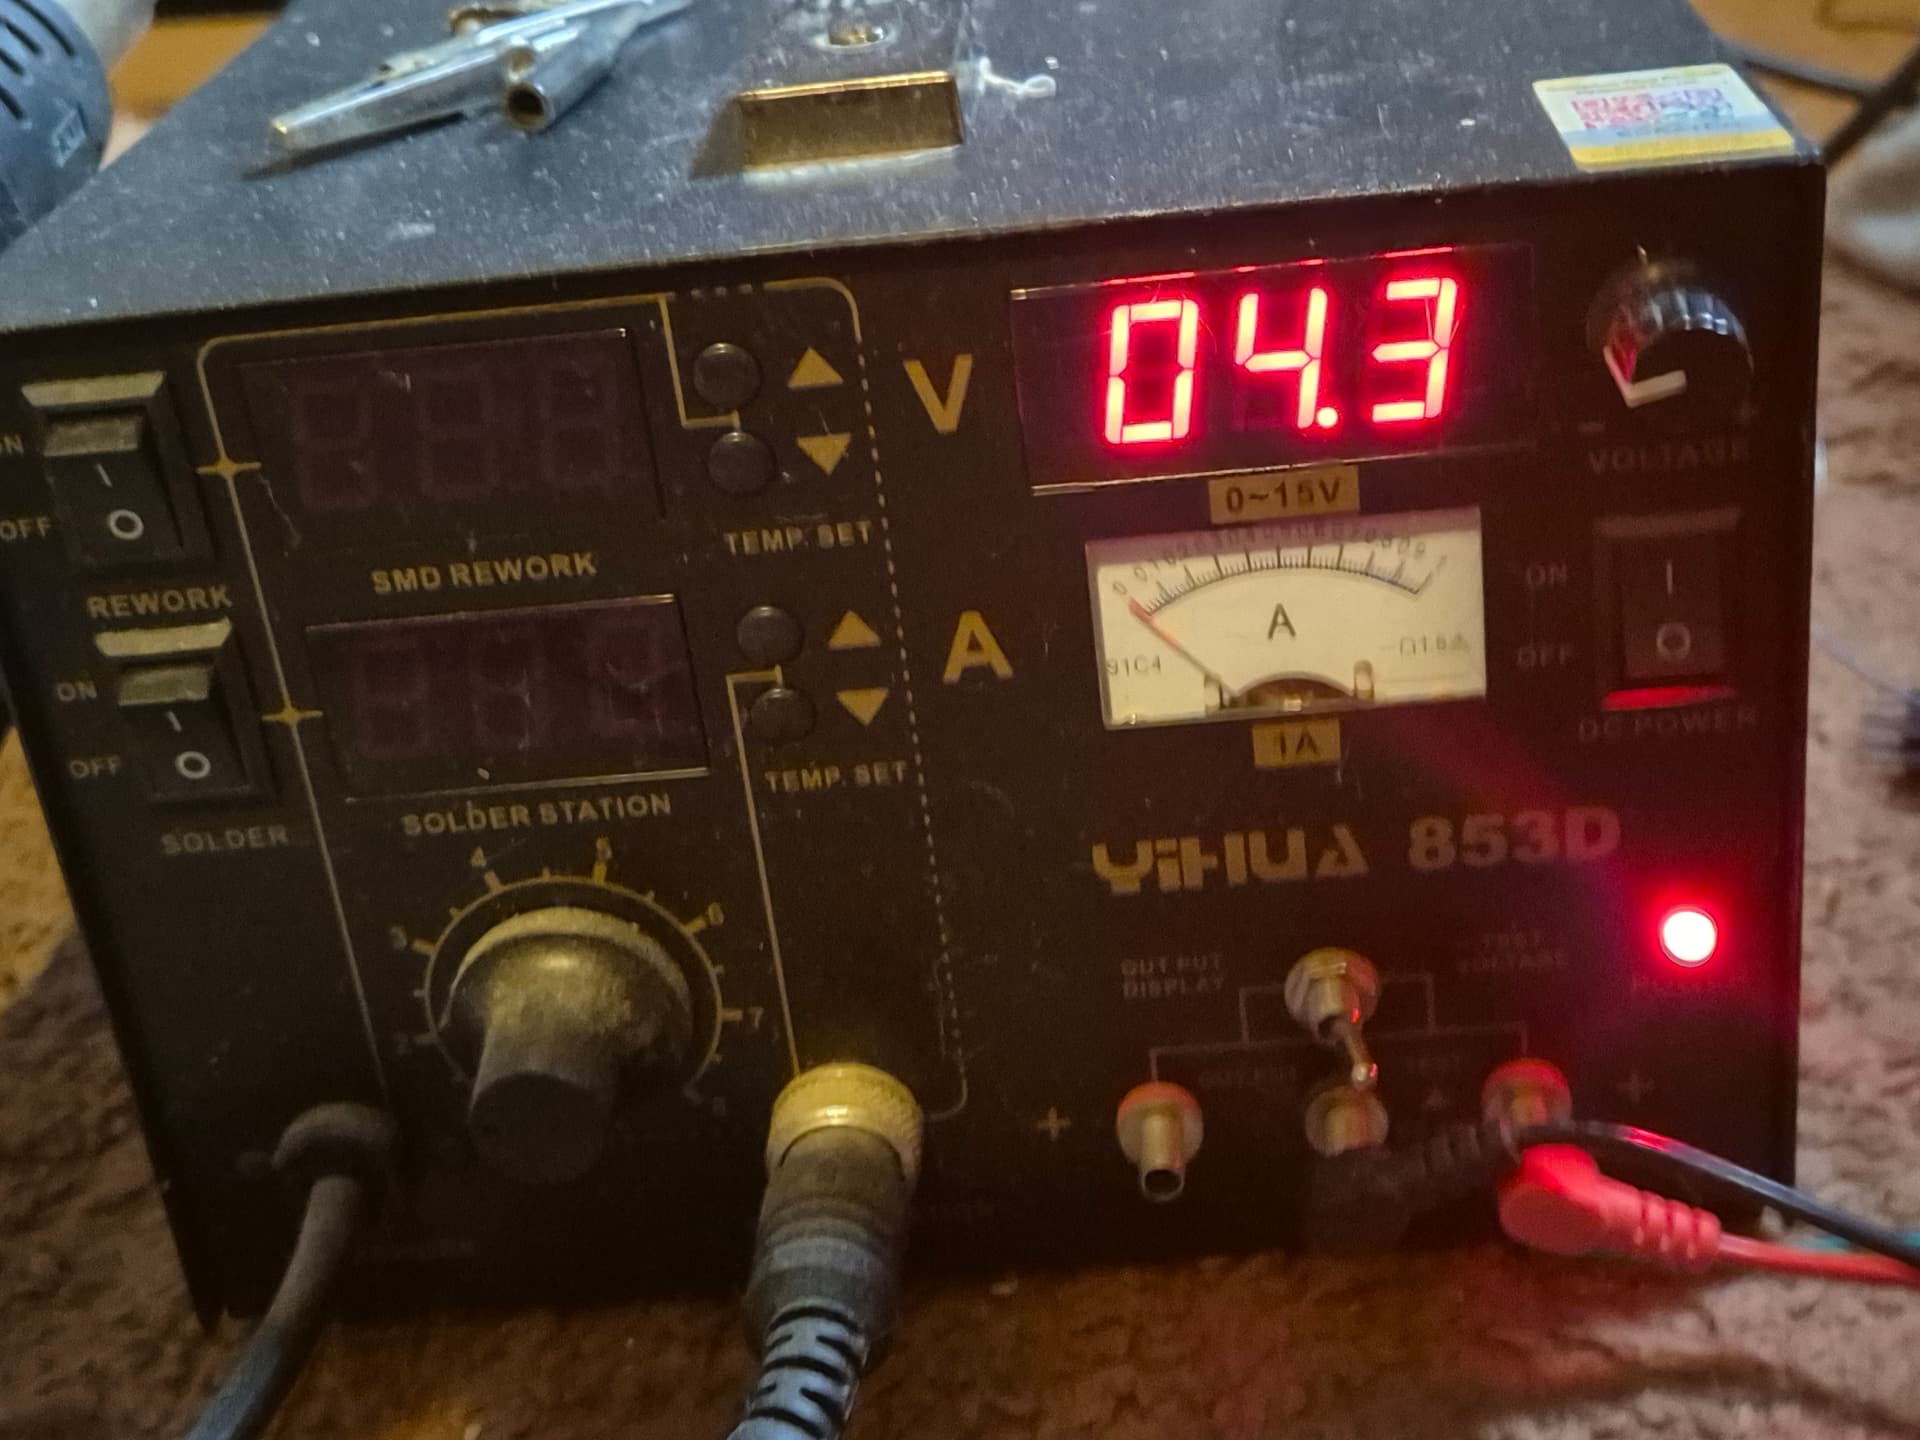
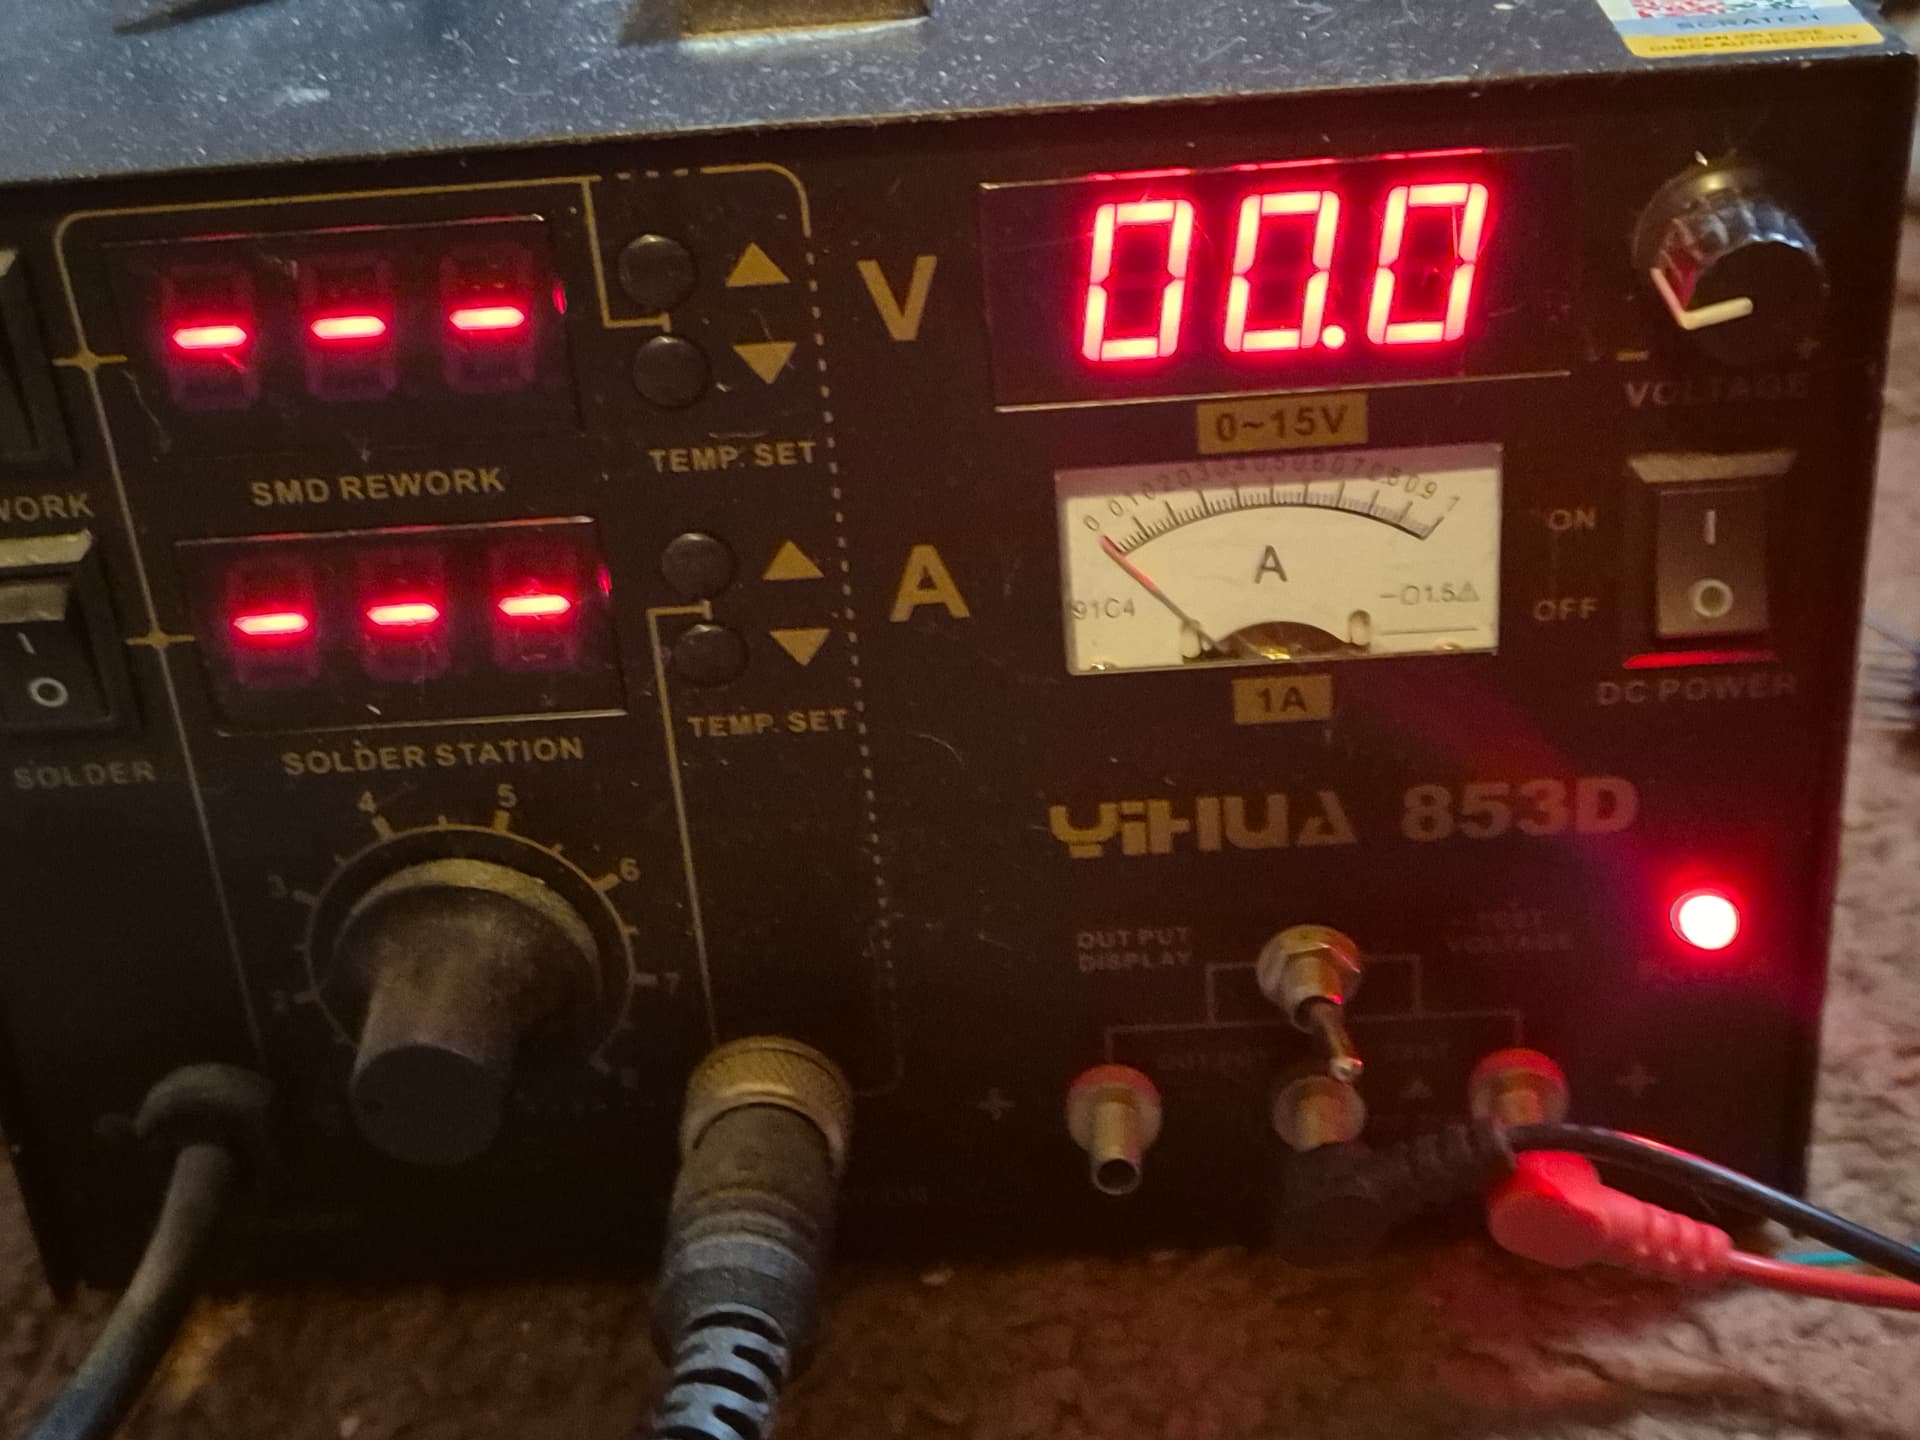
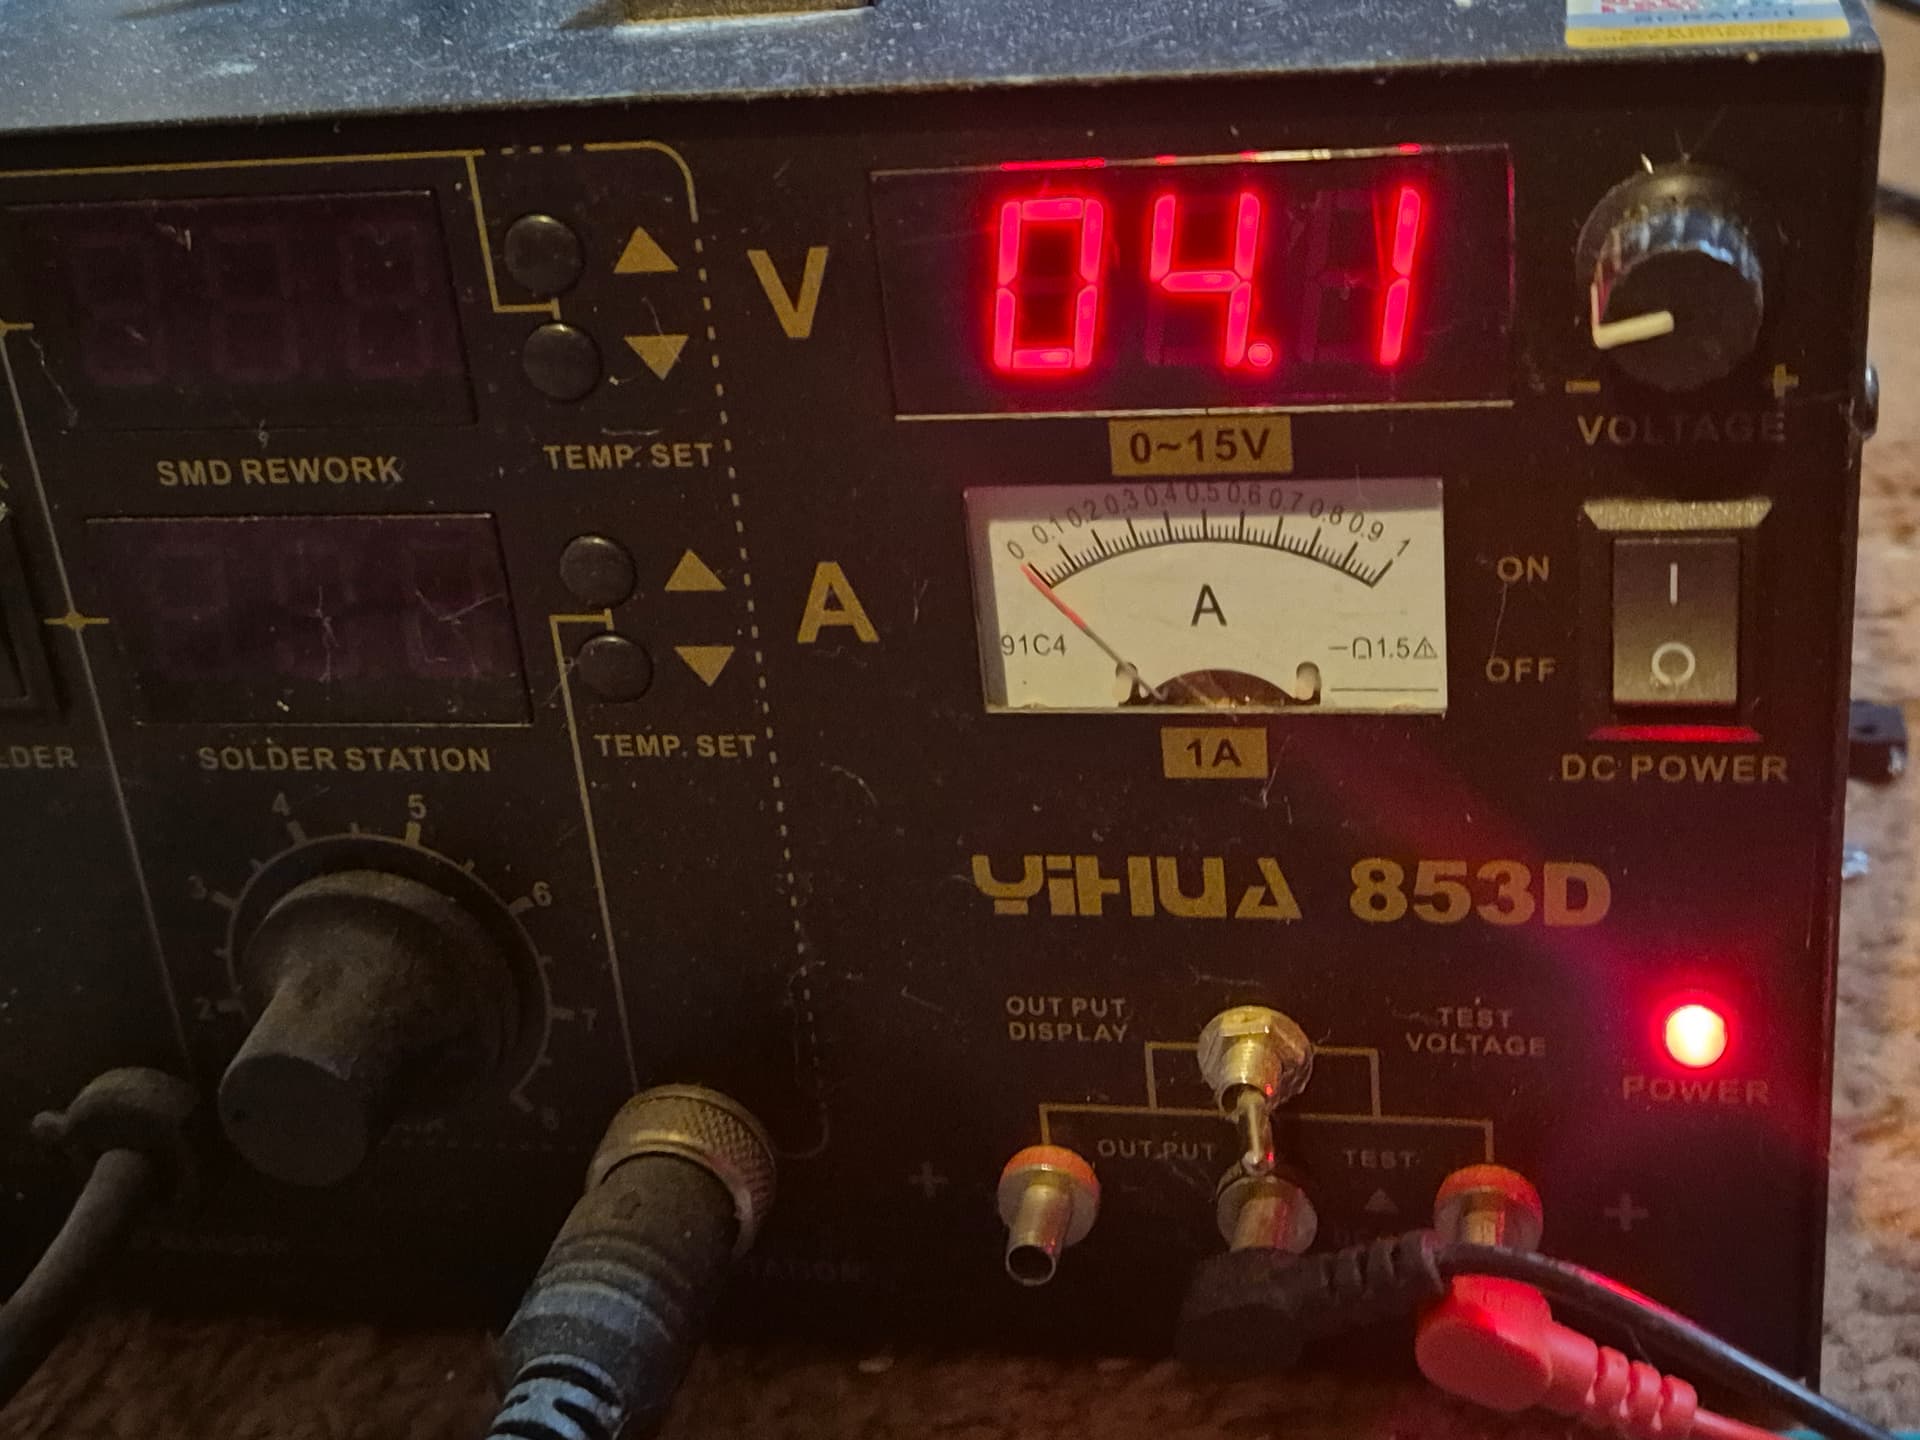
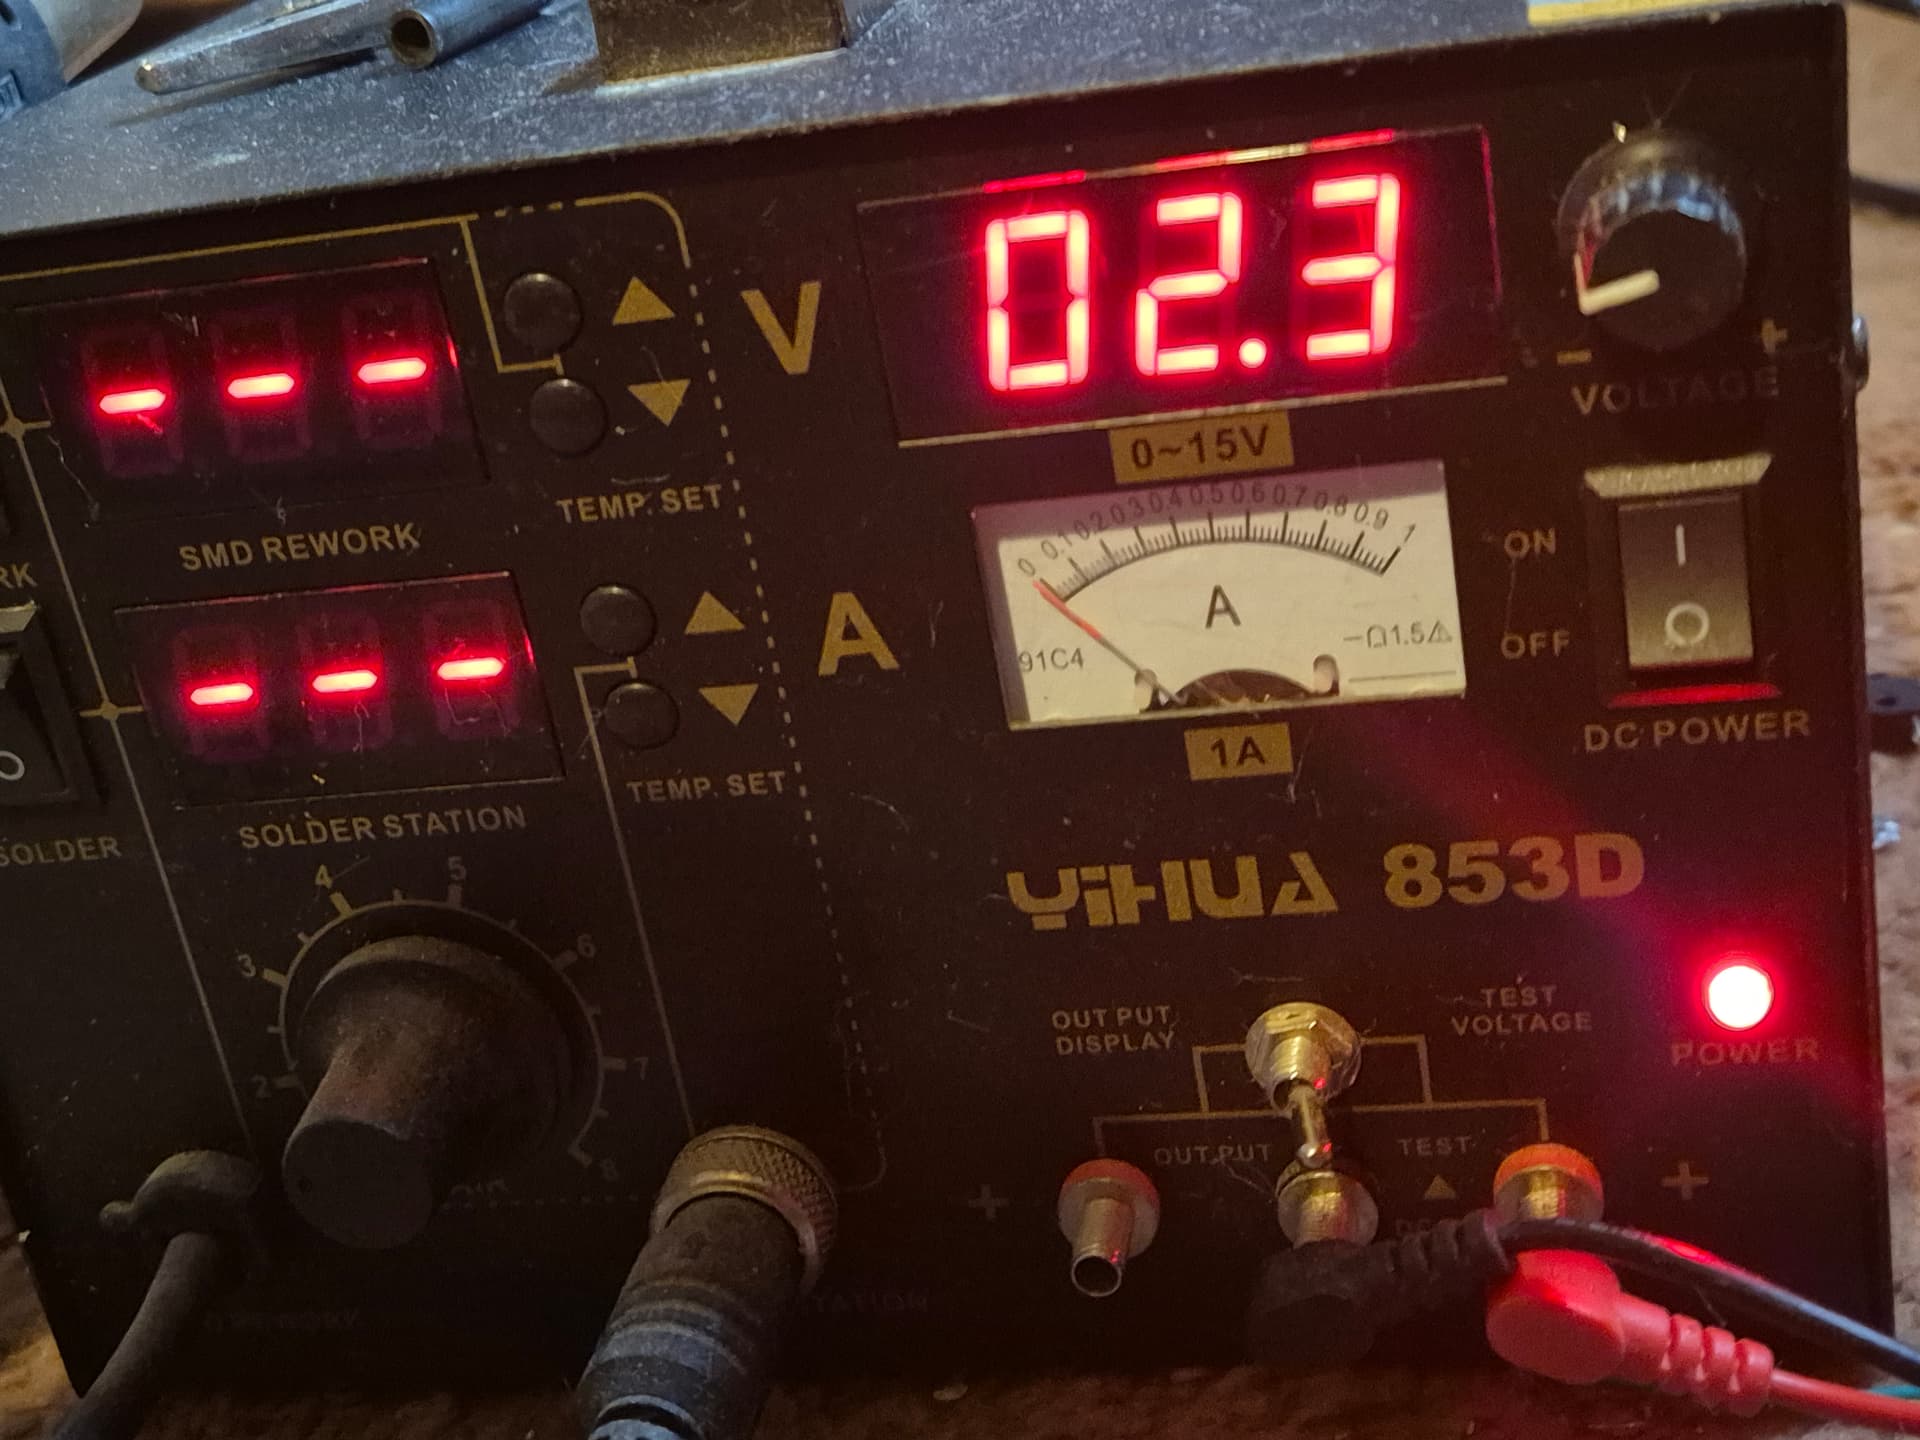
I swapped out the ground wires to a single wire with no change. I measured the voltage across the pins. Disconnected from the soundboard, I’m getting 4.3V at 2000 and 0V at 1000 at both Maestro’s output pins. Connected to the soundboard, I’m getting 4.1V at 2000 and 2.3V at 1000.
The 5V pin is connected to all the buttons for the servos (which are currently unplugged from the maestro’s inputs), wired with a resistor as in the attaching buttons section of the user guide.
How are you powering the Maestro (e.g. is it plugged directly into a computer or going through some hubs)? Do you have any power connected to the Maestro’s VIN pin during your tests? Also, how are you measuring the voltages? Could you post some pictures showing the measurements? To check the grounding, could you measure the voltage on a Maestro GND pin and also a sound board ground pin?
The Maestro is plugged directly into the PC through the mini USB port to run the Control Center, along with a 5V power bank that powers both the Maestro and the soundboard. The power is connected to the Maestro via the servo power pins at the bottom right of the board. I’ve got a solder station that has the ability to test voltage.
Disconnected from the soundboard on the maestro’s output pins at 2000:
Thank you for the additional information. Unfortunately, it is still not clear to me what is causing the problem. However, I noticed this FAQ in Adafruit’s documentation that mentions pins 9 and 10 take more current than the others to trigger for some reason. It is possible that this might be causing the issue. Have you tried triggering any of the other input pins on the soundboard from the Maestro other than pins 9 and 10?
If you have similar problems with other pins, could you try rechecking those voltages with a more modern multimeter as well as the voltage at the 5V pin on the Maestro?
That was it! I moved the files around to work on the soundboard’s 1 and 2 pins and now I can trigger the audio by going below 1500 on the control center. I’ve put in the script and it’s working as expected.
One issue, which isn’t a crazy dealbreaker but a little annoying, is that upon powering the unit, the sounds play on an infinite loop as though they are constantly connected to ground. This resolves itself when pressing the corresponding buttons and then they work as expected, only triggering when there’s a button press. I don’t know if it’s something the Maestro can fix though and only annoying because the sound is an ear piercing scream on loop.
I’m going to attach the jaw servo to the jaw and start playing around with acceleration and speed to get more natural movements.
Is it possible to cycle through different movements in one sequence on each button press? Currently I have two buttons; one for hissing/growling and one for screaming, but there are a number of different hiss and scream sound files on the soundboard that cycle upon each button press. Is it possible to do the same for the servo on the Maestro?
For example, a short grunt might have the jaw open and close quickly, whereas a hiss might last longer or have a chittering jaw movement. In that way I could kind of lip sync the sounds to the jaw servo movements.
You can change the behavior of Maestro channels on power up in the “Channel Settings” tab of the Maestro Control Center. For example, you can change the “On startup or error” option to “Go to” and set the target to something greater than 1500 so they default to a high signal when first powered. Alternatively, you could initialize them in your script (e.g. putting 8000 6 servo and 8000 7 servo at the top of your script before begin).
It is possible to have your sequence change slightly on each cycle (i.e. each button press), but doing so can increase the complexity of your script quickly. For example, one option is to use some sort of state variable for each button that keeps track of the number of times the button is pressed. Then, you can have your sequence check that to decide what to do. To do this with the Maestro scripting language, you can use the stack to hold your state variable(s). A simplified example script showing how to do this can be found in this thread. Another way to implement a state variable is to use a free Maestro channel as a dummy servo channel, in which case you could use that servo channel’s target position to store your state.