Hi,
I am trying to make a line following robot and I am using the Pololu QTR-8A, 2 DC geared motor (1:48), and the L293D motor driver. I am using six of the eight sensors from the QTR (sensors 2,3,4,5,6,7), which are connected to an Arduino UNO to analog pins A0-A5.
This is my code:
#include <AFMotor.h> // Motor Shield Library
#include <QTRSensors.h> // QTR Sensor Library

// set to 1kHz PWM frequency
AF_DCMotor motor1(1, MOTOR12_1KHZ); //create motor #1 using M1 output on Motor Drive Shield
AF_DCMotor motor2(2, MOTOR12_1KHZ); //create motor #2 using M2 output on Motor Drive Shield

// note that KP < KD
#define KP 0.02
#define KD 2
#define M1_minimum_speed 150
#define M2_minimum_speed 150
#define M1_maximum_speed 250
#define M2_maximum_speed 250
// speed can be between  0 and 255 - 0 is LOW and 255 is HIGH.

QTRSensors qtr;

const uint8_t sensorCount = 6;
uint16_t sensorValues[sensorCount];

void setup() {
  qtr.setTypeAnalog();
  qtr.setSensorPins((const uint8_t[]){A0, A1, A2, A3, A4, A5}, sensorCount);
  qtr.setEmitterPin(2);

  pinMode(LED_BUILTIN, OUTPUT);
  digitalWrite(LED_BUILTIN, HIGH);
  set_motors(0,0);

  int i;

  for (int i = 0; i < 100; i++) {
    if (i < 25 || i >= 75) {
      turn_right();
    }
    else {
      turn_left();
    }
    qtr.calibrate();
    delay(20);
  }

  stop();
  digitalWrite(LED_BUILTIN, LOW); // end calibration
  delay(1000);
}

int lastError = 0;

void loop() {
  // read calibrated sensor values and obtain a measure of the line position
  // from 0 to 7000
  uint16_t position = qtr.readLineBlack(sensorValues);

  // for PID
  int error = position - 3500;
  int motorSpeed = KP * error + KD * (error - lastError);
  lastError = error;

  int leftMotorSpeed = M1_minimum_speed + motorSpeed;
  int rightMotorSpeed = M2_minimum_speed - motorSpeed;

  // set motor speeds using the two motor speed variables above
  set_motors(leftMotorSpeed, rightMotorSpeed);
}

void set_motors(int motor1speed, int motor2speed) {
  if (motor1speed > M1_maximum_speed) motor1speed = M1_maximum_speed;
  if (motor2speed > M2_maximum_speed) motor2speed = M2_maximum_speed;
  if (motor1speed < 0) motor1speed = 0;
  if (motor2speed < 0) motor2speed = 0;

  motor1.run(FORWARD);
  motor2.run(FORWARD);
  motor1.setSpeed(motor1speed);
  motor2.setSpeed(motor2speed);
}

void stop() {
  motor1.run(RELEASE);
  motor2.run(RELEASE);
}

void turn_left() {
  motor1.run(BACKWARD);
  motor2.run(FORWARD);
}

void turn_right() {
  motor1.run(FORWARD);
  motor2.run(BACKWARD);
}
The robot just moves in circles and the motor doesn’t change direction even if it sees black or white.
Here are the readings I get when I try to test my robot.
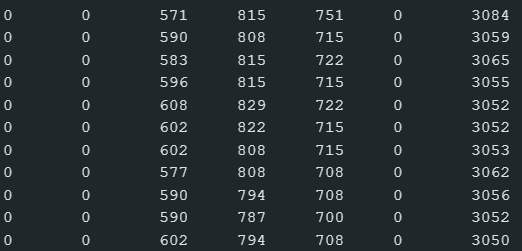
This is my code for the readings:
#include <QTRSensors.h> // QTR Sensor Library

QTRSensors qtr;

const uint8_t sensorCount = 6;
uint16_t sensorValues[sensorCount];

void setup() {
  // configure the sensor
  qtr.setTypeAnalog();
  qtr.setSensorPins((const uint8_t[]){A0, A1, A2, A3, A4, A5}, sensorCount);
  qtr.setEmitterPin(2);

  delay (500);
  pinMode(LED_BUILTIN, OUTPUT);
  digitalWrite(LED_BUILTIN, HIGH); // for calibration

  // 0.1 ms per sensor, 4 samples per second read (default)
  // call calibrate() 300 times to make calibrations for about 10 seconds
  for (uint16_t i = 0; i < 400; i++) {
    qtr.calibrate();
  }

  digitalWrite(LED_BUILTIN, LOW);
  Serial.begin(9600); // print calibration values measured when the emitters were on

  for (uint8_t i = 0; i < sensorCount; i++) {
    Serial.print(qtr.calibrationOn.minimum[i]);
    Serial.print(' ');
  }

  Serial.println();

  for (uint8_t i = 0; i < sensorCount; i++) {
    Serial.print(qtr.calibrationOn.maximum[i]);
    Serial.print(' ');
  }

  Serial.println();
  Serial.println();
  delay(1000);
}

void loop() {
  // read calibrated sensor values and obtain a measure of the line position
  uint16_t position = qtr.readLineBlack(sensorValues);

  // alibrated sensor values will always range from 0 to 1000
  // 0 most reflective (brightest), 1000 least reflective (darkest)
  // print sensor values, followed by the line position
  for (uint8_t i = 0; i < sensorCount; i++) {
    Serial.print(sensorValues[i]);
    Serial.print('\t');
  }

  Serial.println(position);
  delay(250);
}
Hello.
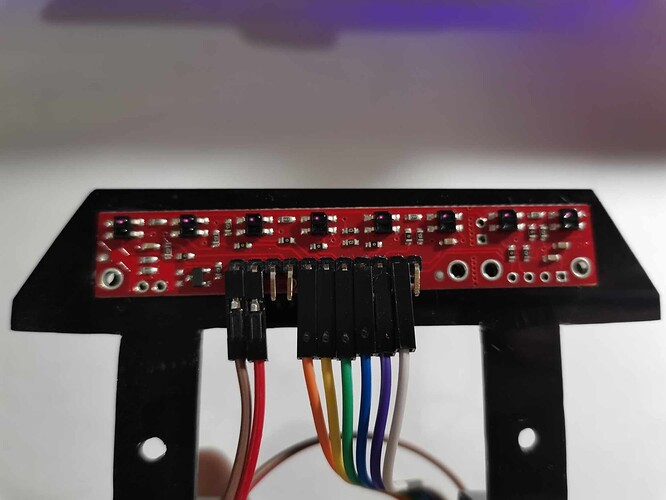
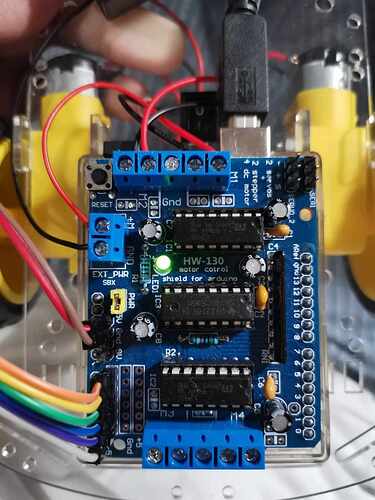
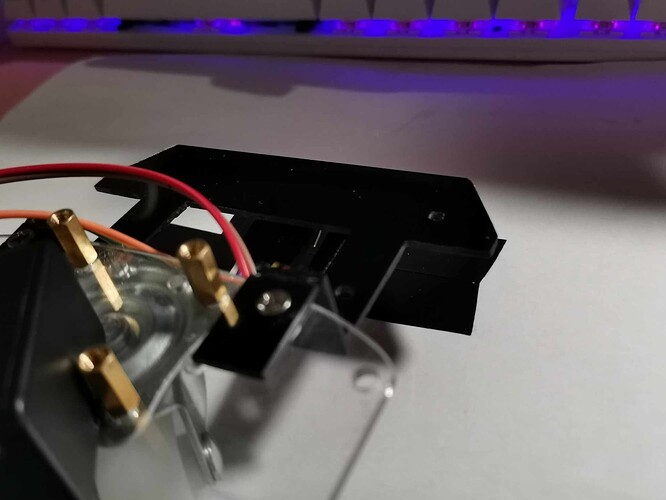
Based on the readings you posted it seems like the line should have been under sensors 4, 5, and 6; was that the case for that experiment? Could you post some pictures of your reflectance sensor array showing all of your connections? A video showing your calibration and testing procedure would be useful too. The forum does not allow users to post very large videos, but it does work well with videos linked from other sites (like YouTube or Vimeo).
Can you also try the QTRARawValuesExample.ino program from our QTR sensors Arduino library? That should be the easiest way to confirm that each individual sensor is behaving as expected
- Patrick
Here are the connections:
I’m actually confused about the readings I’m getting as well. I just assumed that values between 2000 and 3500 indicate that it’s the center detecting the black line.
Upon trying this code:
#include <QTRSensors.h>

// This example is designed for use with six analog QTR sensors. These
// reflectance sensors should be connected to analog pins A0 to A5. The
// sensors' emitter control pin (CTRL or LEDON) can optionally be connected to
// digital pin 2, or you can leave it disconnected and remove the call to
// setEmitterPin().
//
// The main loop of the example reads the raw sensor values (uncalibrated). You
// can test this by taping a piece of 3/4" black electrical tape to a piece of
// white paper and sliding the sensor across it. It prints the sensor values to
// the serial monitor as numbers from 0 (maximum reflectance) to 1023 (minimum
// reflectance).

QTRSensors qtr;

const uint8_t SensorCount = 6;
uint16_t sensorValues[SensorCount];

void setup()
{
  // configure the sensors
  qtr.setTypeAnalog();
  qtr.setSensorPins((const uint8_t[]){A0, A1, A2, A3, A4, A5}, SensorCount);

  Serial.begin(9600);
}


void loop()
{
  // read raw sensor values
  qtr.read(sensorValues);

  // print the sensor values as numbers from 0 to 1023, where 0 means maximum
  // reflectance(brightest) and 1023 means minimum reflectance(darkest)
  for (uint8_t i = 0; i < SensorCount; i++)
  {
    Serial.print(sensorValues[i]);
    Serial.print('\t');
  }
  Serial.println();

  delay(250);
}
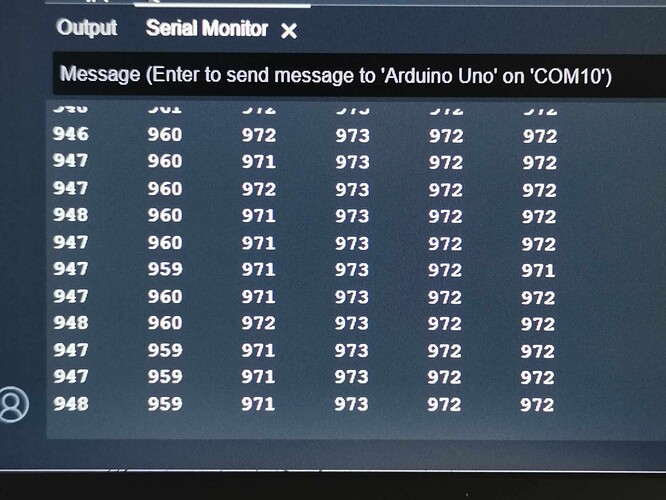
The readings I get are:
As you can see, I tried to use the whole array to detect the black line, but the readings I got seemed to be the opposite (the values were for maximum reflectance when they should have been for the minimum).
Hello.
In both of the programs you posted low values indicate maximum reflectance (white) and high values indicate minimum reflectance (dark). So, if I am understanding your setup correctly (it looks like you have a black material covering all the sensors closely), then all of the sensors reading high as indicated by the Serial Monitor output make sense.
Can you confirm that all of the sensor readings go low when expected? An easy way to check that is run the QTRARawValuesExample.ino program (the second program you posted), but uncover the sensors and hold the array facing upwards. I like to test these sensors by holding them in that orientation, and then covering each sensor one at a time so I can see that each sensor reading operates independently. How much does each value change if you do that?
- Patrick
Upon testing, here are the readings I obtained:
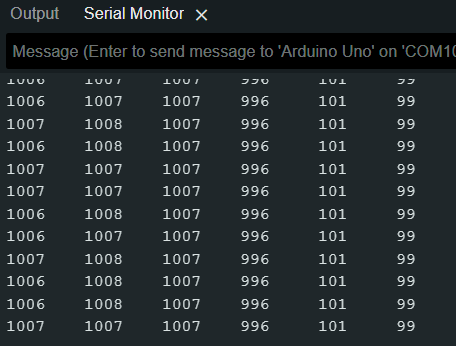
Starting from 1000, when I cover each sensor, the values I obtain range from 90 to 100+. Based on this, it appears that each sensor is functioning properly.
Also, can you help me with the first code I uploaded, where the robot just moves in circles and the motor doesn’t change direction even if it detects black or white? Or advise me on the course of action I should take.
#include <AFMotor.h> // Motor Shield Library
#include <QTRSensors.h> // QTR Sensor Library

// set to 1kHz PWM frequency
AF_DCMotor motor1(1, MOTOR12_1KHZ); //create motor #1 using M1 output on Motor Drive Shield
AF_DCMotor motor2(2, MOTOR12_1KHZ); //create motor #2 using M2 output on Motor Drive Shield

// note that KP < KD
#define KP 0.02
#define KD 2
#define M1_minimum_speed 150
#define M2_minimum_speed 150
#define M1_maximum_speed 250
#define M2_maximum_speed 250
// speed can be between  0 and 255 - 0 is LOW and 255 is HIGH.

QTRSensors qtr;

const uint8_t sensorCount = 6;
uint16_t sensorValues[sensorCount];

void setup() {
  qtr.setTypeAnalog();
  qtr.setSensorPins((const uint8_t[]){A0, A1, A2, A3, A4, A5}, sensorCount);
  qtr.setEmitterPin(2);

  pinMode(LED_BUILTIN, OUTPUT);
  digitalWrite(LED_BUILTIN, HIGH);
  set_motors(0,0);

  int i;

  for (int i = 0; i < 100; i++) {
    if (i < 25 || i >= 75) {
      turn_right();
    }
    else {
      turn_left();
    }
    qtr.calibrate();
    delay(20);
  }

  stop();
  digitalWrite(LED_BUILTIN, LOW); // end calibration
  delay(1000);
}

int lastError = 0;

void loop() {
  // read calibrated sensor values and obtain a measure of the line position
  // from 0 to 7000
  uint16_t position = qtr.readLineBlack(sensorValues);

  // for PID
  int error = position - 3500;
  int motorSpeed = KP * error + KD * (error - lastError);
  lastError = error;

  int leftMotorSpeed = M1_minimum_speed + motorSpeed;
  int rightMotorSpeed = M2_minimum_speed - motorSpeed;

  // set motor speeds using the two motor speed variables above
  set_motors(leftMotorSpeed, rightMotorSpeed);
}

void set_motors(int motor1speed, int motor2speed) {
  if (motor1speed > M1_maximum_speed) motor1speed = M1_maximum_speed;
  if (motor2speed > M2_maximum_speed) motor2speed = M2_maximum_speed;
  if (motor1speed < 0) motor1speed = 0;
  if (motor2speed < 0) motor2speed = 0;

  motor1.run(FORWARD);
  motor2.run(FORWARD);
  motor1.setSpeed(motor1speed);
  motor2.setSpeed(motor2speed);
}

void stop() {
  motor1.run(RELEASE);
  motor2.run(RELEASE);
}

void turn_left() {
  motor1.run(BACKWARD);
  motor2.run(FORWARD);
}

void turn_right() {
  motor1.run(FORWARD);
  motor2.run(BACKWARD);
}
I am glad to hear that your sensor array is working as expected!
Helping with user code is typically beyond the scope of our technical support, but I took a quick look at your code and can give you a few general suggestions for troubleshooting line following programs like this.
One error I noticed in your program is that you are expecting line position values from the readLineBlack() function to range from 0 to 7000, and 3500 to correspond to the middle of the sensor array. However, since you are only using 6 sensors, the range will actually be 0 to 5000, and 2500 will correspond to the middle of the array (or at least, the part of the array you are using).
If you continue having trouble after that fix, then the issue probably has to do with your PID tuning. A quick internet search (or even just searching our forum; I particularly like the discussion in this thread) will give you up a plethora of advice on this topic, but here is the procedure I would follow:
- Write and test a simple program to confirm that your motors are turning the correct directions and have similar speed performance.
- Simplify the control algorithm by setting KD to 0 so you can focus on KP first.
- Comment out the
set_motors() command in your main loop, and add some serial print lines to show what is going on. Some good values might include position, error , leftMotorSpeed, and rightMotorSpeed.
- Since
set_motors() is commented out, test this program by just manually moving your robot over the line, and see how the values respond. Use that feedback to adjust the KP value as seems needed.
- When you think you have it working well without motors, comment the
set_motors() line back in. Your goal with the KP term is to find a small value that causes your robot to steadily oscillate back and forth across the line while it goes around the course. I strongly recommend when you first start, reduce your minimum and maximum speed values significantly (e.g. 1/4 what they are now, or maybe even slower). It will be much easier to troubleshoot and tune a slow robot, than a fast one, and though you might need to retune when you increase the speed, you will have something you know works to fall back on.
- Once you think you have a good KP value, add in the KD value to try to smooth out the robot’s motion. It might be helpful to follow a similar procedure of commenting out the
set_motors() command, and printing values to see how the KD term affects them before adding the motors back in.
- Once you think you have good KP and KD values for running your robot at a slow speed, incrementally increase your minimum and maximum speed values, retuning KP and KD as needed.
- Patrick


