Hello. I have an R2D2 that I have installed 2 Maestro Minis (18 channel). One in the dome and one in the body. After getting the dome one working well, I installed the body one. Suddenly the dome one stopped working with commands from my xbox controller. I double and triple checked all of my wiring, making sure that I had common grounds, good signal wires and connected properly to the arduino mega. I could get the body maestro to work but the dome no matter what I did would not work. I ended up swapping the two maestros around and now the dome works and the body doesn’t. Both are being powered with 6 volts and the jumpers are in place. The dome maestro is controlled through software serial and the body is controlled through hardware serial. It appears as if my RX pin is not receiving a signal on the “bad” maestro regardless of being hooked up to the software or hardware side of the arduino. Is there anything else I can try to get it working properly or is my maestro defective? Thanks in advance for any help you can provide.
Hello.
Does the Maestro in question still work if you just try to control it over USB with the Maestro Control Center software?
Can you post a copy of the problematic board’s settings file? You can save a copy of your settings file from the “File” drop-down menu of the Maestro Control Center software while the controller is connected.
- Patrick
Yes, I can use the maestro when connected via USB. I have attached the settings file for you.
maestro_settings.txt (4.2 KB)
Thanks; your settings look okay. It sounds like your goal is to get both of your Maestros to take commands from the same Arduino, and although the now problematic unit was working by itself for a while; you never got them both working together. Is that correct? Were you trying to connect your Maestros to the same serial bus, and if so, did you make sure to configure the Maestro with different device numbers (set under the “Serial Settings” tab)?
We established that the problematic unit still works via USB; what about if you try to command it from your Arduino with the second Maestro (and any other extra electronics) removed from the system? If you could try one of the example programs from our Maestro library for Arduino with minimal modification, that would be a good reference point for us to work from.
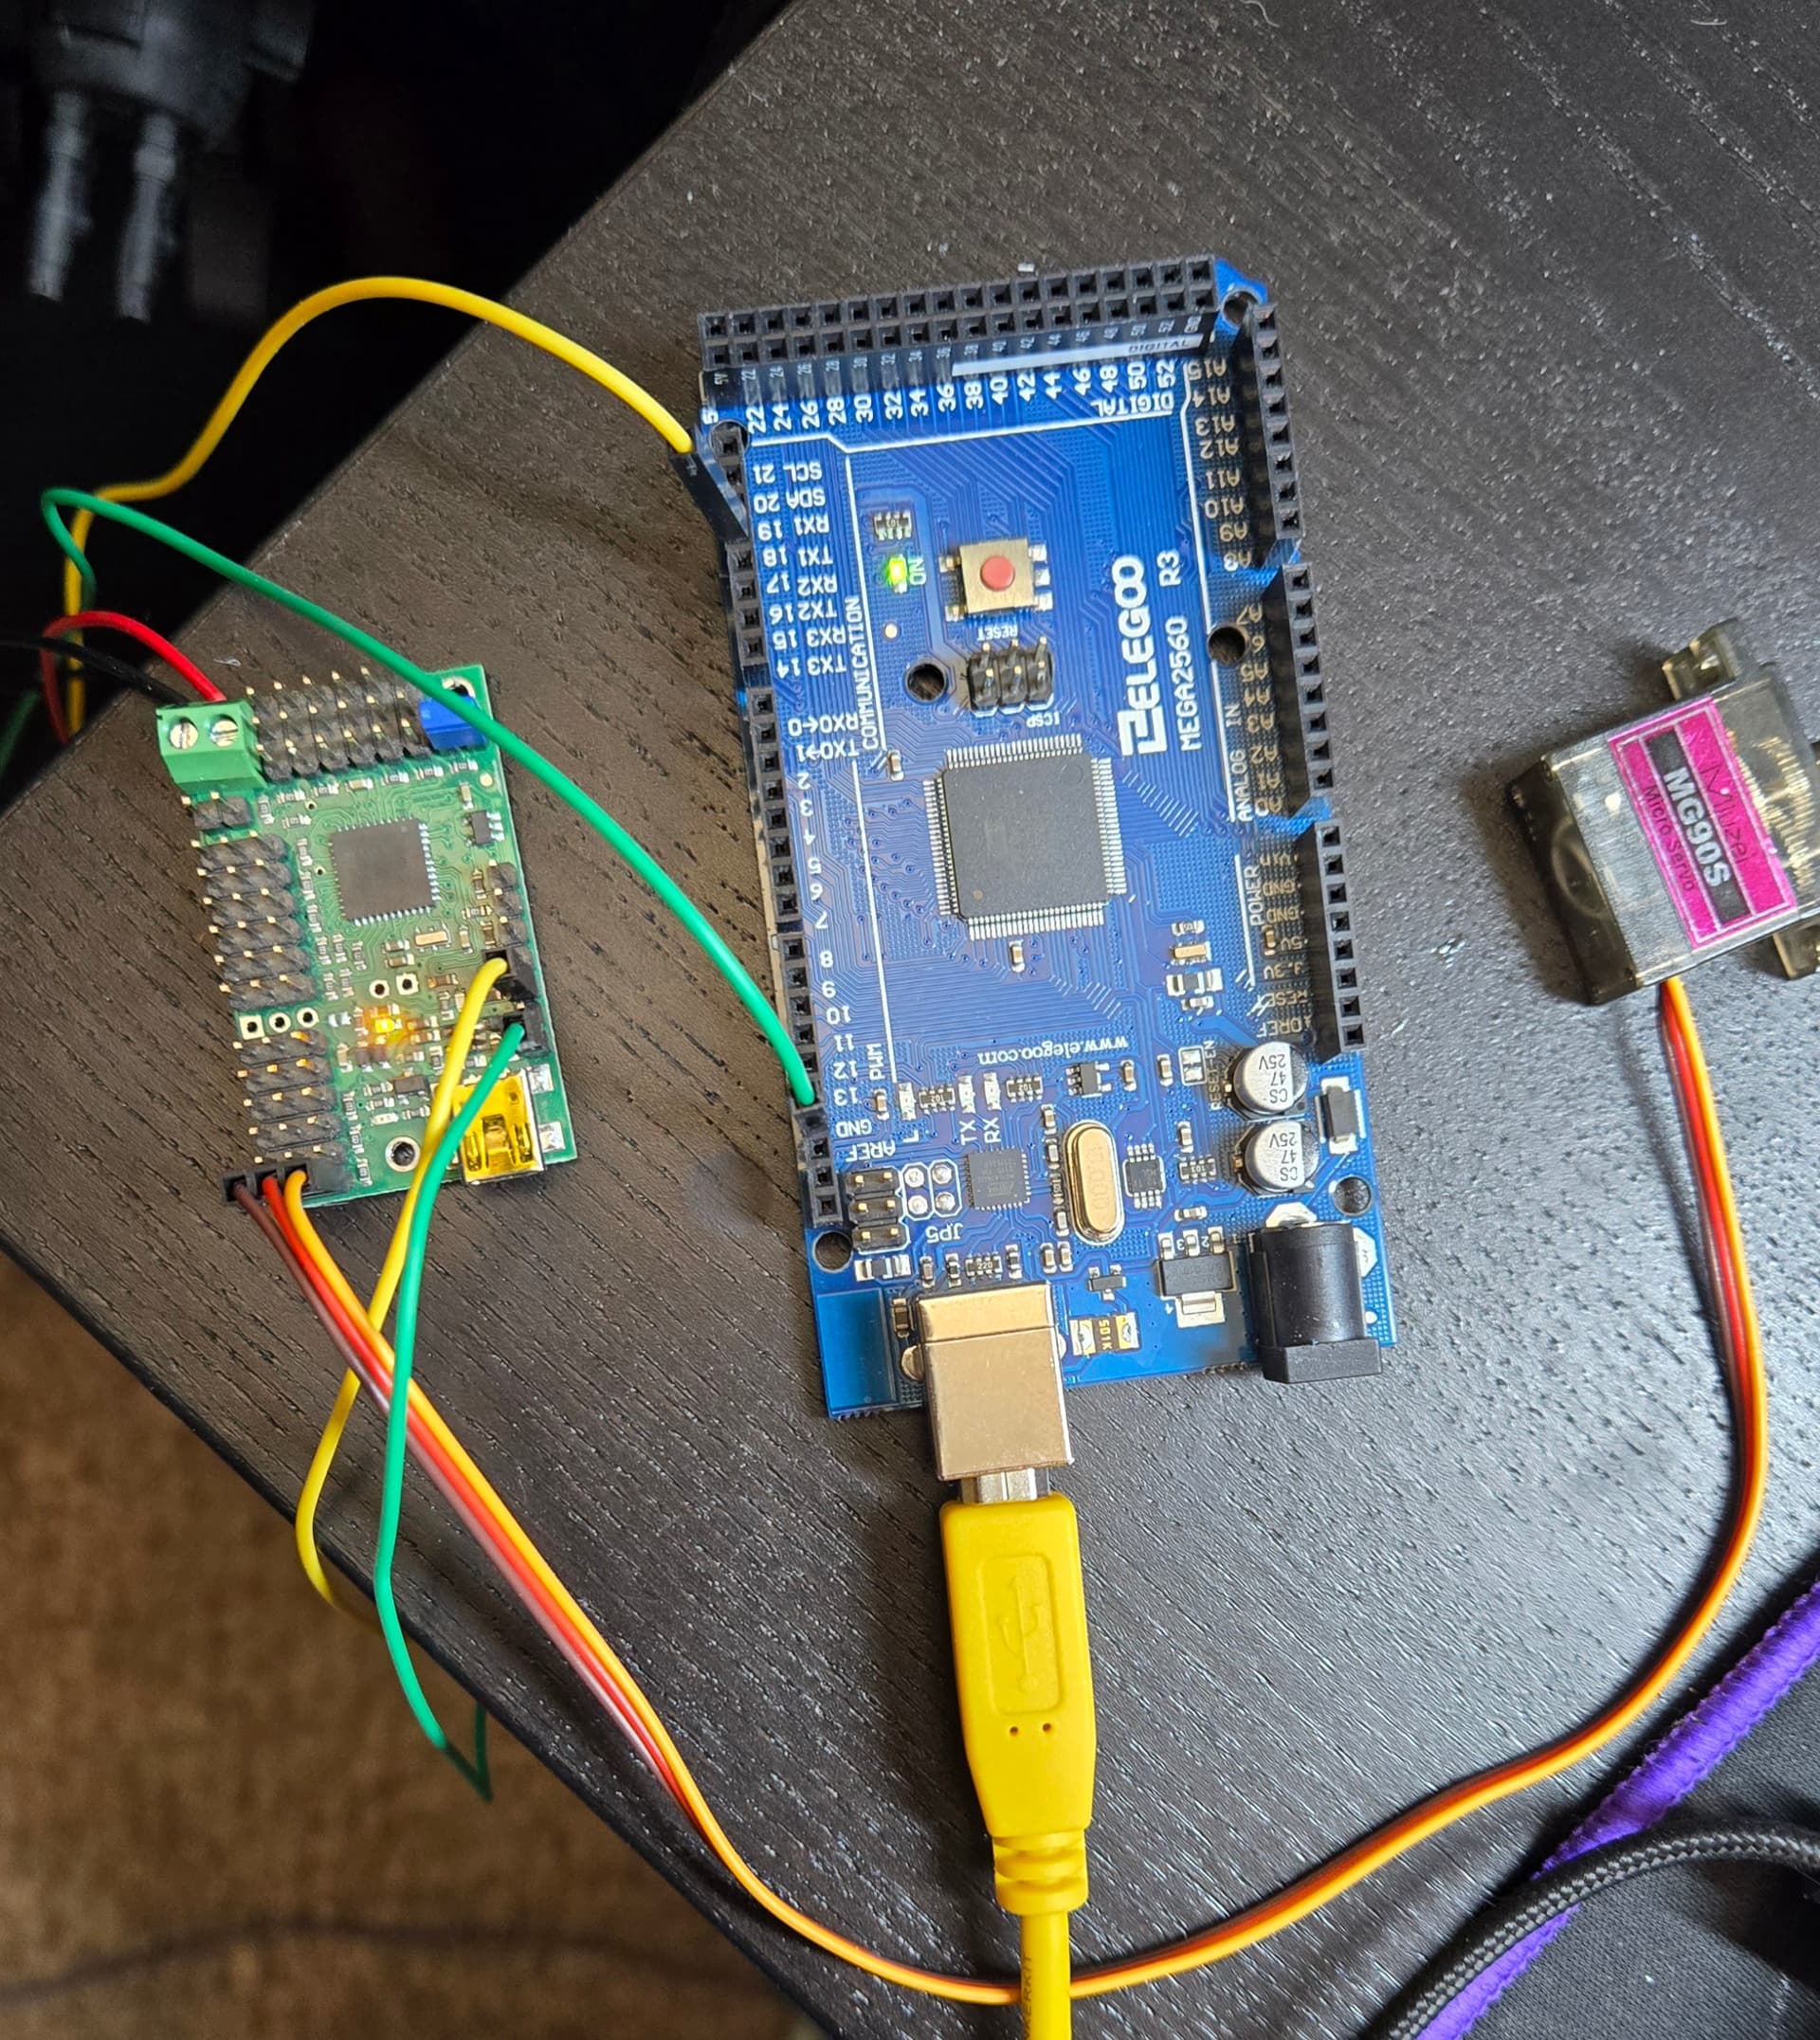
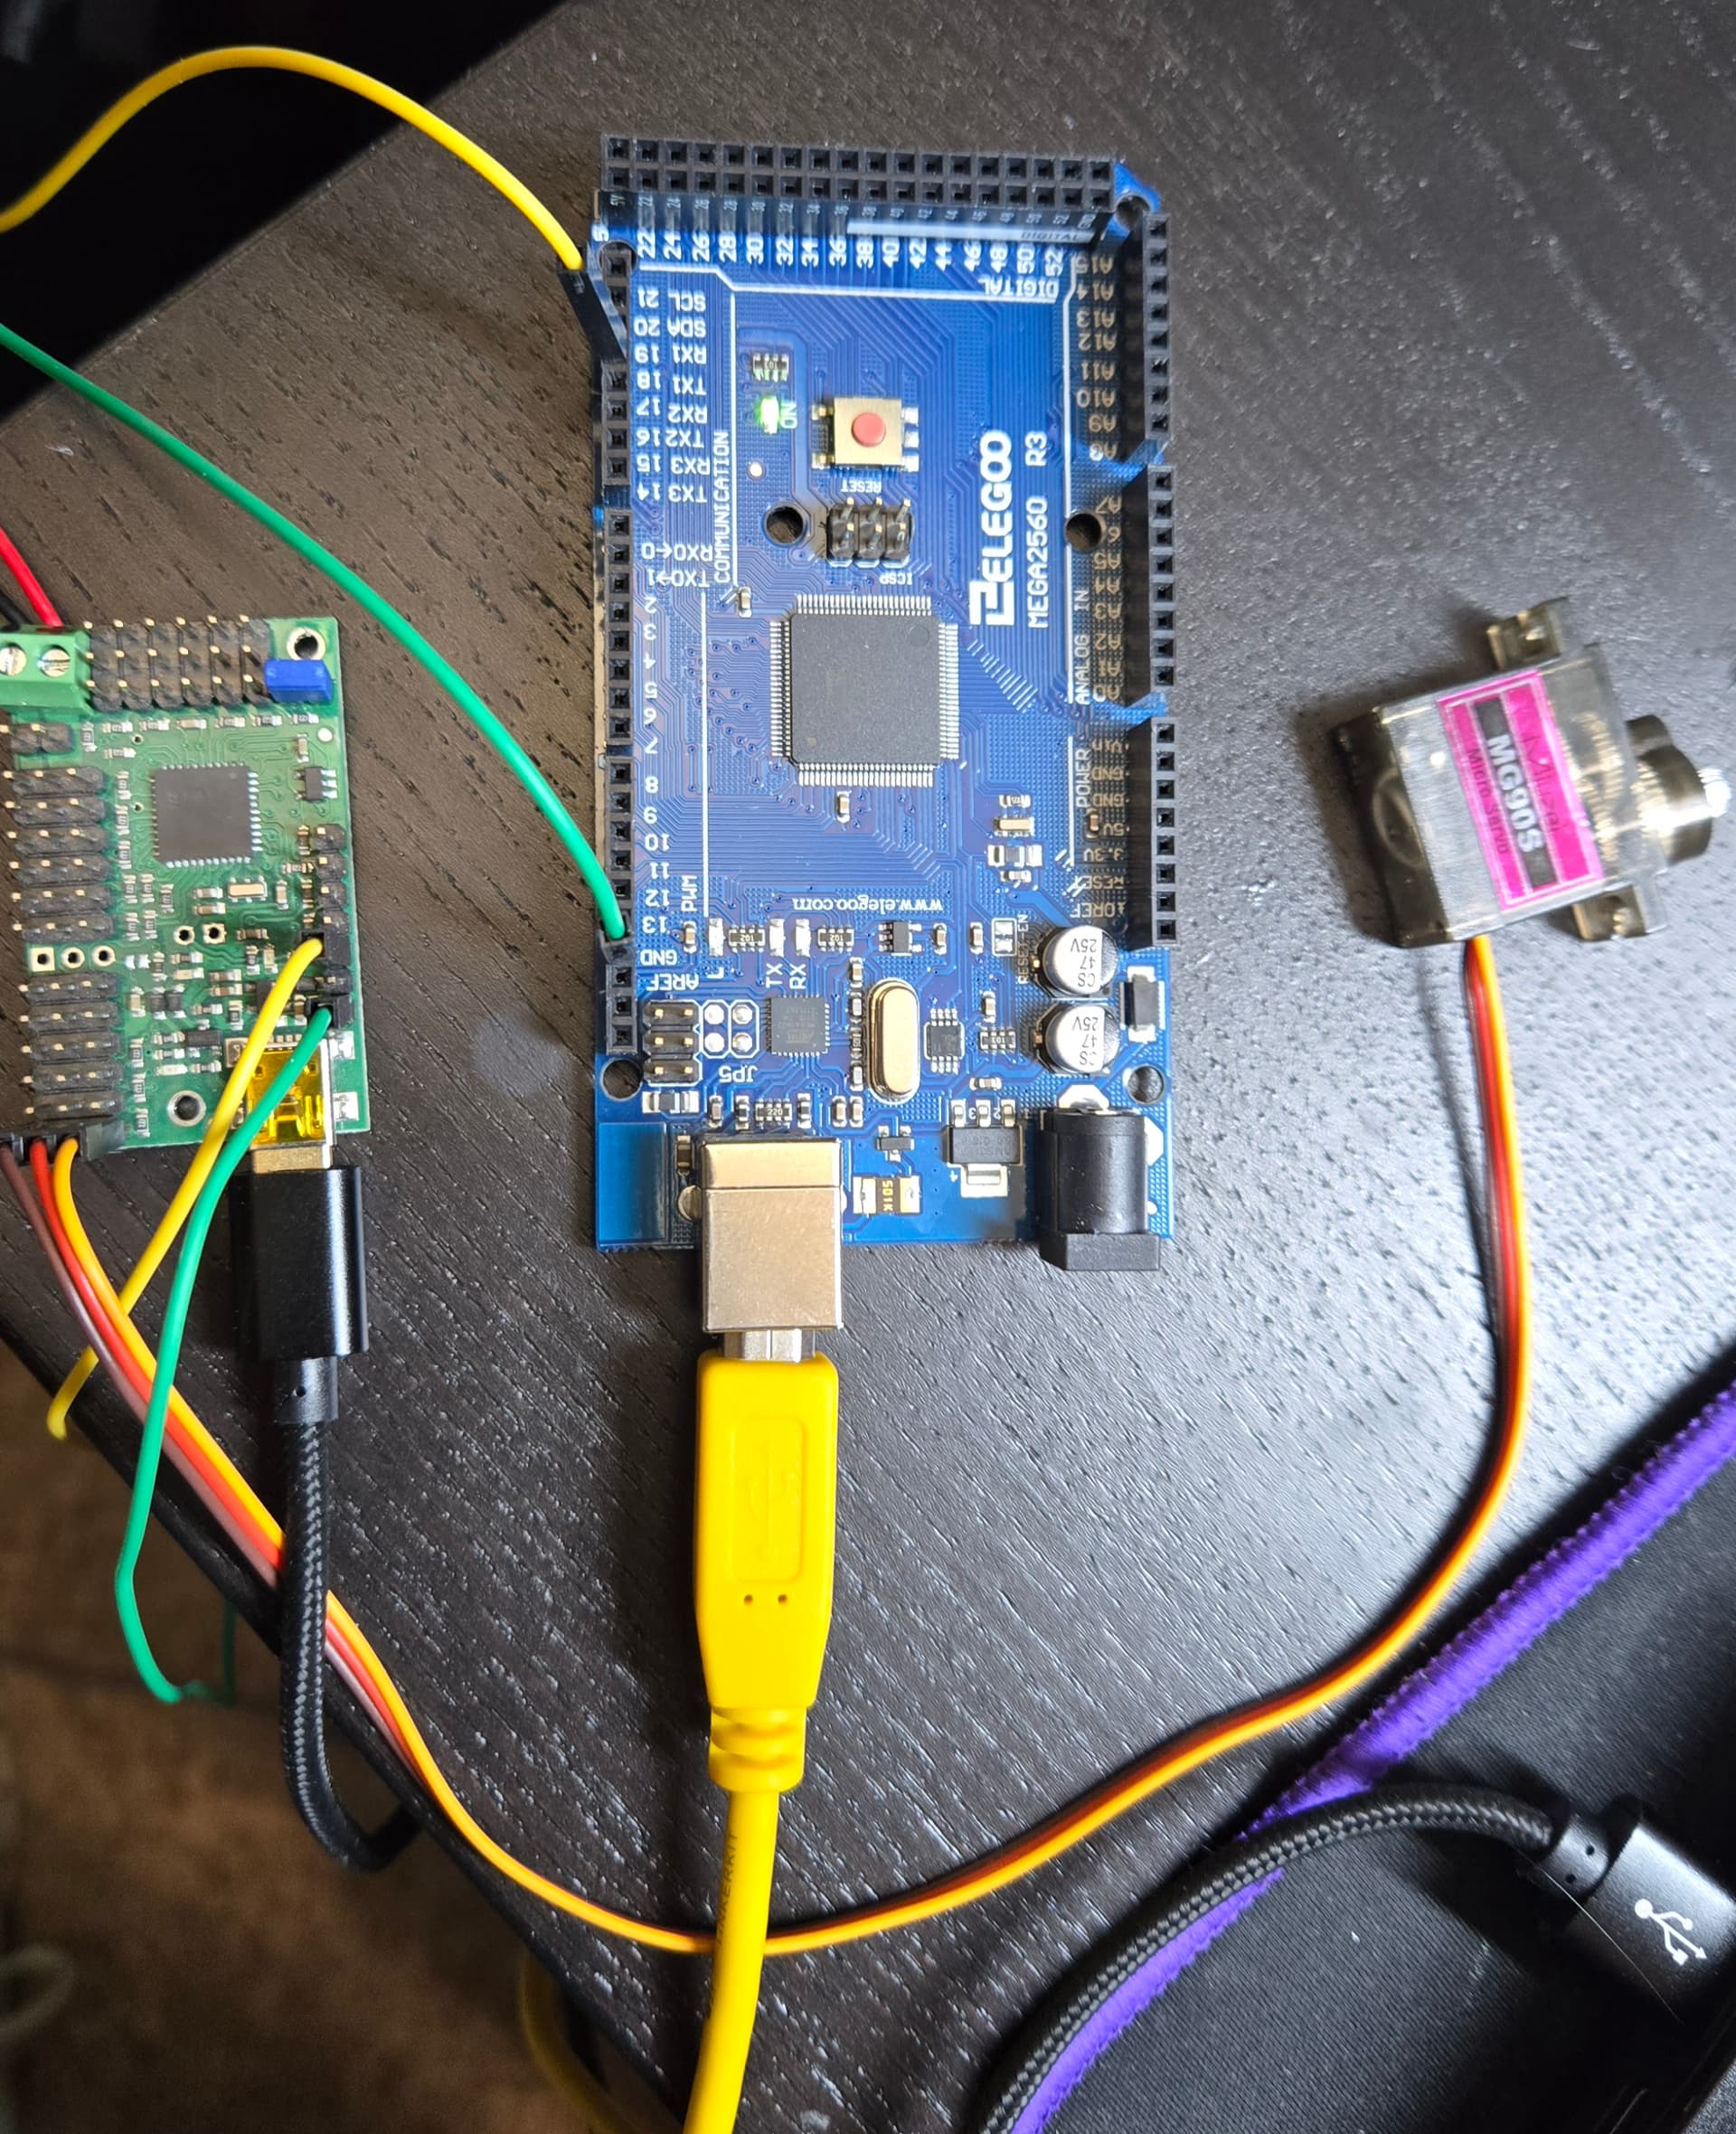
Also, please post some pictures that show all of your connections.
- Patrick
Hi, thanks for the reply. No I was not trying to connect the Maestros to the same bus. I am connecting 1 Maestro to Hardware Serial 3 and the other Maestro to Software serial 13. I have enabled both in my arduino code and what I have done to trouble shoot is the following. Lets call them Maestro 1 and Maestro 2. I hooked Maestro 1 to Hardware Serial 3 and Maestro 2 to Software Serial 13. Maestro 2 works, Maestro 1 does not. Then I swapped the Maestros so Maestro 2 is now on Hardware Serial 3 and Maestro 1 is on Software Serial 13. Now Maestro 2 still works and Maestro 1 still doesn’t work leading me to believe it is the board. Does that make sense? My wiring is correct as I can send signals to the good board on either Hardware or Software but the “bad” board I can not get to work on either connection.
I think I am understanding your process correctly. From here, I recommend trying the each of your Maestros by themselves in a simple a setup as possible so we can really isolate the problem. Can you try using your Arduino to send commands to one Maestro without any other electronics connected like I suggested in my previous post? Please use one of the example programs from the Maestro Arduino library with minimal modification for that.
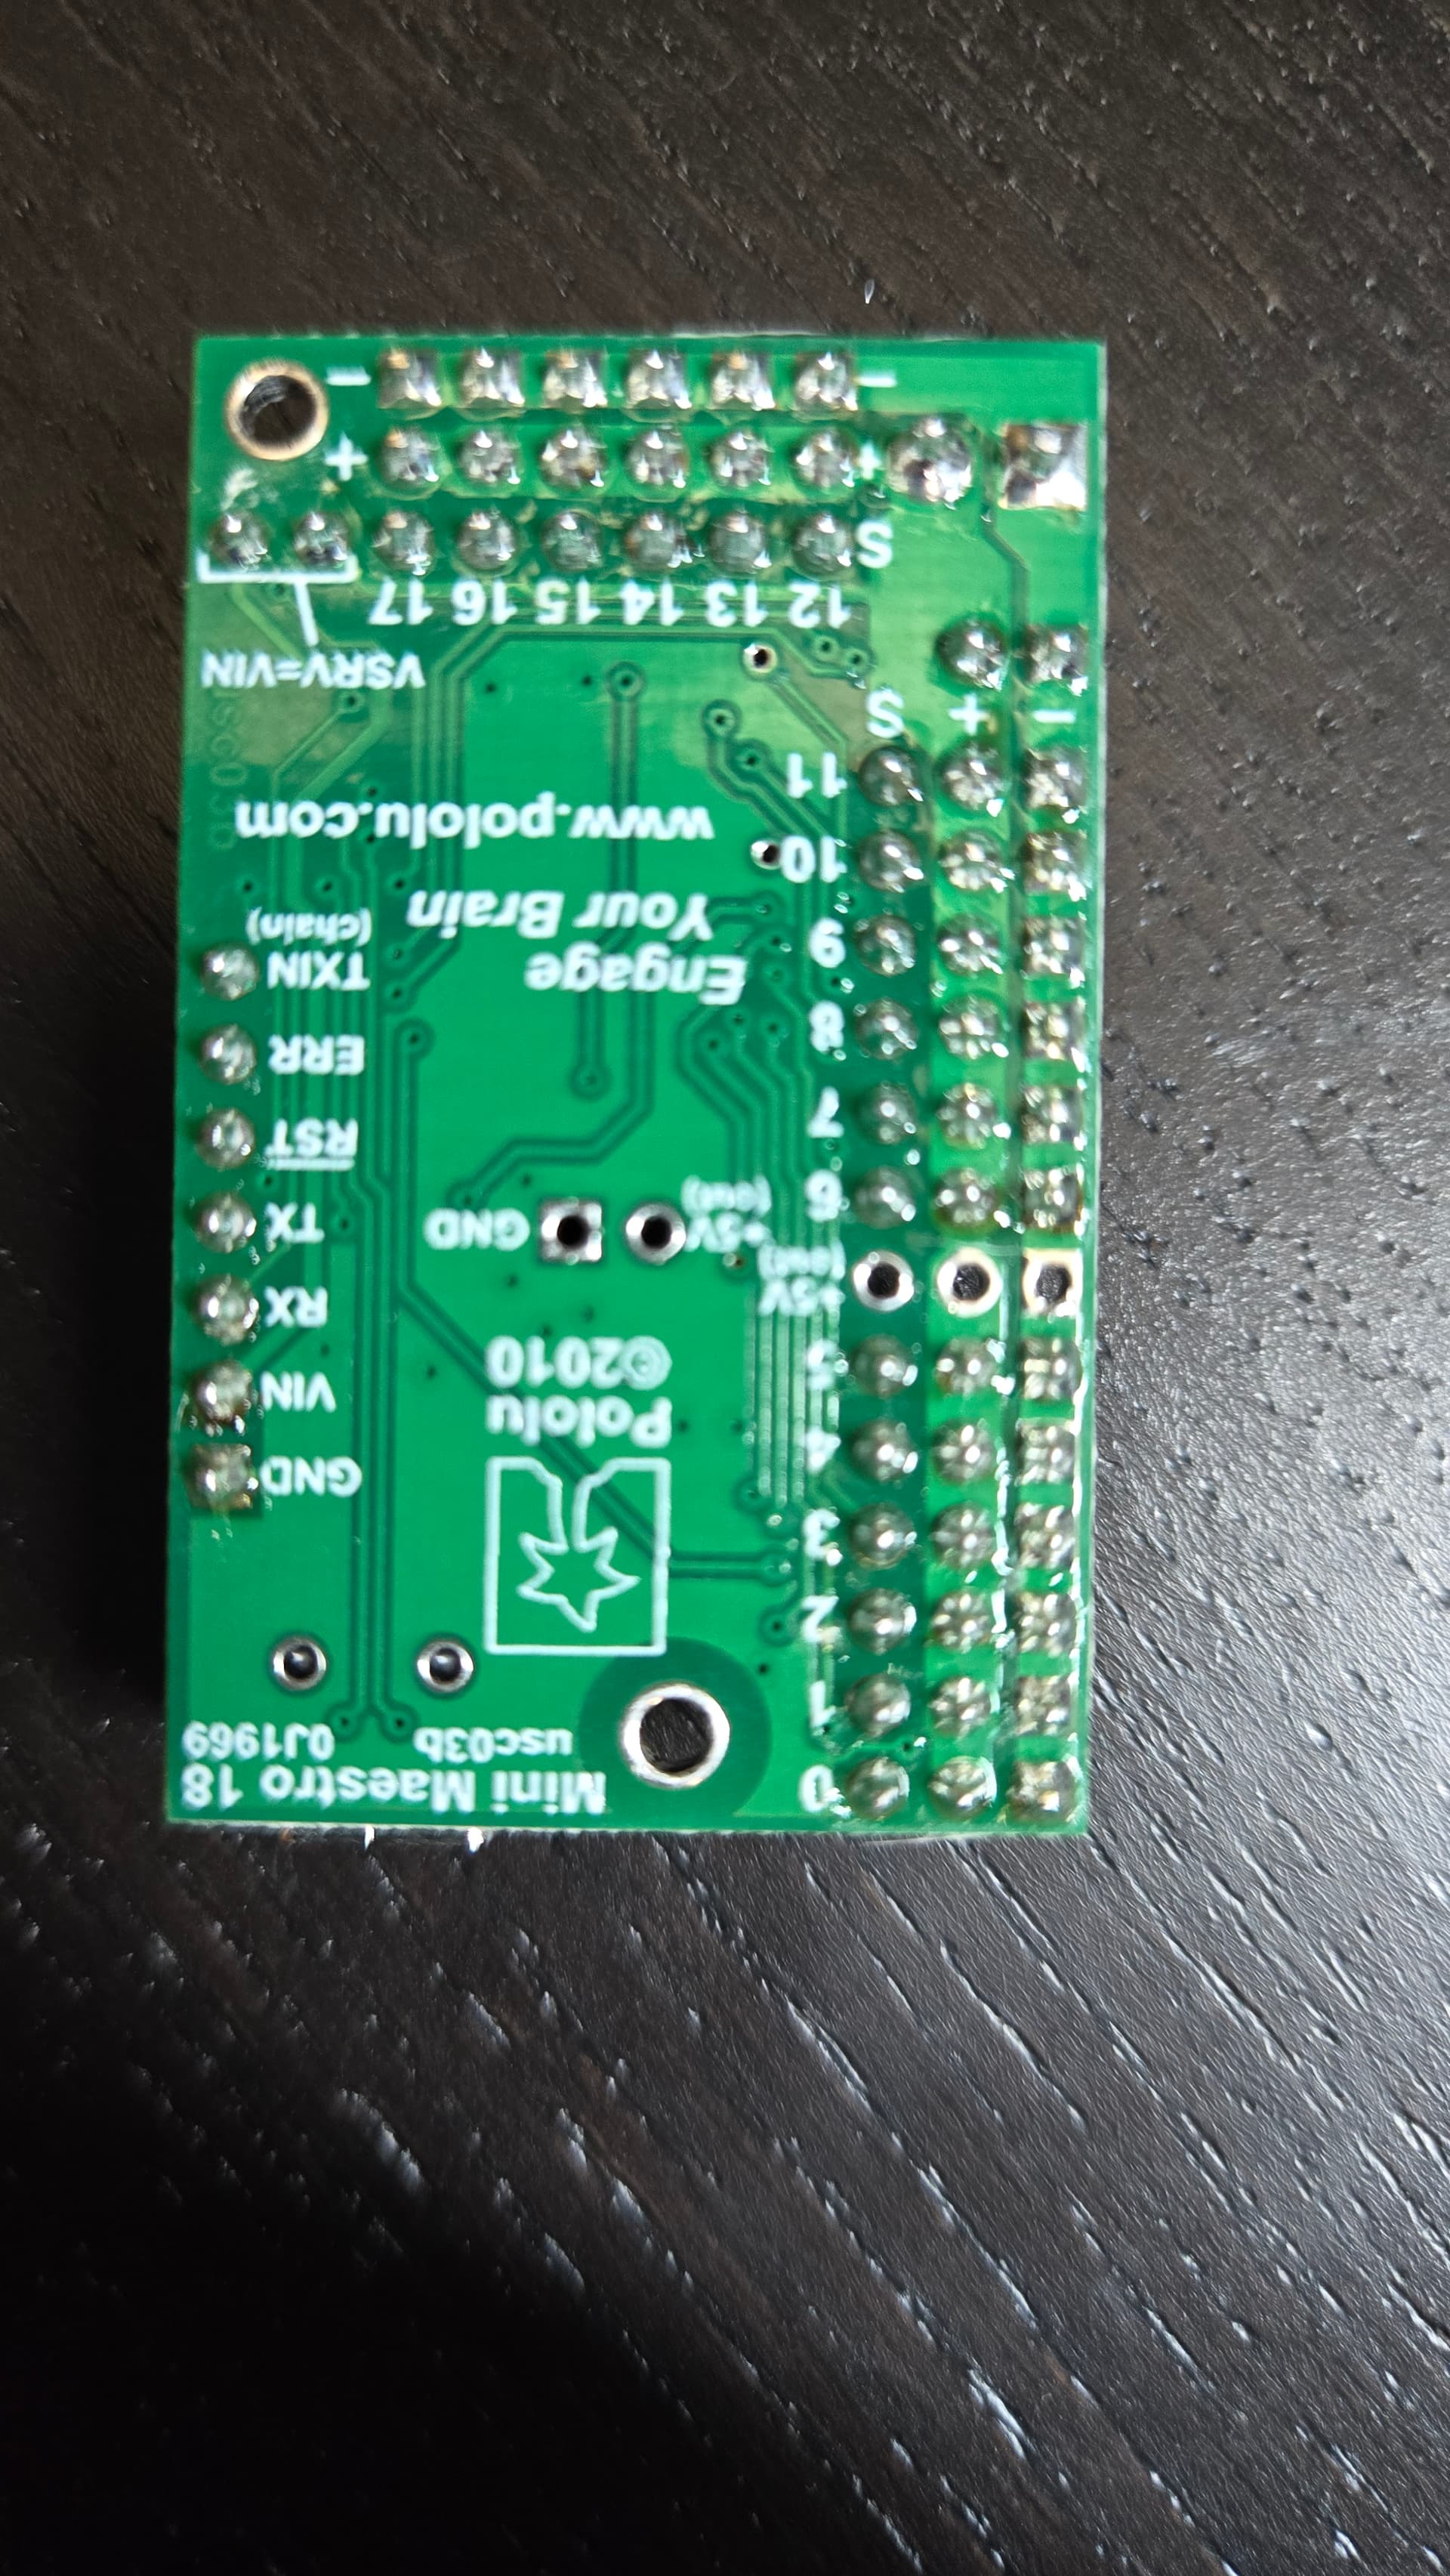
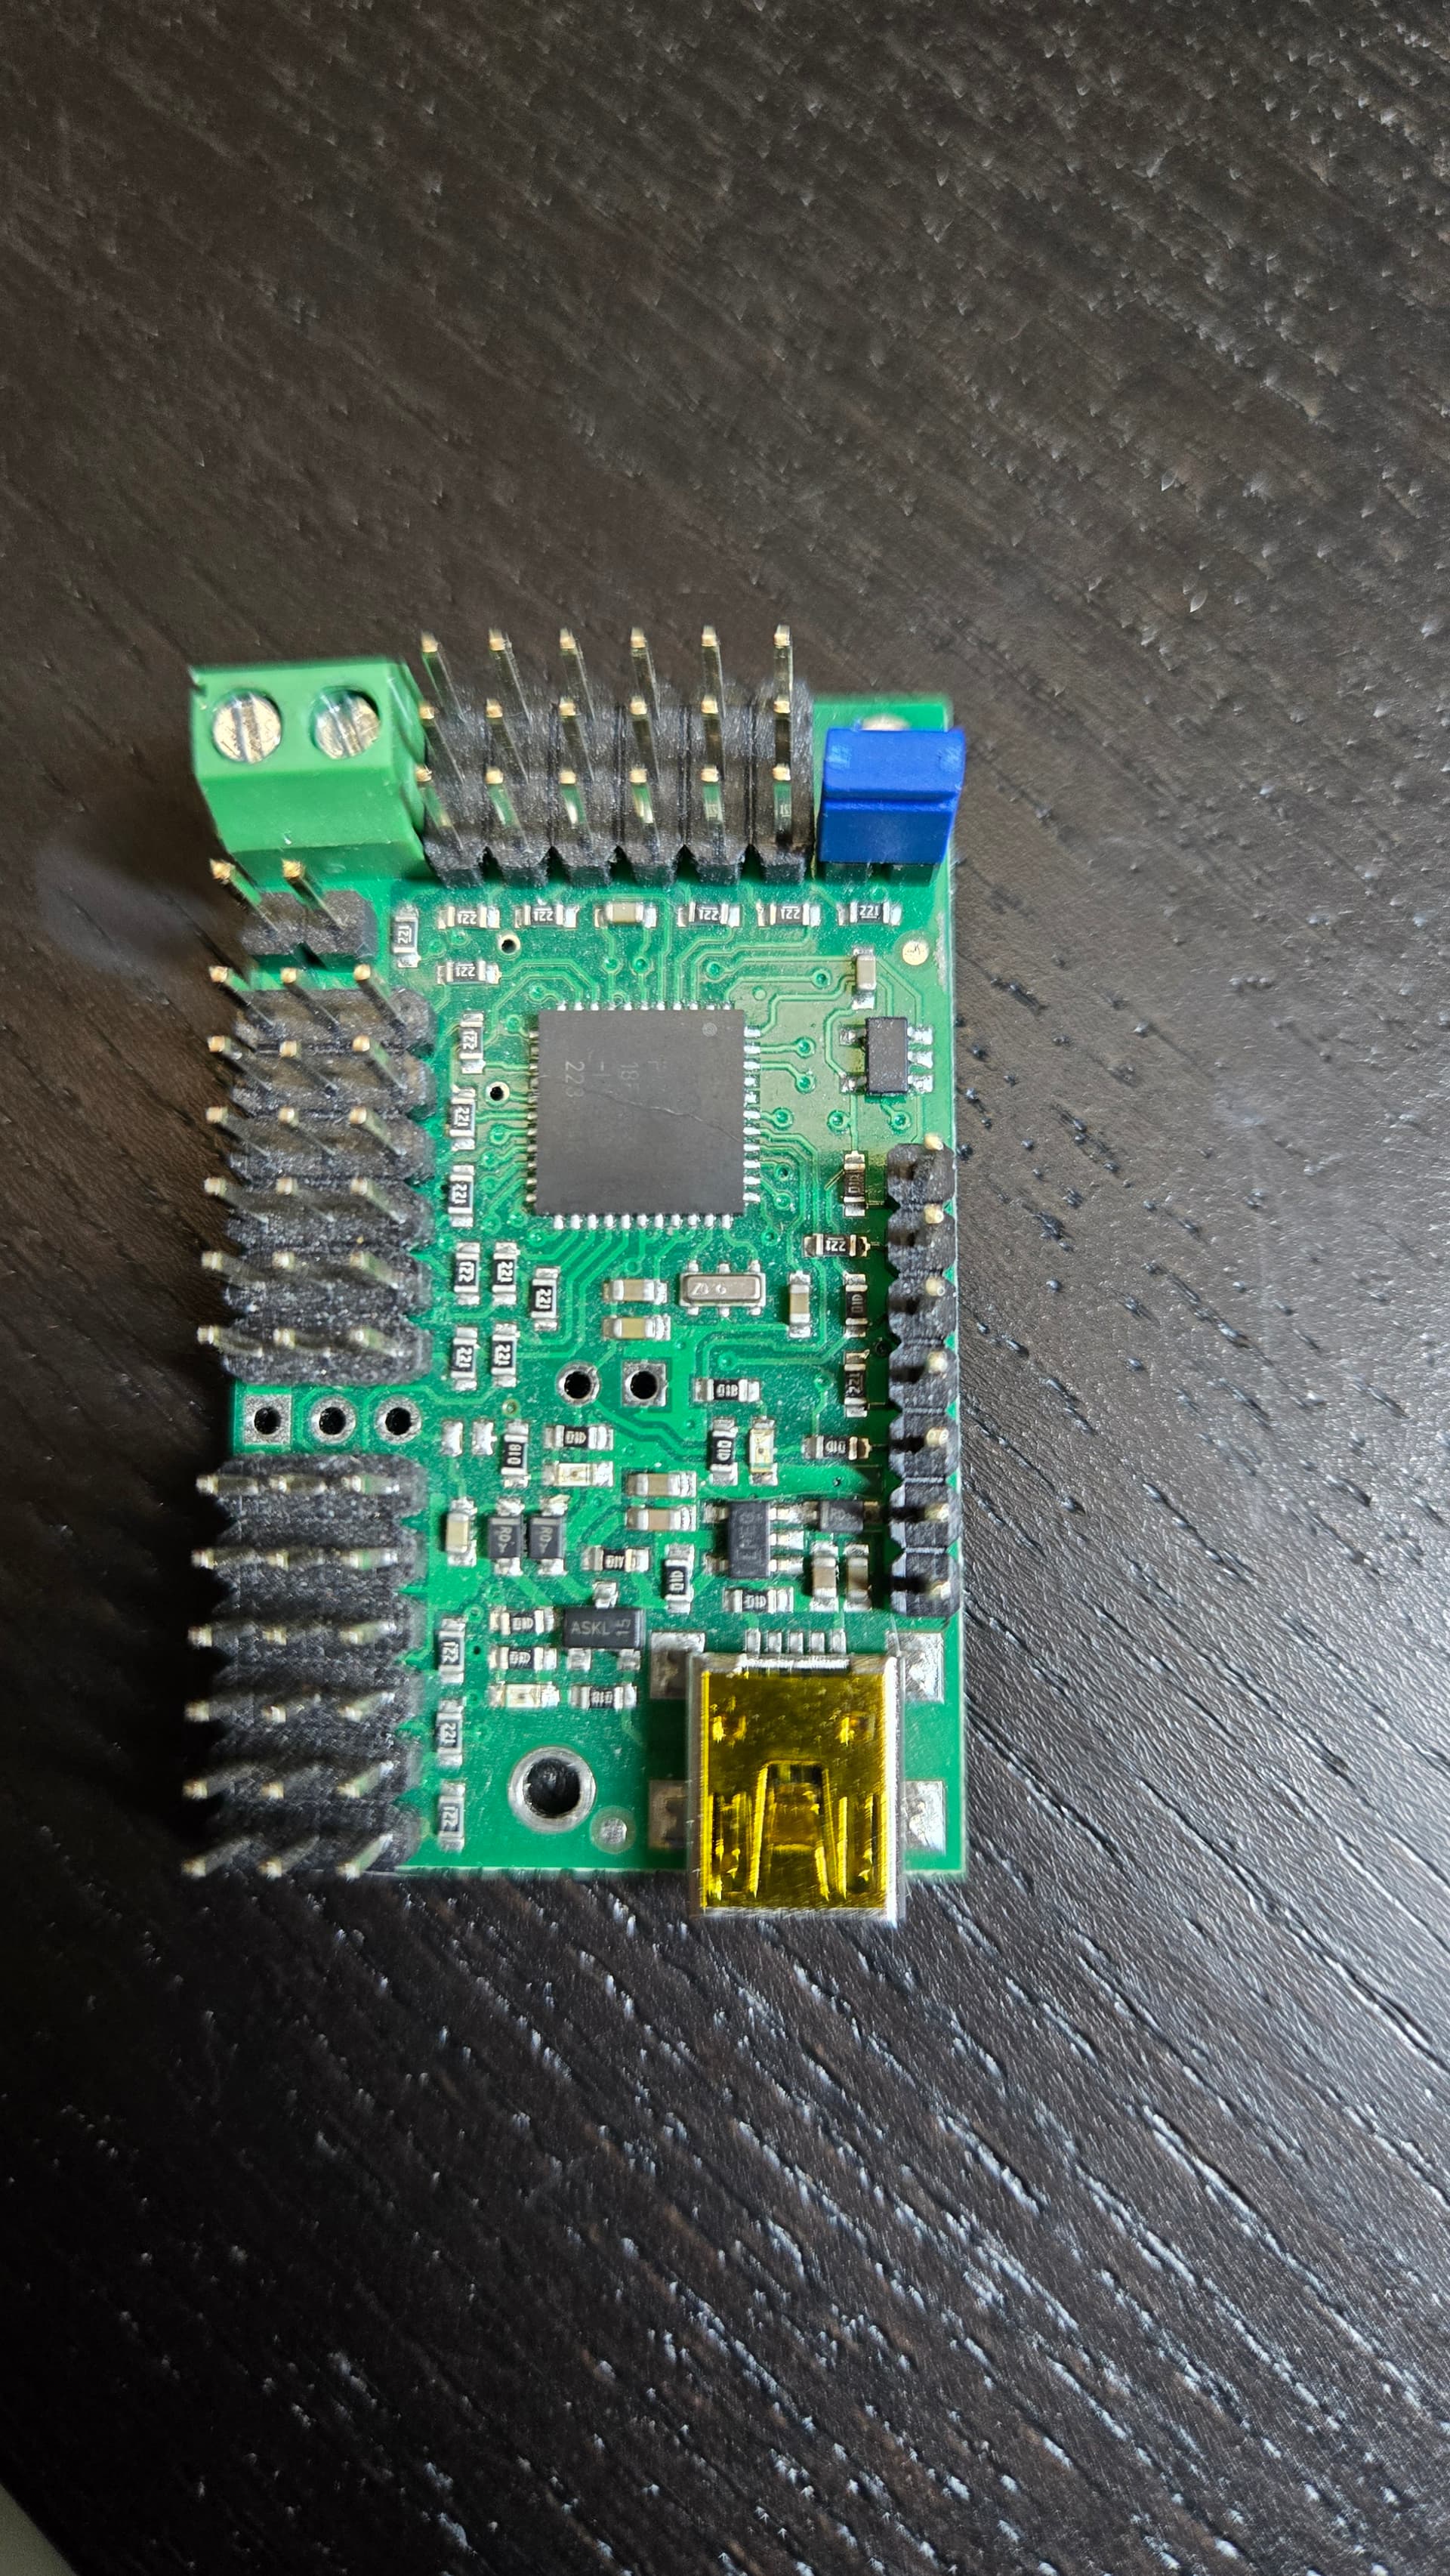
Additionally, can you post some pictures that show the connections in the simplified setup, as well as some close-ups of both sides of the problematic board so we can inspect it?
- Patrick
thanks for the reply. So I am a little confused- When I upload the basic script to arduino- I upload the script to the Maestro- once I power on the arduino and Maestro- should the servo automatically run or do I need to do anything to trigger the command?
Here is the sketch I uploaded to Arduino. When powered on, nothing happens with the servo- however I can run the servo script from the Maestro Control Center. /* This example shows how to control Maestro scripts with an
Arduino. It assumes you have an RC hobby servo connected on
channel 0 of your Maestro, and that you have already used the
Maestro Control Center software to verify that the servo is
powered correctly and moves when you command it to from the
Maestro Control Center software.
Before using this example, you should go to the Serial Settings
tab in the Maestro Control Center and apply these settings:
- Serial mode: UART, fixed baud rate
- Baud rate: 9600
- CRC disabled
Be sure to click “Apply Settings” after making any changes.
It also assumes you have connected your Arduino to your Maestro
appropriately. If you have not done so, please see
GitHub - pololu/maestro-arduino: Pololu Maestro Servo Controller library for Arduino for more details on how
to make the connection between your Arduino and your Maestro.
Also, the Maestro needs to have the script in the comment
below installed on it. */
/*
Maestro script for Script.ino Arduino library example.
Copy into the Script tab of the Maestro Control Center and
click Apply Settings.
Don’t do anything by default.
begin
repeat
Subroutine 0
sub alternate_mid_to_high
begin
6000 0 servo
1000 delay
7000 0 servo
1000 delay
repeat
Subroutine 1
Expects the delay time to be on the top of the stack
sub alternate_mid_to_low
begin
6000 0 servo
dup delay
5000 0 servo
dup delay
repeat
*/
#include <PololuMaestro.h>
/* On boards with a hardware serial port available for use, use
that port to communicate with the Maestro. For other boards,
create a SoftwareSerial object using pin 10 to receive (RX) and
pin 11 to transmit (TX). */
#ifdef SERIAL_PORT_HARDWARE_OPEN
#define maestroSerial SERIAL_PORT_HARDWARE_OPEN
#else
#include <SoftwareSerial.h>
// SoftwareSerial maestroSerial(10, 11);
#endif
/* Next, create a Maestro object using the serial port.
Uncomment one of MicroMaestro or MiniMaestro below depending
on which one you have. */
//MicroMaestro maestro(maestroSerial);
MiniMaestro maestro(maestroSerial);
void setup()
{
maestroSerial.begin(9600);
}
void loop()
{
/* Subroutine numbers can be found by clicking “View Compiled
Code…” on the Maestro Control Center script tab.
Restart script at subroutine 0. Subroutine 0 constantly
alternates the servo position from the neutral position to the
high end of the range. */
maestro.restartScript(0);
delay(4000);
// Stop the running script.
maestro.stopScript();
/* Restart subroutine 1 with the value 2000 on the stack.
Subroutine 1 constantly alternates the servo position from the
neutral position to the low end of the range. In this case, The
parameter put on to the stack represents how long the delay is
between servo movements.*/
maestro.restartScriptWithParameter(1, 2000);
delay(4000);
}