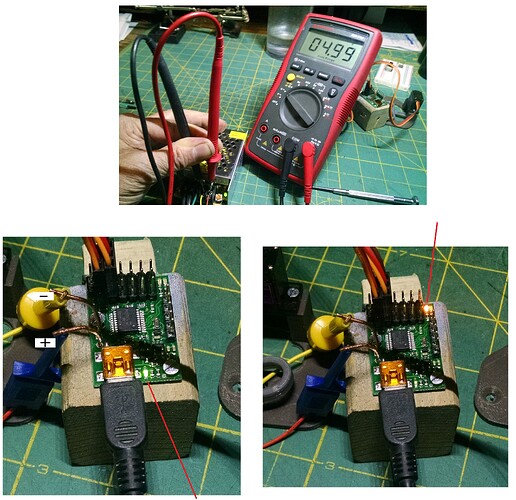
Watched and followed along with this Video - “Getting Started with the Pololu Maestro Servo Controller” Purchased a micro_6 channel_servo_controller and attached a tower pro 9g and a MG90S to the _+ signal pins. Using usb & 5V dc power source. On the video the woman shows moving the servos with the slide bar on the Maestro control panel. Have done a lot of searching and am asking here as a last resort. The servo’s I have attempted to use are running very well on my Arduino UNO, wired up on a sweep routine. Any suggestions will be greatly appreciated.
Hello.
I am sorry you are having problems with your Maestro servo controller. I moved your post to the “Servo controllers and servos” section of the forum since it seems more appropriate.
Can you tell me more about your setup? How are you powering your servos? Also, could you post pictures of your setup that show all of your connections?
Brandon
Brandon, good morning.
Have a model S-15-5 power block set at 4.9v, connected to the P&N on the board. USB connected to the mini B connector. Two servo 3 wire leads to the pins on signal, P & N. usb green led flashes, as does the Y&R status led when power from the USB is applied. Neither will move using the slide bar on the screen.
Thank you for the pictures. It looks like you are connecting your 5V source to the 5V (out) pin on the Maestro. This pin is an output and should not be connected to an external supply; doing so could potentially damage the Maestro. If you are connecting the Maestro via USB, the logic side of the Maestro is being powered already. If you are powering the Maestro from a separate supply, you can do so through the VIN pin.
In either of these cases, you will also need to supply power to the servo power rail for your servos, which looks like it is missing from your pictures. You can power the servo power rail by connecting your power source to the pins labeled “BAT” on the underside of the board.
More details about the various options for supplying power to the Maestro can be found in the “Powering the Maestro” section of the Maestro User’s Guide.
Can you try moving your power connections to the servo power rail see if that fixes the problem?
Brandon
Thank You Brandon, sure grateful there are men like yourself to aid in errors like I make. It is working and I will add a ground onto the back side to supply three servo’s. Any recomendations for a power supply that will be left running 24-7? Will make it easy to power up my train room from one switch as soon as I get it figure out. Been searching for a solution for over three years!
I am glad you were able to get it working.
If you are looking for a single power supply to power your servos and the Maestro, I would normally recommend a 6V wall-wart style power adapter (which we unfortunately do not carry), that can handle around an amp per standard servo you are using. However, since your servos are relatively small and shouldn’t be drawing too much current, you might be able to get away with something like our 5.25V, 1A power adapter. Since the Maestro’s minimum operating voltage is 5V and the voltage from the power supply will likely drop as you approach the rated current, you might try checking the current draw of your servos when in use first to be sure their combined current is not close to an amp.
Brandon
Brandon, I cannot get a simple momentary button to work this circuit. All I wish to do is turn on & off a pair of light switches, the servo moves the printed cage to slip the switch up or down. Have searched all your files, just do not get the transition in the code.
This is the code:
sub Sequence_0
  500 3968 4007 0 0 0 frame_1..5 # Frame 0
  500 8000 8000 frame_1_2 # Frame 1
  500 3968 3968 frame_1_2 # Frame 2
return

sub frame_1..5
  2 servo
  1 servo
  delay
return

sub frame_1_2
  2 servo
  1 servo
  delay
return
Thank You
RJ
It does not look like you have any code in your script for handling a button. From your script, it looks like you might have created it using the “Sequence” tab of the Maestro Control Center, which does not handle buttons or inputs directly. You could use that to get a starting point, then add the button logic to it in the “Script” tab. You can find an examples for handling buttons or switches in the “Example Scripts” section of the Maestro user’s guide.
If you try adding the button logic to your script and run into problems or more specific questions, you can post an updated script here with what you have tried and I would be glad to help troubleshoot.
Brandon
Figured it out, you search machine sucks.
Got this, just unsure of the switch as it does not work on the Maestro 6.
0000: 067900 – goto main_loop # Run the main loop when the script starts (see below).
0003: –
0003: – # This subroutine returns 1 if the button is pressed, 0 otherwise.
0003: – # To convert the input value (0-1023) to a digital value (0 or 1) representing
0003: – # the state of the button, we make a comparison to an arbitrary threshold (500).
0003: – # This subroutine puts a logical value of 1 or a 0 on the stack, depending
0003: – # on whether the button is pressed or not.
0003: – sub button
0003: 02002E01F40128 – 0 get_position 500 less_than
000A: 05 – return
000B: –
000B: – # This subroutine uses the BUTTON subroutine above to wait for a button press,
000B: – # including a small delay to eliminate noise or bounces on the input.
000B: – sub wait_for_button_press
000B: 82 – wait_for_button_open_10ms
000C: 83 – wait_for_button_closed_10ms
000D: 05 – return
000E: –
000E: – # Wait for the button to be NOT pressed for at least 10 ms.
000E: – sub wait_for_button_open_10ms
000E: 09 – get_ms # put the current time on the stack
000F: – begin
000F: – # reset the time on the stack if it is pressed
000F: 80 – button
0010: 071800 – if
0013: 0B09 – drop get_ms
0015: 062300 – else
0018: 090D1D020A29 – get_ms over minus 10 greater_than
001E: 0723000B05 – if drop return endif
0023: – endif
0023: 060F00 – repeat
0026: –
0026: – # Wait for the button to be pressed for at least 10 ms.
0026: – sub wait_for_button_closed_10ms
0026: 09 – get_ms
0027: – begin
0027: – # reset the time on the stack if it is not pressed
0027: 80 – button
0028: 073900 – if
002B: 090D1D020A29 – get_ms over minus 10 greater_than
0031: 0736000B05 – if drop return endif
0036: 063B00 – else
0039: 0B09 – drop get_ms
003B: – endif
003B: 062700 – repeat
003E: –
003E: –
003E: – sub button1
003E: 02012E01F40128 – 1 get_position 500 less_than
0045: 05 – return
0046: –
0046: – # This subroutine uses the BUTTON subroutine above to wait for a button press,
0046: – # including a small delay to eliminate noise or bounces on the input.
0046: – sub wait_for_button1_press
0046: 86 – wait_for_button1_open_10ms
0047: 87 – wait_for_button1_closed_10ms
0048: 05 – return
0049: –
0049: – # Wait for the button to be NOT pressed for at least 10 ms.
0049: – sub wait_for_button1_open_10ms
0049: 09 – get_ms # put the current time on the stack
004A: – begin
004A: – # reset the time on the stack if it is pressed
004A: 80 – button
004B: 075300 – if
004E: 0B09 – drop get_ms
0050: 065E00 – else
0053: 090D1D020A29 – get_ms over minus 10 greater_than
0059: 075E000B05 – if drop return endif
005E: – endif
005E: 064A00 – repeat
0061: –
0061: – # Wait for the button to be pressed for at least 10 ms.
0061: – sub wait_for_button1_closed_10ms
0061: 09 – get_ms
0062: – begin
0062: – # reset the time on the stack if it is not pressed
0062: 80 – button
0063: 077400 – if
0066: 090D1D020A29 – get_ms over minus 10 greater_than
006C: 0771000B05 – if drop return endif
0071: 067600 – else
0074: 0B09 – drop get_ms
0076: – endif
0076: 066200 – repeat
0079: –
0079: – # Uses WAIT_FOR_BUTTON_PRESS to allow a user to step through
0079: – # a sequence of positions on servo 1.
0079: – main_loop:
0079: – begin
0079: 0304A00FA00F88 – 4000 4000 frame
0080: 03048813881388 – 5000 5000 frame
0087: 03047017701788 – 6000 6000 frame
008E: 0304581B581B88 – 7000 7000 frame
0095: 0304401F401F88 – 8000 8000 frame
009C: 067900 – repeat
009F: –
009F: – sub frame
009F: 81 – wait_for_button_press
00A0: – # servo 1
00A0: 02012A – 1 servo
00A3: 05 – return
00A4: –
00A4: – begin
00A4: 01A00F88 – 4000 frame
00A8: 01881388 – 5000 frame
00AC: 01701788 – 6000 frame
00B0: 01581B88 – 7000 frame
00B4: 01401F88 – 8000 frame
00B8: 06A400 – repeat
00BB: –
00BB: –
Subroutines:
Hex Decimal Address Name
00 000 0003 BUTTON
01 001 000B WAIT_FOR_BUTTON_PRESS
02 002 000E WAIT_FOR_BUTTON_OPEN_10MS
03 003 0026 WAIT_FOR_BUTTON_CLOSED_10MS
04 004 003E BUTTON1
05 005 0046 WAIT_FOR_BUTTON1_PRESS
06 006 0049 WAIT_FOR_BUTTON1_OPEN_10MS
07 007 0061 WAIT_FOR_BUTTON1_CLOSED_10MS
08 008 009F FRAME
It is hard to debug your script since you have not given a description of your setup or how you want it to work. However, it looks like you tried to copy and duplicate the WAIT_FOR_BUTTON_PRESS (and associated) subroutines, so it looks like you might be using two buttons. I noticed that the subroutines you duplicated still reference the button subroutine instead of button1.
I also noticed you have two BEGIN/REPEAT loops, and there is no way for the second one to ever be accessed. The one that is being looped through (which is the one just after the main_loop: tag), sends two arguments to the frame subroutine, but the frame subroutine only takes one argument, so it will not work correctly and eventually trigger an overflow error.
By the way, if you are unsure if your button is working properly with the Maestro, you can monitor the channel it is connected to in the “Status” tab of the Maestro Control Center. You should see the slider change when you press the button.
Brandon


