Me and some friends have started a project, we’re making a robot.
We are using Orangutan X2 microcontroller, but we’ve got a problem with the motor driver board.
I tried to google it, but no results were found, so I hope you can help us.
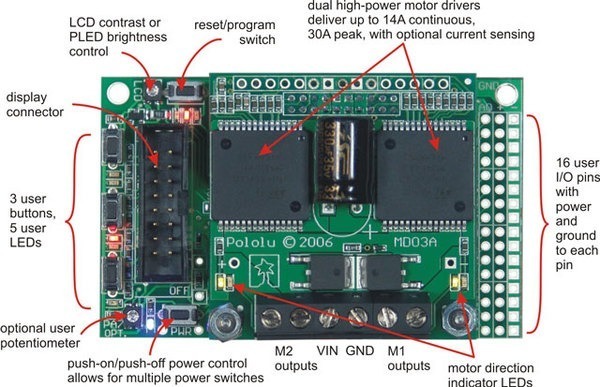
The question is: How to switch the power to motor driver board? *Image with Orangtuan X2 starting manual. We’re using Orangutan X2 VHN3 without the LCD
It would be really helpful if you could give an image, were exactly I have to make a connection.
The document you’re referring to means that the power switch on the Orangutan X2 only shuts power off to the lower board; the motor-driver board is always receiving power while power is connected. If you want to shut off power to the motor-driver board, you need to add your own external switch between your power source and the Orangutan X2.
To power your X2, you should connect power to the VIN and GND pads on the motor-driver board (i.e. to the middle terminal block pair). This power will be used by both boards; it is the only place where you need to make your power connections.
So there is no problem within the motor board.
Actually then I have another question/problem.
When I write the code for the motors to turn on and rotate they don’t do a thing.
Is there any prewritten code for the motors to turn them on? Something like preview, so I could test, whether the motors are running at all?
The X2 ships with a demo program that runs the motors. You can download this program from the resources tab on the product page and load the hex file back onto the X2. The project is called “Orangutan X2 test code”.
Did you buy the version of the X2 with an LCD? If so, the LCD will help guide you through the demo. Just push the user buttons on the side to run the various demo tests. If the motor-driving code is working, you will see the motor indicator LEDs light up, even if no motor is connected.
Please let me know how things go, or if you have any further questions.
Hi there! Thanks for the test code, it worked, so we know, that everything must be okay. But what i would like to know is, if you could give us a code that would actually make the robot drive? And i mean drive anywhere, forward, back, anywhere! Kind of getting frustrated about not being able to see any results of our coding, and not knowing, if everything is trully ok.
So, could someone please give us a code, that would actually make the robot drive? Thanks!
P.S some robot programming tutorials with Orangutan X2 would be appreciated as well. Thanks!
Making the motors move is very easy if you use the SPI wrapper functions (make sure to add the SPI.c file to your AVR Studio project so that it appears in the left-hand AVR GCC bar under the “Source Files” heading). The following code will run both motors at full speed forward, which will make your robot drive around:
#include "SPI.h"

int main()
{
  setMotor1( 255 );
  setMotor2( 255 );

  while (1);  // loop here forever (never let program execution run off the end of your program)
  return 0;
}
Is there something more complicated that you want to know how to do?
Hello Everyone,
I am working on a walking robot and got the parts. For 16-servo controller I need power supply. Should I use a rechargable battery or a computer power suplly. For control part of the controller, I get USB voltage but I need power for the servos.
Can you tell me if the SPI functions apply to the baby orangutang also. If they don’t is there an equivalent set for the baby? I can find little in the resources for the baby at all.
The SPI functions are specific to the Orangutan X2, which has an auxiliary microcontroller that is preprogrammed with firmware to control the motor drivers, buzzer, and other on-board hardware in response to SPI commands from the user microcontroller. The Baby Orangutan only has a user microcontroller; all of the hardware is tied to this microcontroller.
What do you want to do with the Baby Orangutan that isn’t covered under the resources tab of the product page? Have you looked at the Pololu AVR library?
All I can see on the Baby-o resources pages are references to the pololu avr library. When you follow the links to that library all the references are to the Oranutang, not the baby which is why I asked the question. Is there a set of routines for the baby-o. I bought several baby-o’s a few months ago on a clearance sale and I am finally getting around to using them but it seems to me the support for the baby-o is no longer there.
What I am trying to do is use a baby-o to power a small toy tank that I am putting together to be a wall following maze robot. It will have three sharp IR distance modules, front and rear fail safe bumber switches, a servo to tilt one of the sensors, and two DC motors. After reading an article about how voltages over 3v tend to cook small DC motors I am considering modifing the baby-o to isolate the motor supply from the 5V supply and put in an exernal 3.3v regulator to handle the motors. I will be using a 7.2v Lipo battery pack to power the thing. Oh yea there are also two quaderature controllers on the drive axles. Might end up using more than one baby-o talking via I2C.
I guess what I am really asking is is there a seperate library for the baby-o or am i going to have to modify the orangutang routines? I prefer developing in “C” but will do asm if required.
Do you have a Baby Orangutan B (blue solder mask)? The Baby Orangutan B is an Orangutan, and the Pololu AVR library works with it. Did you look at the devices on the introduction page of the Pololu AVR library user’s guide? The Baby Orangutan is mentioned many times throughout the user’s guide and command reference. Note that many parts of the library don’t mention the Baby Orangutan because they are designed for hardware on Orangutans that the Baby Orangutan lacks, such as an LCD, buzzer, or pushbuttons. If you connect such hardware to the Baby Orangutan in a way that matches the connections on the Orangutan SV-328, the Pololu AVR library routines for that hardware will work on the Baby Orangutan.
This never posted the first time so I’ll try again:
You told me before that the BigO has a separate motor controller while the baby does it by banging hardware. So the library handles both? Based on defines for the processor type? Do we have access to the source for the library, or is it just a typical library package that links in the needed routines? I really don’t want any more overhead than necessary. As it is I will probably need two baby’s, one for the motors and their quadrature detectors and another for the rest of the sensors. I too will have a Map array but it only needs to handle a 4x12 grid, probably 48 ints with status of each side encoded in each of 4 nibbles for recording wall presence.
FWIW I have both blue and green Baby-o’s. I intend to physically modify a baby to isolate the motor supply from the VCC supply. The simplest way I can see to do this is to remove the 5v regulator and the reverse connection diode., cut the trace between pin-11 on the h-bridge and the filter cap above it and then jumper pin-11 to the VIN connector and the supply an external 5v to the VCC pin and 3.3V to the VIN pin for the motors. This should also help with noise and voltage sag for the controller. My concern is I cannot see under the h-bridge to see if there is another VCC connection buried under the bridge. You wouldn’t have a picture of the PC traces layout without components lying around would you??
The original Baby Orangutan and the Orangutan X2 are not supported by the Pololu AVR library, though we will be adding support for the X2 in the future. For the original Baby Orangutan, please see the Orangutan-lib, an open source C library for the original Orangutan and Baby Orangutan robot controllers; the Pololu AVR library will only work with your Baby Orangutan B. We make the source code available for the Pololu AVR library (please see the library’s user’s guide), and the library keeps overhead down by only linking in functions that your program uses.
You can separate VIN and VCC by removing the regulators on your Orangutans. You will need to short across the diode on the original (green) Baby Orangutan, and you will need to short from the VIN pin to the VBAT node on the reverse-protection MOSFET on the (blue) Baby Orangutan B. You don’t need to cut any traces or worry about additional VCC connections.
The original Baby Orangutan was available with the ATmega48 or ATmega168 microcontroller. The newer Baby Orangutan B was available with both of those microcontrollers (B-48 and B-168), but we recently discontined the B-168 version and replaced it with the B-328 (ATmega328 with 32 KB flash and 2 KB RAM, which is twice the memory of the ATmega168).
The Baby Orangutan B uses a different, more powerful motor driver than the original Baby Orangutan, has a wider operating voltage range, and has different pin assignments to the on-board hardware. The latter is what makes the original Baby Orangutan incompatible with the Pololu AVR library.

 *Image with Orangtuan X2 starting manual. We’re using Orangutan X2 VHN3 without the LCD