Mini Maestro seen, but not responding

Hello all! I’m having some trouble with my mini Maestro and I was hoping someone could point me to a direction I might not have tried :slight_smile:

What I’m using

  • NVIDIA Jetson AGX (Ubuntu 22.04.5 LTS)
  • Polulu mini Maestro 24 channel controller
  • MG90S servos

Hardware setup
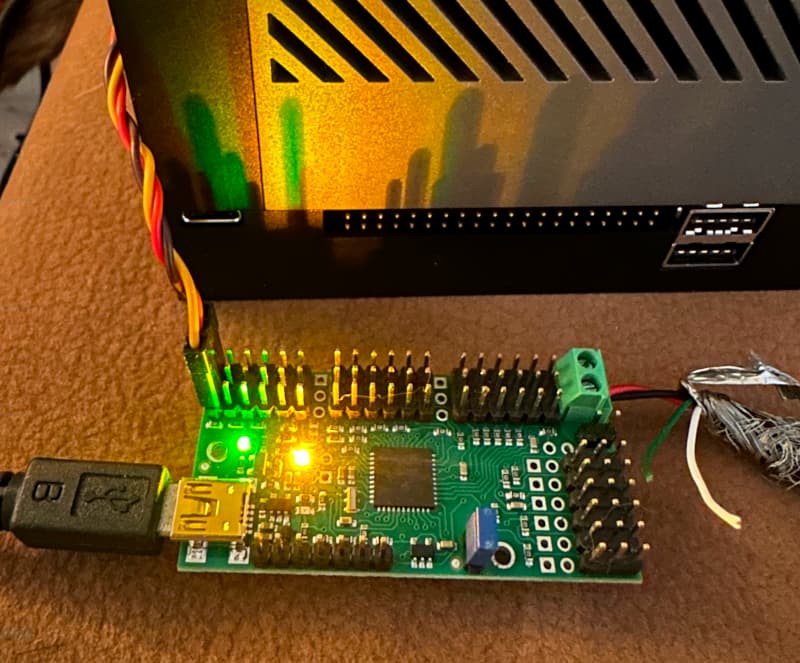
The Maestro is connected via a known working cable (I used a mini USB cable and these same servos with my Arduino, and there everything works fine), and receives 5.2V via a 2A USB phone charger connected to the VIN connector. I put the blue jumper in place, so the servo power rail is powered by that. I measured voltage on the servo power rail, and I get the 5.2V there. (Question; when I remove the jumper, there still seems to be 5V on that rail, but I’m assuming that’s the 5V the Maestro feeds it (?)).

When I connect the power adapter for the servos, the orange/yellow light comes on and starts blinking slowly (1 second intervals).
When I connect USB, the green light comes on, it does a sequence of 10 short flashes, then 3 short flashes and then it remains on.

Software
I see both /dev/ttyACM0 and /dev/ttyACM1 when I connect the Maestro via serial

I’ve installed the necessary dependencies in a .venv and I get output when I use ./UscCmd:

(.venv) eric@nox:~/projects/misty/pca-test/maestro-linux$ ./UscCmd --list
1 Maestro USB servo controller device found:
#00503856

Via native USB using pyusb and libusb-1.0 I can fetch diagnostics of the board and servos (in this log, I have a single servo that’s sort of centered connected to servo port 0):

(.venv) eric@nox:~/projects/misty/pca-test$ sudo .venv/bin/python3 check_maestro_native.py
Opening Maestro via native USB...
  Channel count: 24
  Channel modes: 0=Servo, 1=Servo, 2=Servo, 3=Servo, 4=Servo, 5=Servo, 6=Servo, 7=Servo, 8=Servo, 9=Servo, 10=Servo, 11=Servo, 12=Servo, 13=Servo, 14=Servo, 15=Servo, 16=Servo, 17=Servo, 18=Servo, 19=Servo, 20=Servo, 21=Servo, 22=Servo, 23=Servo
  Channel 0: position = 3968 (quarter-µs) = 992.0 µs  [mode: Servo]
  Channel 6: position = 0 (quarter-µs) = 0.0 µs  [mode: Servo]
  Channel 7: position = 0 (quarter-µs) = 0.0 µs  [mode: Servo]
  Channel 8: position = 0 (quarter-µs) = 0.0 µs  [mode: Servo]
  Native USB works. Use maestro_native.MaestroNative and puppet_controller_native.

When I try to use ./UscCmd to move a servo however, this happens:

(.venv) eric@nox:~/projects/misty/pca-test/maestro-linux$ ./UscCmd --servo 0,1200
Setting target of servo 0 to 1200...

(.venv) eric@nox:~/projects/misty/pca-test/maestro-linux$ ./UscCmd --status
 #  target   speed   accel     pos
 0    3968       0       0    3968

The servo doesn’t respond; I do see the green light blink but no movement. Am I using the CLI tool correctly; should it move? I didn’t do any configuration on the Maestro (directly started tinkering with it from the Jetson), and although every setting seems to be correct (Dual USB serial, all servo ports set to ‘Servo’), I can’t seem to be able to move them :slight_smile:

If I need to provide more information, please let me know!

Hello.

Could you post pictures of your setup that show all of your connections?

The Maestro does not supply the servo power rail with any voltage by default. Could you try removing the Maestro from your setup, removing the VSRV=VIN jumper, and measuring the voltage on VIN as well as the servo power rail when only USB is connected?

Also, please note that the default serial mode is “UART, auto detect”, and you will need to change that if you want to control the Maestro from USB, since it cannot detect the baud rate and generate servo pulses at the same time; did you see somewhere that your Maestro was set to “USB Dual Port” mode? Could you post a copy of your Maestro settings file? You can save a copy using usccmd with the --getconf FILE option (where FILE specifies the filename).

By the way, the units for the --servo command are quarter-microsecond, so if you want to set the target to 1200 μs you need to write 4800 on the command line.

Brandon

Hi Brandon,

Thank you for reaching out to me! I have attached a picture of my setup:

And a dump of my conf (using the --getconf command):
dump.log (4.3 KB)

I think my measurements were incorrect, maybe due to residual power in the supply. I measured with just USB connected and my multimeter initially showed 5V as previously reported, that dropped pretty quickly to zero (without the VSRV=VIN jumper).

I indeed try to control the Maestro from USB (That was my reason to buy it; previous tests with a PCA9685 via i2c seemed impossible on the Jetsons’ GPIO without kernel overlays); is there a way to change the default serial mode via the cmd line, or do I need Maestro studio for that?

Gotcha on the servo units, thanks for the tip!

[edit] I assumed the dual mode actually, since I saw two serial ports in /dev. That might also be wrong on my side :slight_smile:

Best regards,
Eric

My post was too old, so I was unable to edit it anymore but:

I updated the configuration file and SerialMode from UART_DETECT_BAUD_RATE to USB_DUAL_PORT, performed a ./UscCmd --config and my servos started moving! I probably read over those parameters in the manuals somewhere and my assumption that it would work via USB right away threw me off :slight_smile:

Thanks for your help Brandon!

How would you recommend the servo’s to be set? Right now, I have 3, I did my best to center them as good as possible before building them into my armature. It’s a hand/sock puppet with two arms and a head that will ‘animate’. There is some strain on the servos (MG90S), and if I move the servos to their extreme, I can hear some very faint buzzing. How does the Maestro handle those, I know servos can send voltage peaks when they’re stuck on things; would you recommend a capacitor at the servo power lines?

1 Like

I’m glad you were able to get your servos responding!

I do not have any specific recommendations for your servo as it mostly depends on the specifics of your system, but if they are straining when you command them to their extremes, you might consider avoid that by limiting their range (by adjusting the “min” and “max” configuration values); the Maestro does not do anything special to detect or automatically respond to those situations.

Brandon

Hi Brandon,

Thanks for the additional info! I’ll test the servos with their min/max positions. I saw the API supports reading values aswell so I’ll see if I can add something to my script that checks if a position is reached within the expected time (if not; update target to current position).

So far, I really like playing with the Maestro and besides my own RTFM issues, it worked out of the box with the Jetson (Unlike the PCA9685 :sweat_smile:)

Best regards,
Eric

Unfortunately, that method will not work with the Maestro and standard servos. Standard servos do not make their position feedback information known to the controller (they just use it internally). You can use the Get Position command to read the current pulse width that the specified Maestro channel is sending (which is not necessarily the actual position that the servo is physically in). Note that when using an acceleration and speed limit, the Maestro breaks the movement up into multiple smaller movements, so in those cases the current position and target position will differ until the movement is finished. In any case, to compare the actual position of the servo, you would need some way to read the position feedback data from the servo, such as using a specially modified servo that gives access to the feedback potentiometer signal.

Brandon