I bought this thing a year ago, but I could never figure out how to get it working.
I am a mechanical engineering student, and have taken a class where a professor talked about PID line following, which was what got me interested in this and starting out, but i don’t have any experience with micro-controllers.
Here is where I think I am stuck. I am not really sure what is going on as each manual I find tells me to download and install things, so I am finding myself quite confused.
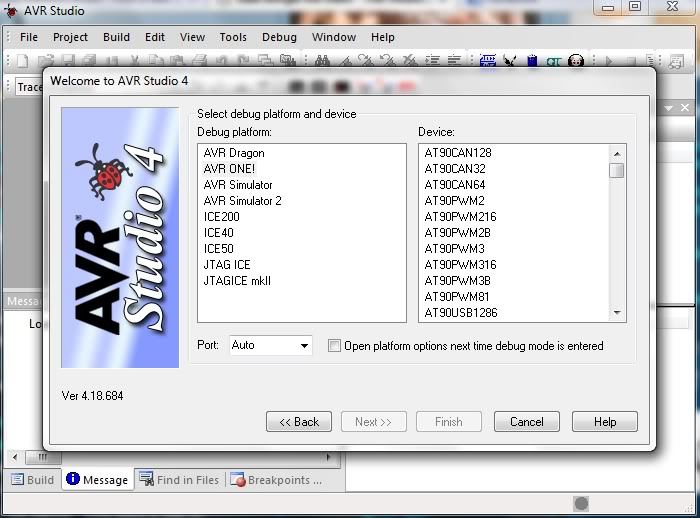
I downloaded this, but I don’t know which of these options the 3pi corresponds to.
If you’re just trying to get started, I strongly recommend that you use the AVR Studio project examples included with the Pololu AVR library rather than trying to create your own project. The example projects are already configured to work on the 3pi, so you can jump right into testing and modifying the code. Have you followed the instructions from the “Programming Your 3pi” section of the user’s guide? Specifically, section 6.b walks you through compiling and running the simple-test example program. Once you have this working, I suggest you move on to trying other examples included with the library, and from there I suggest you move on to modifying copies of the example projects. Please let us know if you have any trouble with this.
I got the simple test program working and downloaded it onto my 3PI, and modified it to slow down the LED’s so I see that I can modify the program.
I had another question but I worked it out a few minutes after posting it. I don’t think I’ll be sleeping much tonight.
What kinds of things have you done with your 3PI?
I want to build up to making a line follower from scratch.
I’m glad to hear that you’re now able to play around with modifying code. Our 3pi video library shows a lot of the interesting things that our customers have done with the 3pi (that we know of; I’m sure there are plenty of other cool things being done that we don’t know about).
Line following and maze solving can ge achieved without adding any additional electronics, so those make good initial projects. Our sample line-following and maze-solving programs are rather simple, but you can get pretty fancy if you want to, especially with maze solving. Here are a few other ideas for things you can do beyond line following and maze solving:
Add an RC receiver and turn your 3pi into a radio-controlled vehicle (see our RC 3pi sample project).
Add some sharp distance sensors and turn your 3pi into a wall-follower/obstacle-avoider (see our wall-follower sample project).
Program your 3pi to use its reflectance sensors to follow a laser pointer.
Create a sensorless contact-detecting 3pi. Kevin, an engineer at Pololu, programmed his 3pi to tell when it hit an obstacle by detecting the small dip in VCC that occurs when the motors suddenly stall. Upon hitting and detecting an obstacle, it would spin around a random amount and drive off in a new direction, allowing it to essentially endlessly roam around a room without getting stuck. At some point we will probably create a sample project for this and provide the source code, but you might have fun trying to implement it yourself. The Pololu AVR library already has code for measuring VCC, so the program is pretty simple.
Add a wireless-to-serial adapter and use it to control the 3pi remotely or stream data from the 3pi to your computer.
Hey Ben, I came across something and I have another question for you.
I uploaded the demo program “Stepper Motor” or something like that, and noticed that it runs and then turns the 3pi off. I found it hard to upload new code as i had to hit program right as i turned the 3pi on and it got me thinking that this could brick my robot if I’m not careful.
If a program ended up on the 3pi that immediately turned it off when it was turned on, how would one upload a new program?
A program that shuts off the 3pi is doing something very bad (like shorting out the power supply) and could very well permanently damage the 3pi. The first step is to be very careful about the programs you load. The stepper motor program is not designed for use on the 3pi, it’s intended for use on an Orangutan robot controller with a stepper motor connected to the motor outputs. You need to make sure that whatever program you put on there is appropriate for the external components connected to the 3pi’s microcontroller.
If you do somehow get a program on there that causes the 3pi to shut off, you should keep the board reset by holding the reset button (starting before you turn on the 3pi), and then erase the MCU before releasing the reset button.
I’m pretty much resigned to the fact I am going to break this one one way or another. I crashed it off a table today but it seems okay now.
I got a code to work that keeps the robot driving around a “pen” of white surface bordered by black tape. it sorta bounces around. I think I have the library installed in the wrong way though, because i seem to only be able to get new code to work when i modify an existing example. Otherwise the build doesn’t recognize any functions.
Still, at the rate I’m going I’ll have it figured out soon. I’m gonna try to optimize the line follower soon.
There’s nothing wrong with using a copy of an existing AVR studio project as the starting point for a new project.
If you want to make your own project from scratch, you need to follow the steps in section 7 of the Pololu AVR Library user’s guide. Specifically, you will have to link the project into the appropriate library file, and we strongly recommend you add the linker option -Wl,-gc-sections to prevent unused library functions from being included in your program.
Your program sounds like fun, though you migth want to keep it on the floor while working out the kinks! Ramming into things and falling off tables can dislodge components from the board (especially the reflectance sensors, which tend to make first contact), so you might want to keep an eye out for sensors that aren’t reporting what you think they should.
If you do come up with some cool 3pi projects, please share them with us!
I’m glad to hear you have the line-following code working better. How are you charging your batteries? Your question surprises me because I’d expect your charger to have satisfactory default settings for NiMH cells.
I think I misunderstood your last post. I read it as asking what voltage you should use when charging your batteries/what voltage should you charge them to, but it makes much more sense that you’re asking how low you should let them go before recharging them! I would avoid programming the board when the batteries are below 4 V (you could permanently disable the 3pi if it loses power during programming). If your program makes heavy use of the motors, you might want to recharge earlier (say around 4.2 or 4.3 V). Basically, if you see the robot start turning off while it’s driving around, it’s time to recharge the batteries! Note that we strongly recommend you include code in your programs to display the battery voltage on the LCD at startup so that you can keep track of the battery voltage and avoid trying to program the 3pi if the batteries are too low.