I’ve got a mini maestro 12 and a few micro servos (those cheap 9g servos from anywhere). Win 7, your soft installed and that’s about it, I can’t get no servo to work.
…Yes, I must say I’m working with my usb to power up the mini and I did 3 different tests with rechargable batteries at 4.5 and 6v with no result and also a 5v, 2amp power adaptor (…) nothing.
There is not much to say about the connections, I’m trying 2 servos and that´s it. Moving sliders from the soft or creating some frames it doesn’t make any difference.
The board’s LED are working as described in the manual. Just after reading the book a few times, and playing around changing and applying different setting I got the yellow LED to stop blinking super fast to make it fading more slowly, but that’s all.
I had a couple of error by trying to run some frames applyed to the script with no result.
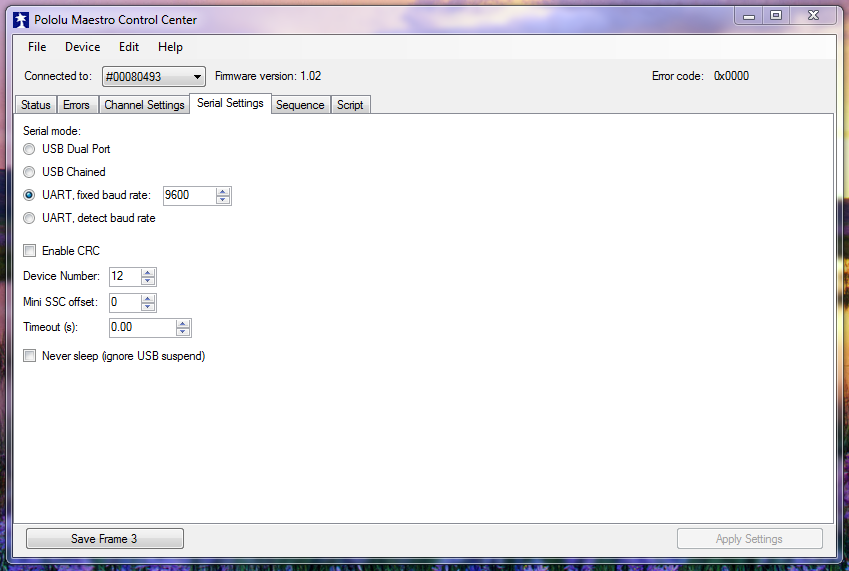
After trying a reset, I was able to start from scratch with my green blinking fast and the yellow a little slowly and fading. Cool! after that, I’m going to status tab to “enable” a servo and a windows promp with the message "The servo controller is currently configured to detect serial baud rate. Until it has detected the baud rate, it will not be able to control servos. (so what should I do?) by followinf the option “change the mode to UART 9600 and applying” nothing happen.-
I don’t know what else to do.
A few time the screen promted a message kind of like "you programmed the board in other comp so you can not do anything else than retry in that original comp where the script was applied. (but there is only one comp here) I don’t get it…
You can see, I need some answers or a tutorial
I’m sorry you are having trouble with the Maestro.
First of all, please reset your Maestro to its default settings using the “Reset to default settings…” command in the Device menu. Next, please make sure the Maestro’s serial mode is NOT “UART, detect baud rate”. This is the default serial mode, but in this mode you can’t control servos from USB because the Maestro will be waiting to detect the baud rate on the RX line. The message that you encountered when you tried to drag a slider bar was:
That dialog box contains two buttons: OK and Cancel. Pressing “OK” will cause the program to take the corrective action described in the dialog box, so you should press OK. Pressing Cancel will prevent the Maestro Configuration Utility from taking that action, which will prevent you from controlling your servos over USB.
Please make sure you have plugged in your servos correctly. I recommend only plugging in one servo at a time in case there is a problem with one of your servos or the combination of the two.
If you still can’t get a servo to move, please post some photographs showing your setup so we can verify that everything is plugged in correctly.
Also, do you have an RC receiver or some other servo controller that you could test the servos on?
The other dialog box you saw was:
Unfortunately, you will usually see this dialog box if you have a script saved in your Maestro and then select “Reset to default settings…”. It is OK to ignore this message.
Hello David and thank you for your support, I appreciate your help.
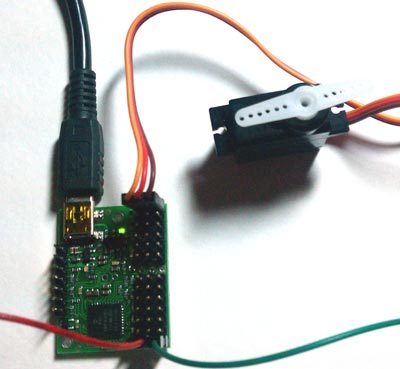
Ok, here is a picture, but I think you are not gonna get any clue out of it. I’m trying all around your comments with no result yet. Now I have only one brand new servo conected and nothing moves.
I’ve tested the power supply and works fine. Unfortunately I don´t have a servo tester but I’m positive on them (ok, 90% +) there are 4 of them and all brand new.
I’ve perform the reset function a few times before using “ok” and “cancel” and nothing. I’m confused… If “cancel or not” the “serial settings” always preset “UART, detect or 9600” which is confusing because or your explanation about “UART is not the one for USB”.
Then my other options are USB dual port or USB chained, I tryed both (nothing) so what should I try?
There is any possibility to see some “screen shots” of your settings just to confirm? or any video tutorial if available? Any detail to check the channel settings?
Just letting you know, the first thing I’ve did with the board was play with it trying to control a shiftbrite and its shiftbar with no result. (Ok, reading around many people said it is not so easy to make it to work but anyway, nothing happen here too).
It can’t be that hard… I need to make my servos to move
I still have bigs plans for more maestros, but I don’t know… I need good vibes to see some action.
Thank you for the picture. Everything shown in the picture looks correct as far as I can tell. However, your picture does not show your power supply, so I recommend that you check to make sure that your green wire is going to the negative terminal and the red wire goes to the positive terminal. How did you test the power supply? If you have a multimeter, please measure the voltage difference between GND and the servo power rail (i.e. the voltage difference between the outer-most pin your servo is connected to and the middle pin).
I’m thinking of potential problems that may be causing this:
The USB output from your computer does not have sufficient power for both your microcontroller and your servos.
The mini USB cable you are using is either faulty or old (created for a USB1 device). I think there are mini USB2 compatible cables with more pins or more power or something.
The little blue VSRV=VIN cap that came with your microcontroller is wobbly or missing.
The drivers from the zip file did not install correctly.
There is a program running on your computer that is conflicting with the drivers or the USB power output.
Maybe one of your USB outputs provides more current than the others and you will need to use this USB port in order to power your microcontroller plus the servos.
I recommend adding a power supply / battery pack that does not exceed 7.5v and has at least 2 amps. You can keep this plugged in at the same time the USB is plugged in.
I just had the same problem for five hours with errors all over the place and now its fixed both on USB and when unplugged. I have a bunch of servos plugged into my mini maestro 24.
As you can see, the Connected to: at the top of the screen tells me that the program recognises the microcontroller and that it is using Firmware version 1.02.
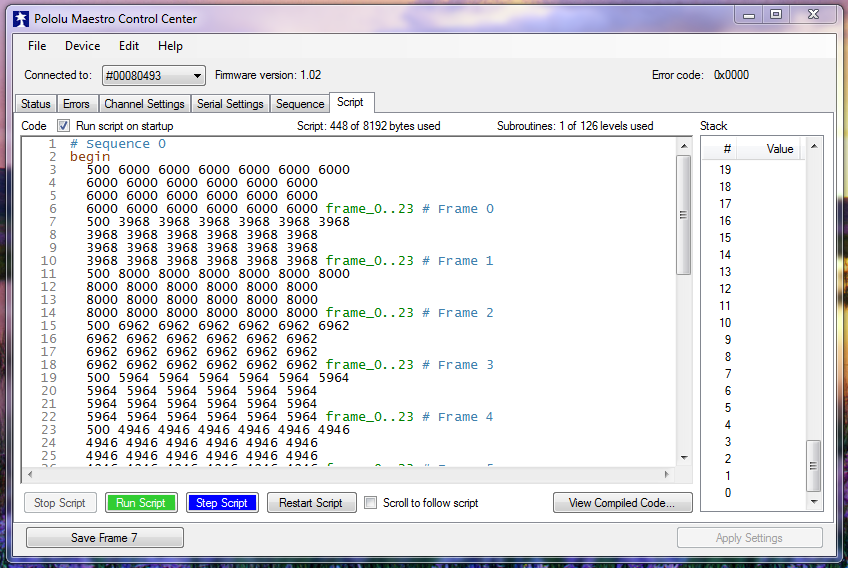
Here in the Sequence box (after I saved a bunch of servo movements as frames in the status tab), I have made sure ‘Play in a Loop’ is checked, then clicked ‘Copy Sequence to Script’:
If you had the same problems as me they were these:
The USB did not provide enough power to run the microcontroller and the servos, and the ‘Run Script on Startup’ wasn’t checked.
I solved these two problems by plugging in a battery pack and clicking ‘Run Script on Startup’ (I also unnecessarily messed around with all the other settings and tested power sources and servos and scoured the internet and documentation for answers and wasted heaps of time until I realised what was required).