
You can always send yourself a private message with information you want to record for later use.
OMG i cant use the code you sent me with the devcpp.exe software, i try to run but it says i have to compile it, so i try compile, but it’s something wrong with every line of the code, eksample of when i started compiling:
(this is without edditing anything to the code)
1’st wrong:
return;
35 C:\Dev-Cpp\Examples\FileEditor\Untitled1.cpp return-statement with no value, in function returning ‘int’
UPDATE: i removed every return; command in the code and tryed again, this made the compiling finished and it was ready to run, while i soldered the batterys and all of that to the servo controller we made a bit mess on 2 of the servo 0 I/O pins and 2 of the servo 1 I/O pins. Still i tryed to attach the servo onto it, allthough the servo dident go as far down on the pins as it did on the pins witout any mess on it i tryed them. I ran the program and a red LED glowed on the USB to serial adapter and a yellow LED glowed on the servo controller, a black window opened with availebility to press eks: A to get servo 0 to a position, lets say 3300. Still even if i pressed the buttons nothing happend with the servos, i think i read somewhere that the yellow LED indicates that the servo position is out of range.
What did i do wrong?, why diden’t it work?
This repeats itself with all of the return lines!
Glad you figured out how to compile the code. Source code doesn’t run as a program on its own, its just a set of instructions for how to build a program that will do what you want.
Looking at my code more closely, there is one somewhat improper return function (still compiles and runs fine for me), but for the most part the return functions are necessary to the proper functioning of the program! Here’s a slightly fixed version of the source code. This compiles and runs correctly for me, so you shouldn’t make any changes to start, except for the com port number (if you’re using a com port other than COM1).
If you get error messages from DevC++ when you try to compile this code with no changes, there is probably a bad compiler setting somewhere. Try starting a new project (file–>new–>project) and selecting “Console Application” and “C Project”. Save it somewhere and copy-paste the original code over the example code in the “main.c” file it creates for you.
The yellow LED on your servo controller means that it is powered on and is waiting for instructions, but hasn’t received any (without return lines, the program wouldn’t be able to open a serial port). If the servo controller receives a good signal from the computer, the yellow LED will go out, and the green LED will flicker as you send new signals. A flashing red LED is the signal that something bad has happened.
Let me know if this helps!
-Adam
This is my situasion right now:
Im sittin here with all the wirering in front of me: all batterys connected, and the USB to serial adapter attached to the micro controller, the USB to serial adapter is also connected to the computer’s COM port. The USB to serial adapter’s LED is glowing red and the micro controller’s yellow led is lightning. i have 3 servos connected, one at I/O pins 1, one at I/O pins 2, and 1 at I/O pins 7. I tried to compile and run the new code you sent me and it worked, nothing wrong with the code itself, but nothing happend with the servos!
Great that you got it to compile and run! This is a big step!
The yellow light means that no signals are being recieved still, so something is not right. Does the software take you to the “Press a key to move the servos” menu, or does it say something about a com error? One guess is that the program is trying to use the wrong com port.
You can check which com port the USB to Serial adapter is using by going to the device manager (in XP right click on “My Computer”–>“Properties”–>“Hardware”–>“Device Manager”) and opening up the “Ports” list. One of the devices on the list should say:[ul]Pololu USB to Serial Adapter (COM1)
or
Pololu USB to Serial Adapter (COM3)[/ul]or something like that.
Lets say, for example, your USB to Serial adapter is operating as COM3. You would need to change one line in the code [ul]from:
comPort=openPort(1);//PUT YOUR COM PORT NUMBER HERE!
to:
comPort=openPort(3);//***PUT YOUR COM PORT NUMBER HERE!***[/ul]
Also, you might try to move your servos with the slider program I sent you a while ago, just to see that you have the right port number and everything’s wired up right.
-Adam
Here’sthe update:
I did what you said and checked the COM port number, it was COM5, so i changed the number…IT WORKED!! 
The servos changed the position at once and i got a window where i could press different buttons and the servos did move some degrees at every button press. Then 2 wires i had soldered had physical touch and the servos stopped working, a red LED flashed, then i knew something was wrong. I fixed the soldering problem, but still it dident work, so i changed the Current flow for a cupple of seconds and so changed it back
(from 6V to 9 and then back to 6)
It woorked… Everything is just fine now and it really worked…
I think this is, maybe, my last post on this topic except when i will post the final result.
So my question is: Do you/ Pololu company have any special way you solder the battery to the microcontroller or something like that, couse i see the pololu microcontroller have perfect soldering result and im having difficultys with getting to big pieces of solder iron!
Do you have any links withy solder package that can give a little better result?
And i wanna say that without your help i probably woulden’t come this far, and you have also helped me out in the robotics world, now i have more experience for my next robot, THANKS! 
For board soldering you’re after two things: low wattage, and a small tip. At work we pretty much only use Weller irons. I’ve got a non-Weller at home, and like it a lot, too. (I think that company is out of business, though, and I can’t remember the name off the top of my head.) Here’s a discussion on various soldering irons on Make:
makezine.com/blog/archive/20 … ing_i.html
A couple of points get mentioned in that article that I’ll repeat here: Keep your tip clean! I use a wet sponge, which is pretty universal. Someone on that thread mentioned a brass shavings tip cleaner. I can see that would work well, but I haven’t felt the need to go that route.
When shopping for a new iron, get the best one you can afford. I’ve had mine for over fifteen years. It’s not one of those tools that tends to wear out (unless the heating element goes.) Get a fine tip. Get low power, or better yet a temperature controlled iron. Get one from a company that will be around when you need to replace the heating element or the handpiece. And by all means get good, fine solder for doing board soldering. The thick stuff that’s sold at hardware stores is ok for plumbing, terrible for board soldering.
Congratulations on your project. Great to see stuff move like it’s supposed to.
Tom
Tom is absolutely correct about spending money up front on a good iron! For years I was terrible at soldering, then I found out that I wasn’t really all that bad, I was just using terrible soldering irons! Especially when you’re just starting out, you really need a good iron to get really good at soldering, and good irons usually cost good money!
Adjustable temperature is a big help, and keeping your tip sponge-cleaned and coated with solder helps a lot! I’m partial to a very thin silver-bearing solder from Radio Shack. It flows and coats better than any rosin solder I’ve ever used, and it comes in very very thin strands, so its easy to control how much solder you apply. As a rule of thumb I look for things that call themselves a “soldering stations” rather than just a “soldering iron,” and a really nice temperature controlled soldering station that you can use for the rest of your life is going to run you $80-$100 at least. At work we use mostly Weller and Hakko brand irons, but there are plenty of good brands out there.
My personal favorite iron is the Weller WES51:
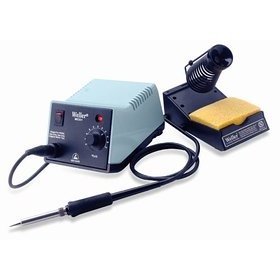
It can be had for about $100, and it takes a variety of tips, including this one little flat-tip that I use for almost everything!
If you want a medium-okay iron for very very cheap, you might consider the Velleman VTSS5U
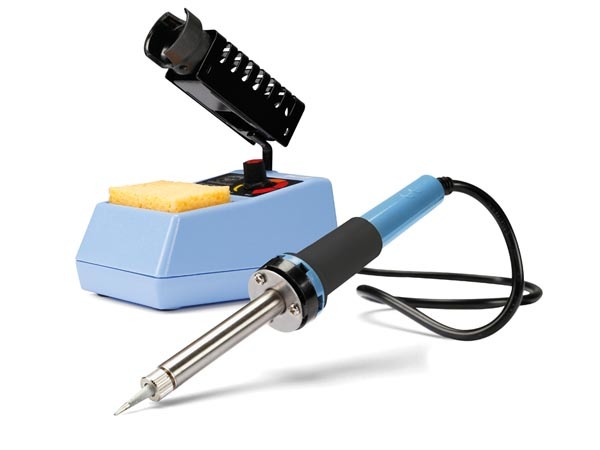
It can be had for ~$20, and has a single kind of tip which you can replace for a dollar or two. I wouldn’t want to try soldering surface-mount components with it, but its good enough for header pins and wires.
Glad you got your servos moving, let us know how you are progressing!
-Adam
A good soldering iron is definitely crucial, but I disagree with the “spend all you can” approach. I was disappointed by a $500 Weller unit, and my favorite soldering stations are the cheap Chinese ones from MPJA (http://www.mpja.com/prodinfo.asp?number=15845+TL for general stuff, http://www.mpja.com/prodinfo.asp?number=15141+TL for SMT stuff) and other sources. Adjustable temperature and digital readout for under $50! (Plus how useful is a USB port on your soldering iron if it doesn’t solder that well?)
So, I think the brand and individual model really matter more than price, so if possible, try one out before buying one, or at least get one that someone specifically recommends.
- Jan
Good info! Thanks, Jan. The one I have at home isn’t adjustable, aside from a high-temp low-temp switch, so that’s seriously tempting.
But I have to ask… errr… Which Weller had a USB port on it? Was it for data logging on temp or something? I’ve come up with some seriously goofy ideas for sticking micros into something but that one has me scratching my head.
Tom.
I have a soldering iron looking pretty alike as the ones you have reccomended, i dont really know what type it is (its not written on it and i dont have the package anymore) It’s basicly just a soldering iron and spiral tingy to put it in. So i was wondering, what is the advanteges of having possibility to change the degrees?
I didn’t look into what all it was for. Among other things, I think the idea is that you can set up various settings that assemblers can’t mess with, giving you more process control.
http://www.cooperhandtools.com/PDFs/550517_WD_Series.pdf
- Jan
From the looks of it the USB port can control its temp and do data-logging. ISO certification is what they’re aiming it for, so my guess is you’re right on the money, Jan.
Mmmmm, the other ones you posted have a lot more appeal. My shop isn’t ISO9001 certified. (Cripes, my shop at home is an OSHA disaster area.)
Tom
The main advantage of temperature control is being able to turn the temperature down low, but not too low, just a little more than enough to melt your solder immediately on contact. I usually stick around 550F-600F. I find that single temperature soldering irons are usually either way too hot (which will damage electronics and melt wire insulation) or not hot enough, which makes it difficult for the solder to really soak in (leading to big chunks of bad solder joints, like I think you were talking about).
Irons with temperature feedback are nice too, because you can keep a very small tip at the right temperature, without it getting cold as you work with it.
If you haven’t soldered before, you might want to get a piece of prototyping board (with metal plated through holes) and some bargain bin components, and practice soldering a bit, without fear of messing anything up.
-Adam
Well, they think unmarked bottles of water and high-quality extension cords plugged in for more than four hours make for a disaster area, so it’s not saying much.
- Jan
When the window where i can control the servos with the keyboard appears. Is there a way to make the servos change its position further then just 1 degree? Anything i can change in the code?
Are you still using some form the code I posted?
(If not, remind me what code you’re using)
If so, you can change the step variable in the code, which controls how much a servo moves in response to a single key press:
To double how much a servo moves, set step=100, etc…
How’s your project going?
-Adam
Its going just fine  . Me and a clann m8 just finished it up for a school project tomorrow. We met some problems but handled them perfectly =). Its looking kinda cool 2. I dident get the robot working connected to my wireless computer, so we captured it on tape and made a powerpoint of it. Even tough we will bring it to school tomorrow, it wont be able to move. Maybe now i’ll try experimenting with the code a little, i found that to risky to do after just having a working time on 2 days. Hope to stay in touch at the forum, i might send u some pictures of the masterpiece xD CyA
Great, I’m looking forward to seeing the pictures!
-Adam
[quote=“nexisnet”]Great, I’m looking forward to seeing the pictures!
-Adam[/quote]
I just posted a reply but dunno where it went :S
Anyway, heres the pictures of the robot i made (on my own website) i guess u will be able to find the pictures yourself
You know where i can buy a microcontroller that can control both motors and servos at the same time, as well as having a section to input a RC reciever (im making it RC) - You know of any cheap packages of RC transmitter and reciever?
Thnx