
Hello
I’m using a Micro Maestro Controller
With actually 4 servos 270°
I need to light led strips when they move and I would prefer not to use Arduino.
It looks like a simple plan but it’s complicated for me now.
since servos are controlled With PWM and are always powered even when they don’t move there is no way to use a relay but is there something else?
Is there a way programming?
Is it possible?
Thank you
Hello.
The extent of the control you want or what kind of LED strips you are referring to isn’t clear to me. If you just want to be able to toggle a relay from a Maestro channel, you might consider something like our RC Switch with Relay. Alternatively, you might consider our RC Switch with Small Low-Side MOSFET or RC Switch with Medium Low-Side MOSFET.
Note that you would need a separate Maestro channel for each RC switch module you want to independently control.
Brandon
Hello Brandon thank you for the time you took and for your answer,
If I understand,
A RC Switch with a relay and a mofset can help me control the lights over the initial 5v?
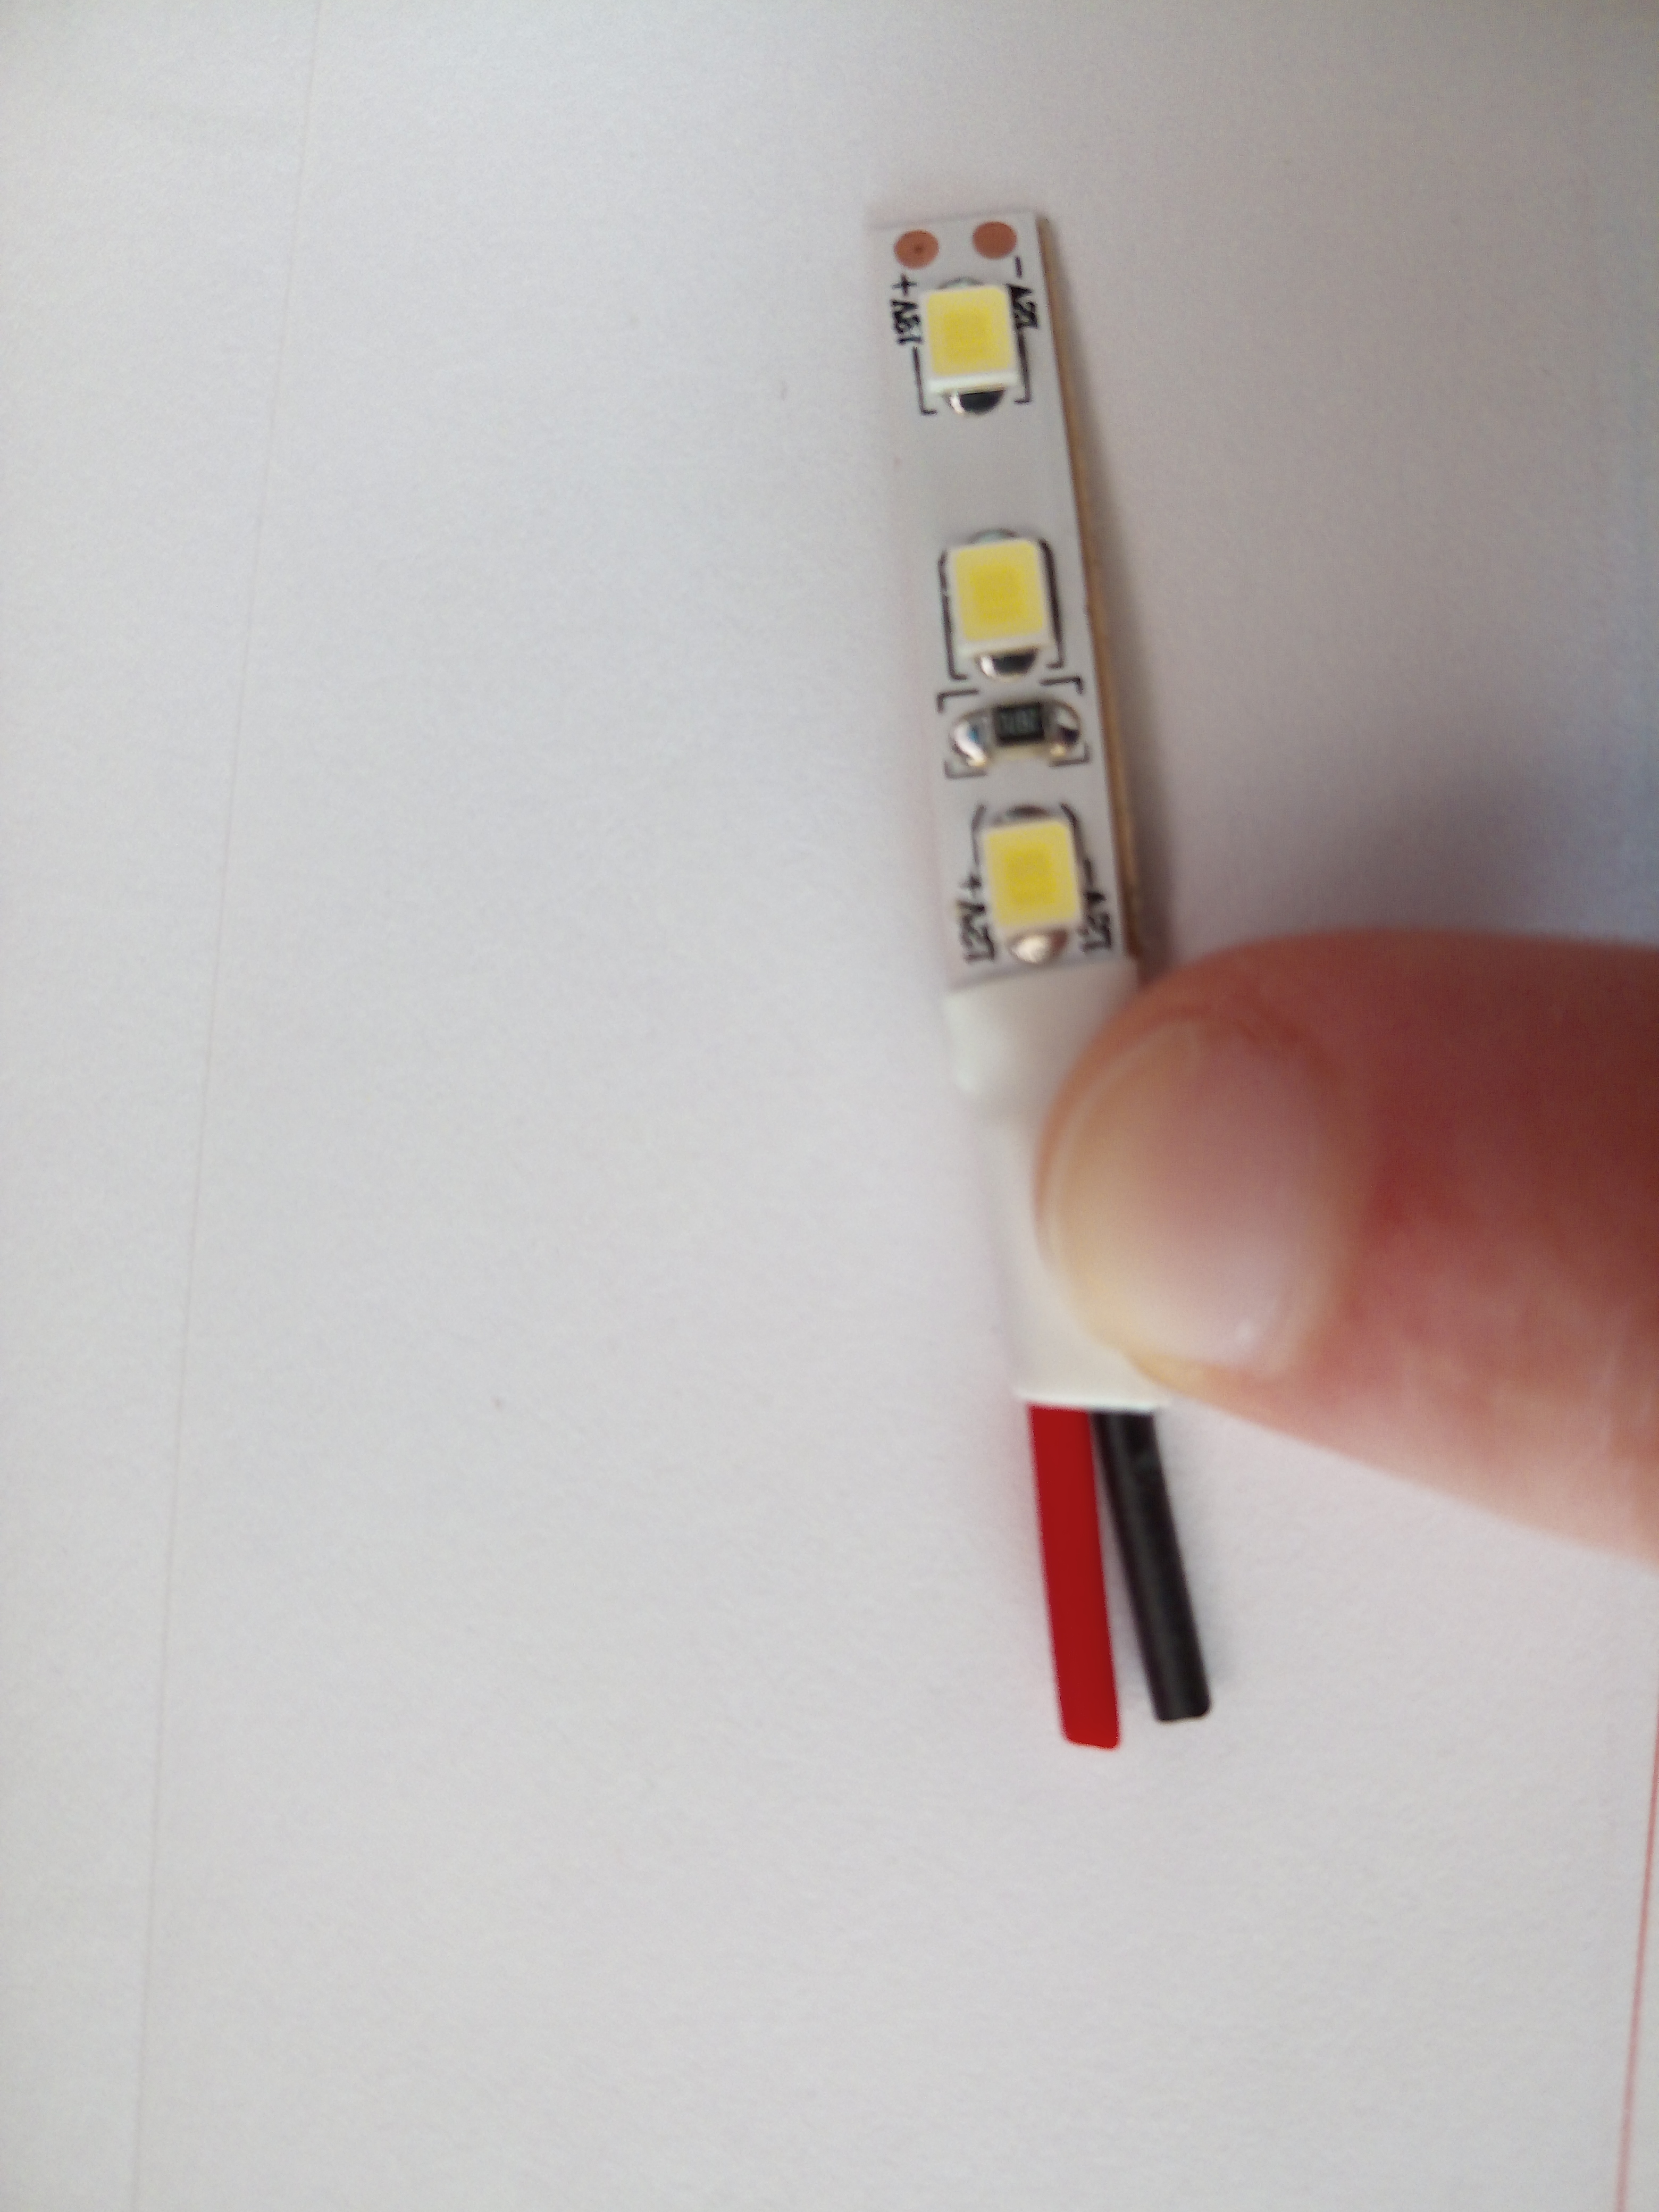
I want to control 12DC V led strips
and …a servo also respond to RC command? Does Pololu Maestro card uses RC? If true this is a great news ! or will I have to use a transmetor or something else to command the switches?
I would like to create one sequence, exactly like what the maestro control center helps me to do. (servo positions/time) including switch states for 18 led strips.
“Note that you would need a separate Maestro channel for each RC switch module you want to independently control.”
Can’t I simply plug the switch over the servo pin ? //plug
Or do I have for exemple to Use a 24 channels pololu maestro control ?
many questions …
I’m a newbie and my english is bad so sorry, I may not be aware of the non sense I make ![]()
Thank you again
Aqua
Hello, Aqua.
Can you try rephrasing this question? It is not clear what you mean by “the initial 5V”.
Maestro channels can output hobby RC servo signals, but the Maestro cannot receive signals from an RC transmitter. The RC switches can accept the signal from the Maestro channels and use that to toggle their output.
You can split the signal from a single Maestro channel to go to a servo and an RC switch, as long as that setup works for your application. The RC switches have a user-configurable threshold value that controls when to toggle the output, so that would be the extent of the control you have over the LEDs turning on or off. If you simply want to apply power to your LEDs every time the servo moves beyond a certain position, this might work.
If you are still uncertain, can you post a link to the LEDs you are using? Can you explain in more detail how you want to control the LEDs? It sounds like you have 18 LED strips; do you need to be able to toggle them all separately from each other? Also, how do you want them to work with the servos?
Brandon
HELLO,
“A RC Switch with a relay and a mofset can help me control the lights over the initial 5v?”
what is the use for the medium low side or small low side mofsets? I thought It was to be able to amplify the 5v that runs throught the maestro pin, and then light the light haha.
but is it in fact for the switch signal? To be able to turn off or on? I didn’t really get that part.
"It sounds like you have 18 LED strips; do you need to be able to toggle them all separately from each other? "
yes this is what I wanted to do.
PLUS i would like to be able to edit my sequence in need, in a simple way. IF POSSIBLE.
“Also, how do you want them to work with the servos?”
I already have a scenario it looks like that :
when servo A is in state 3, then for exemple, led strips 1,2,12 OFF and the others ON,
When servos A B C D are in state 4, then everything’s ON…
thanks !
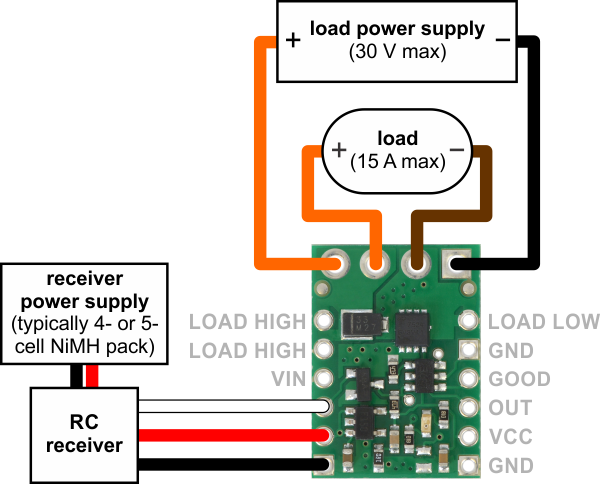
The RC switch with small or medium low-side MOSFET accepts a hobby RC servo signal as an input and uses it to toggle the load power supply (connected to the board) to the load; they do not amplify the input voltage. The diagram on the respective product pages might make this more clear; here is the one for the RC switch with medium low-side MOSFET:
It looks like those LEDs just require a voltage and not some more complex signaling like addressable RGB strips, so you should be able to toggle them on and off with one of the RC switches. Toggling each of the 18 LED strips individually using this method would require you to upgrade to the 24-channel Mini Maestro to have enough pins for each of them plus your 4 servos. Additionally, you would need an RC switch for each one.
You might consider using normal MOSFETs directly instead of the RC switches. This tutorial on using a MOSFET as a switch might be helpful. You would still need the same number of them, but it should be more economical that way. Note that you would need to change the Maestro channel mode to “Output” so it sends a digital signal instead of a servo signal. You can do this in the “Channel settings” tab of the Maestro Control Center.
Brandon
thank you again Brandon, i just recieved my 24 channel micro controller
and i also bought 10 RC switch relay
following your first answer advice. ![]()
Now is the time to make it happend. If you have any other suggestion or indications on how to proceed, I 'm still open for another good advice.![]()
like for exemple an easy way to edit or re edit my sequences …
I’m not very familiar with the pololu code but if I understand there is no path where I can’t go.
Post scriptum : I got a strange blink before full light when the relay is activated, do you know what might be the reason?
Aqua
Does the blink only happen when powering the LEDs through the relay or do you still see it if the supply voltage is directly applied to them? Also, can you tell me more details about your current system and how you are triggering the relay (e.g. is it already connected to the Maestro and if so, are you using a sequence or script to toggle the relay)?
Brandon

This his I proceed. Using the pololu USB controller to control pwm on off
When led strip is directly powered by the 12v bat there is no blink. When powered via relay and pololu usb controller + control center interface (that s what I m using to create sequences) it blinks before full light.
the relay is triggered by PWM signal through the usb controller and is set like if it was another servo
I tried to set it as an output but it doesn’t work for the moment.
I’m using P Maestro controller on a HPxw4600 / windows 10 Pro
Thank you for the additional information. How are you controlling the signal from the Maestro in that video clip? For example, are you using a script, a sequence, or the “Status” tab of the Maestro Control Center?
Can you post a copy of your Maestro settings file? You can save your settings file by selecting the “Save settings file…” option within the “File” drop-down menu of the Maestro Control Center while your Maestro is connected.
Brandon
Hello Brandon,
I’ve changed my initial 12v source with another, There’s no more blink !
The first one BLINK = ![]()

The second one NO BLINK = ![]()
The first one was not stabilised
so i decided to use a computer alim with 12v DC stabilised and it works
I Have to Thank you a lot for your constant support Brandon!
Now let’s do it.
i will ask you one more question, can you direct me to a link that will help me using the maestro controleur WITHOUT the usb cable and computer. A link to the : how to send the code to the board and how to plug the board for it to be fully autonomous.
Thank you again ![]()
have a good day !
I am glad you were able to find and fix the problem!
To have the Maestro work as a standalone controller, without connection to your computer or an additional controller, you can check the “Run script on startup” checkbox in the “Script” tab of the Maestro Control Center. This will make the Maestro automatically run its loaded script when it receives power.
Note that if you are using the “Sequence” tab to create your motion, you can use the “Copy Sequence to Script” button to generate a script from the current sequence. Using this button overwrites the current code in the “Script” tab.
Brandon
Hello Brandon
(It’s been a long time ![]()
Everything works perfectly.
Now I would like to know how it is possible to dim the light with this interface?
Is it possible?
Using the RC relays and the Maestro, actively dimming or controlling the brightness of those LEDs would not be practical. If you just want them to not be as bright, you might try using a lower supply voltage.
Brandon
OKAY.
i’m sorry i’ve got another question, it’s about runing the script over and over (infinite loop) when device starts (without computer interface).
I’ve tried the “begin” and “repeat” into the script. But it doesnt work.
(here is the script)code_02_06_20_tmp481E.tmp.txt (5.3 KB)
Thank you for your time.
Have you enabled the “Run script on startup” box in the “Script” tab of the Maestro Control Center? WIthout this enabled, the Maestro will not run the script.
Additionally, it sounds like you used the “Copy all Sequences to Script” and added your own BEGIN/REPEAT commands, which will probably work fine in your case since you only have one sequence. However, it would be better to use the “Copy Sequence to Script” button instead; this will make it will automatically loop that sequence without putting the entire sequence in a subroutine.
If you try those things and still have problems, could you post a copy of your settings file? You can find a description of how to do this in my previous post.
Brandon