I am working on a servo based panoramic head for my Canon Powershot G10. I have the Pololu USB Maestro 6-Channel servo controller, and Sparkfun BlueSMiRF RP-SMA Blue-tooth Modem. I am using Papywizard on a laptop via blue-tooth dongle. What I’d like to do, is use gPhoto2 (which Papywizard supports) to trigger the camera without connecting the USB cord to my computer, but to use BlueSMiRF module (which is connected to the servo controller). How would I connect the camera up to the controller/blue-tooth module for triggering the camera?
It sounds like you are already planning something like:
PC -> bluetooth -> Maestro -> Pan/tilt
and you want to know if the Maestro can also trigger the camera to take a picture. Is that right?
If that is your question, the answer depends on exactly how the camera is triggered, and this depends on how the camera’s “remote switch” interface works. A lot of people doing panoramas just position a servo in the right place to activate the trigger button.
After Googling around a bit, it seems like your G10 might be compatible with the remote interface described here. It is very likely that you could wire the product you linked to into this interface, and we also sell a similar product, but since the Maestro can generate digital outputs, all you really need to get the same functionality is a MOSFET or transistor.
Papywizard (http://www.papywizard.org) sends commands to the controller to move the pitch and yaw axis servos. When positioned, papywizard then sends a command (through gPhoto2) to trigger the camera electronically. This is simple to do with a usb cord connected to the camera itself and a seperate usb to the maestro controller, However, interfacing the camera up to the BlueSMiRF/maestro to share the same bluetooth link to the computer I’m not sure how to do.
After looking around, I found This, which sounds perfect, however its pretty expensive.
Since the MERS switch I mentioned is out of stock, I found that they also have a ‘nano’ switch which does the same thing. I figured I could just modify my USB cable, and solder a stereo-jack to the two leads on the switch, and plug the switch into the maestro controller for just simple shutter control.
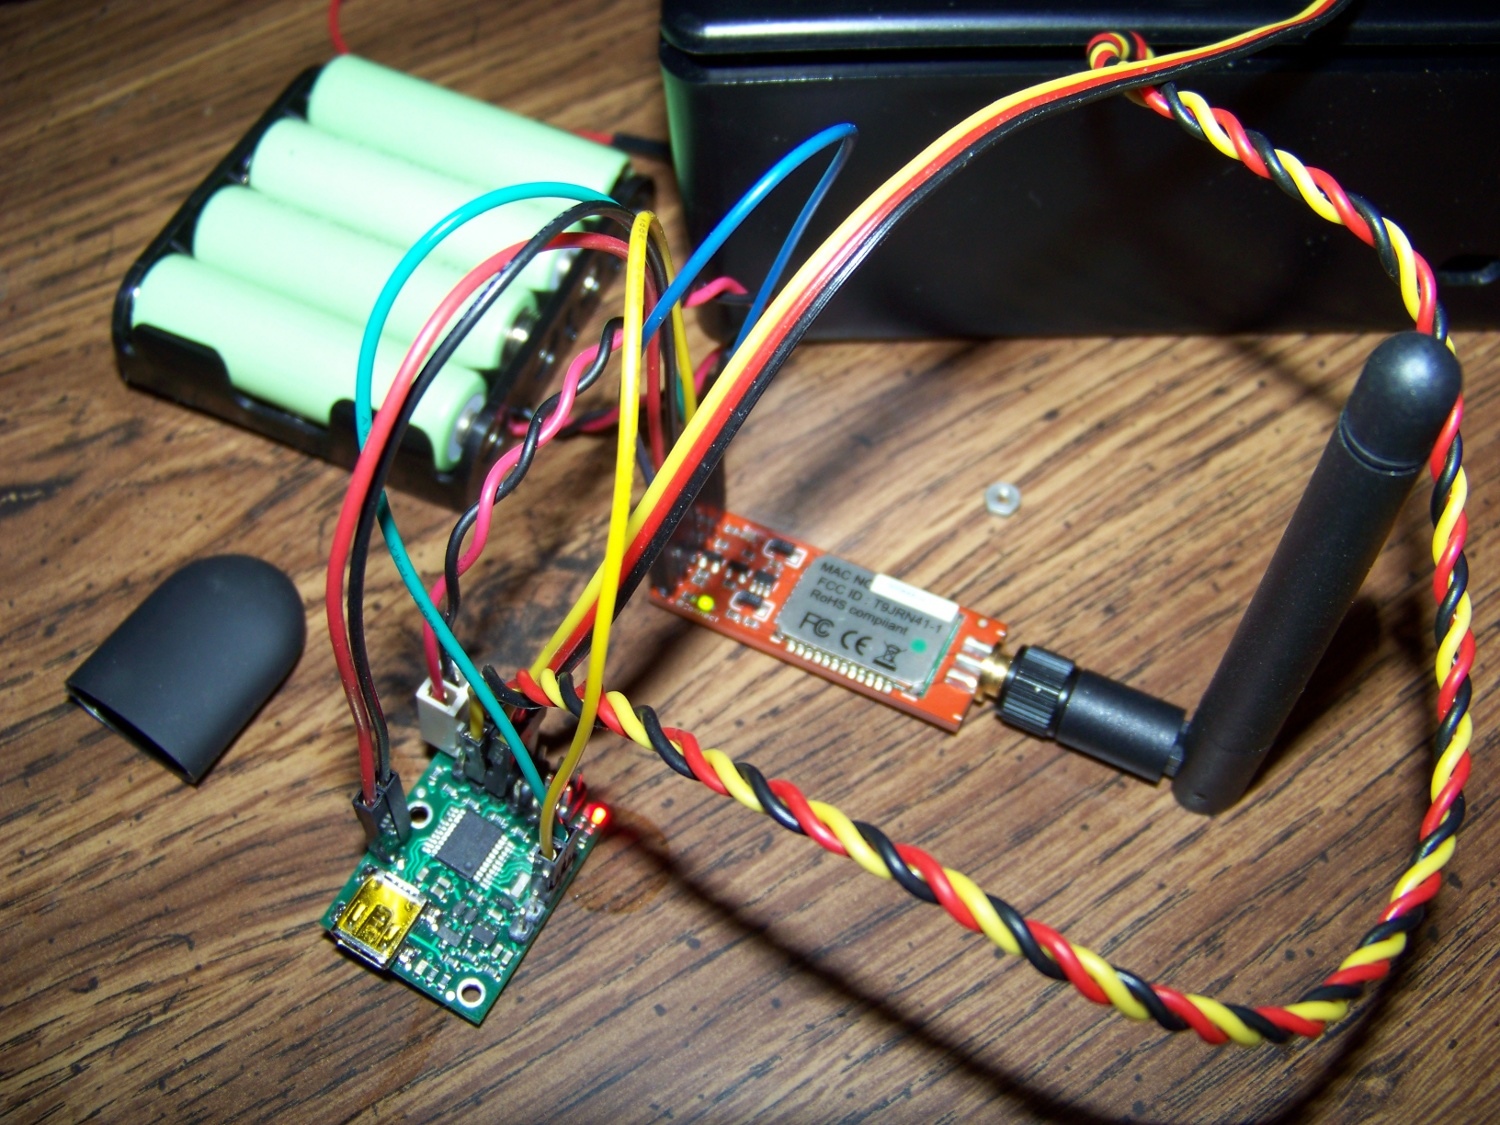
Also, I’m just wondering, I have 4 NiMH rechargeable cells at 1.2 volts (2500 mAh) apiece. Without using a second power source to power the Maestro controller, could I power the board + servos by just using the servo power pins on the controller? Or could I power the board + servos from the VIN/GND pins? I am right now using the USB connector for board power, and the battery pack for servo power, but I ultimately wont be using the USB method of powering the controller.
That VP-Systems remote seems pretty cool, but it is way more than what you need, controlling focusing, exposure, and so on. The Hansen thing will not work, if the schematic I linked to applies to your camera. When it is off, it will not be applying any voltage, so the output will be pulled up to 3.3V, and when it is on, you will be providing ~5V. So the camera will never see a LOW signal, and it might be destroyed by the higher voltage. You should probably use the MOSFET version that you were talking about earlier, or just a MOSFET by itself.
You can try connecting your power to both the servo power and Vin. The nominal 4.8V is technically out of spec for the Maestro, so you might have some problems, especially when the servos are drawing a lot of current and your batteries are low, but it should mostly work. You can install a jumper to provide this power directly to Vin.
I was able to power the Maestro, BlueSMiRF with the same battery pack. I’m able to connect to the bluetooth and send commands to the bluetooth module, however the moment I connect, there is a solid red light on the Maestro that stays on untill I unplug the power source, and a flashing yellow light. The bluetooth looks good though.
A solid red light indicates an error. You can diagnose the error by plugging it in to USB and using the Control Center.
One strange thing you are doing is trying to power the BlueSmirf from the Maestro’s +5V(out) line. Why not just use your batteries directly? The Micro Maestro can only supply about 20mA, which is probably not enough to for the BlueSmirf.
When I connect the USB cable, I don’t get that solid red light, and I am able to control the servos. I cant diagnose the error by bluetooth because the control center does not seem to detect the controller that way. I’m thinking maybe I should have a second power source after all, even though it is less desirable. But Even when I disconnect the servos, I still get that solid red light the moment I connect to the bluetooth. Hmmm.
Even though the Maestro supply’s 20 mA to the blueSMiRF, and the average draw of the BlueSMiRF is 25mA, Powering the bluetooth module and connecting to it with my USB dongle on my laptop seems to not be an issue with my current setup.
After you get the red LED, I suggest that plug it in to USB to check what the error is, without turning off the power. But it is really very likely to be related to the strain that you are putting on the Maestro’s 5V regulator - why don’t you just power both boards directly from the battery?