Can I do this with Pololu Serial 8-servo controller?

This is probably not your big problem, but it is something that has come up before, and I was doing it wrong for a while myself.

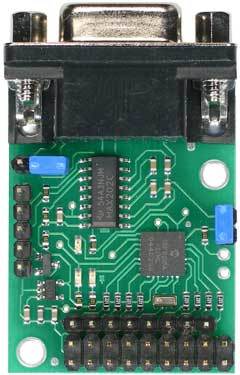
The servos are powered directly from the power source you connect to the servo power pins (you can see the big fat traces on the circuit board). The 4V-6V range is normal for hobby servo power. Meanwhile, the VIN pin powers the servo controller board’s microcontroller through a voltage regulator, so you can connect 5V-16V to it, and the regulator will drop that voltage down to the 5V that the microcontroller uses for normal operation.

The Vcc=Vs jumper connects the servo power line directly to the microcontroller, bypassing the regulator! so if you connect 6V to your servo power you’re actually connecting 6V to the microcontroller! Worse yet, if you use, say, a 5 cell NiMH battery pack, with a nominal 6V, you can actually see 7V with a fresh full charge! The microcontroller is designed for up to 5.5V, with an absolute maximum voltage of 6.5V, meaning that applying 6V to it won’t smoke it immediately, but don’t make a habit of it.

I find this graphic to be quite helpful, it’s based on the micro-serial servo controller, which is mostly the same board but without the 9-pin serial connector:

I like keeping the microcontroller safely behind the voltage regulator (protects from damage from voltage spikes, suppresses interference from motor noise), so I usually don’t use the Vcc=Vs jumper. If your power supply is between 5V and 6V there’s no reason you can’t wire it to both the servo power and VIN pins, just be sure to leave off the VCC=VS in that case!

ANYWAY, down to diagnosing your actual problem. With your servo controller disconnected from your computer, when you connect a power source (5V-16V) to the VIN and GND pins, you should see some LEDs turn on (either just the yellow one, or all three, depending on things I forget at the moment). If no LEDs come on at all when you do this something is very wrong. My first guess would be that power isn’t getting to the microcontroller.

You wouldn’t happen to have a multimeter with a continuity tester, would you? It makes it really easy to check your soldering connections.

-Adam

HI Adam that is what i checked , hehe the multimeter made noise so all solderings are leading electricity, although they dont look fancy, I mesuared the resistance as well and it was the resistance of the solderings was the same as the header pins

okay, this is what I did now:

I disconnect the board form the pc.I removed the servo and connected the power to the VIN (6volts) and it lighted up yellow constantly. I both had the vcc jumper on and out

i checked in the manula and it only said that yellows indicates an error just about 8 or 7bits…
thanx ALOT Adam for your help

Kalle

That’s great news! I don’t think the manual mentions this, but the yellow LED should come on when you power the controller up. That doesn’t mean that anything is wrong, just that it hasn’t received any serial commands yet. When you send it serial bytes the yellow LED should turn off and the green one should flicker on ever so briefly as you send commands.

-Adam

i divided the power so both the VIn and the servos will get power separetely from 6v via pararell connection. all I get is a yellow light constant when everything is connected to the pc, I am really confused on which software/programme to use to start this board, VSA, and others didnt seem to do anything? I feel I need to make the pc recognize that the board is connected but I dont know how?

Kalle

You’re going just going to be sending commands to the servo controller from a serial port, and receiving nothing back in return. Basically the serial port shouts out commands and doesn’t care if they are heard or not. Your computer doesn’t need to recognize the servo controller in the same way as it needs to recognize, say, a USB mouse before it will work.

VSA is a little cumbersome, I would suggest starting with a terminal program like Br@y terminal, or the Pololu serial transmitter utility. In either case, set the program to the com port you have your servo controller connected to and try sending a command.

I would say try the Mini-SSC II mode first, its command protocol is much simpler (so have the mode-selection jumper already in place when you connect power to the board). In this mode, commands are three bytes long: 255,servo number (0-16 by default), position (0-254). So sending the command string “255,0,0” would move servo number 0 to one side, while “255,0,254” would send it over to the other side. You can address servo 0 with either the number 0 or 8, servo 1 with either 1 or 9, and so on. The higher address of each servo makes it move in a wider range, but you can also probably run it into it’s mechanical stops that way, so watch out. It’s not immediately terrible for the servo (unless it’s a really tiny one) but it’s not something you want to do regularly.

-Adam

Thnk you adam I am going to try that tomorrow, btw where is the jumper for the Mini-SSC II mode, I didnt get it, is it the other blue jumper but it is called DTR RTS?

Kalle

That’s odd, you should have received two blue jumpers. Oh well, you should probably leave the DTR/RTS reset jumper completely off for now.

The jumper on the right side of the picture is the one you want to have on to select the simple control protocol, its labeled “Mode” on teh underside of the board.

-Adam

and I gotan error " in Pololu serial transmitter when trying to connect but I fixed it by changing the port number from Com1 to com7 and now I put in the values 128-0-7 in 3 byte command as a test in Pololu serial transmitter and the servo moved. but it seem I am really far from understand how all this byte thing works with the servo movement.

Kalle

Yay, well at least your soldering is all good.

When you say you don’t understand “how all this byte thing works” do you mean the protocol (i.e. why do these three numbers make that servo move) or how the bytes are sent. Or both for that matter.

-Adam

sorry for my unclear question, I was real tired. what I meant was how can I make the servo move back and forth. Now I only know how to send one command to make it move to one direction, and thats it. I simply put the values 255, 7,120 in the 3 byte command: now as I understand it all now the first “255” is a must number to input when in Mini-SSC II mode. the “7” is the number of the servo and the 120 is the destination I want my servo t to turn. I tested and I understood how to do that in Pololo serial transmitter in 3 byte command. but how about making or testing to let the servo go back and forth ? I searched the web for any help for beginners but didnt find

thank you for you support
Kalle

The easiest way I know of to get started with looping/timed command sequences is to use the program Br@y terminal (available here).

To duplicate what you’ve done so far, you would open the program and configure the various settings across teh top of the window. Select your com-port from the drop-down box, an acceptable baud rate (2400 or 9600 for MiniSSC-II mode), 8 data bits, no pairity, 1 stop bit, no handshaking. I think these are all default settings anyway. Then click “connect”.

Then down towards the bottom of the window is a white text box you can type commands into, and send them out by either hitting enter or clicking the “send” key to the right (make sure that the “+CR” box is unchecked). If you type normal letters and numbers into this box and click send, what you’ll be sending out are the eight-bit ASCII character codes of those letters, which is not what you want!

For example, lets say you wanted to move that same servo, so you type into the box “255 7 120”. You’ll actually be sending out nine serial bytes with these values: {50,53,53,32,55,32,49,50,48}. If you click on the “ASCII Table” button, you can see a table of all the ASCII characters and their character code values.

To send out 8-bit numbers instead of character codes, you can preface a three-digit decimal number with a ‘#’ character. The numbers must always be three digits and between 0 and 255 (or their character values will be sent insted), so pad small numbers with leading zeros. So, to move the servo in the same way you did before you would type “#255#007#120” into the text bar and hit send. You can stack up commands one after another, but be sure not to use any spaces, as these will get send as their character codes (number 32).

So, if I wanted to move that one servo back and forth I could type something like: “#255#007#100#255#007#154#255#007#100#255#007#154”. The problem here is that the commands will all get sent at once, so the servo won’t even have time to budge before it gets sent back. What you need now are delays in between the commands. You can add delays using the command: %DLYxxxx, where you replace the xxxx with a number of milliseconds (with leading zeros if necessary). So, if I wanted to add a half-second delay in between each command, I would type this: “#255#007#100%DLY0500#255#007#154%DLY0500#255#007#100%DLY0500#255#007#154”.

Now we’re really getting somewhere, but at some point you’re really going to want the motion to loop! This is where the macro buttons come in. If you click the button that says “set macros” it will bring up a window with twelve text boxes where you can type out different commands that will be sent when you click the corresponding macro button. This is tremendously useful already, but to the right of each command line is a number field (1000 by default) and a blank check box. The number field is a repeat frequency (in milliseconds) and when the check box is checked the macro button text in the main window turns red and the command gets sent out repeatedly, as often as the frequency you set.

SO, if I wanted two servos to move back and forth between two positions in sync, I would type something like:
"#255#006#100#255#007#100%DLY0500#255#006#154#255#007#154" into the first macro box, set the repeat frequency to 1000, and check the check box. Now every half second servos 6 and seven will alternate between position 100 and position 154.

By the way, in addition to setting up to 12 macros, you can load and save sets of useful macros as well. And don’t forget you can get more range out of your servos by adding 8 to the servo number (so addressing servo 7 as servo 15 for example).

That’s a LOT to digest all at once, but play around and see how you like Br@y terminal, and of course let me know if you have any trouble with it (or my instructions). If all you want to do is get the servos going for your experiment this may be all you need.

-Adam

Mna I dont know how much i can thank you, offcourse i will play alot with the bytes

I just to want to ask though, is it normal that when I connect the board and power it up and connect it via terminal it lights up yellow and wheni send command the yellow light is gone and there is no light anymore except when send a command. Only when at the moment the servo moves the green lED flashes.
Kalle

The green light is actually flickering as the serial bytes come in. If you switch to the lower baud rate (2400) you might be able to see this a little more clearly (but then your commands would get sent more slowly). In any case, yes, that is perfectly normal.

-Adam