


Hello.
Unfortunately, we do not have any resources specific to using the VSA software, but if you are just looking for help getting the Maestro configured and communicating with the VSA software, I could help you with that.
To configure the Maestro, the only setting you should need to change from the default to get started is the serial mode, which should be set to “USB Dual Port” or “USB Chained”. Before opening the VSA software, I recommend connecting your Maestro and checking what COM port was assigned to the virtual serial port since you’ll need that later. In Windows, you can do this by opening the Device Manager, and looking for the Maestro’s “TTL Port” entry (typically in the Ports category).
Then, in the VSA software, you can configure each servo channel by selecting the “Settings…” option in the “Tools” drop-down menu. Each “Track” can be assigned a different Maestro channel. I recommend starting by disabling all of the tracks (which you can do quickly from the drop-down menu in the lower left corner of the window), then configuring them one at a time. Here is a breakdown of the settings for each column:
| Setting | Description |
|---|---|
| Name: | Whatever you want to help identify which servo it is. |
| Type: | Maestro Servo (not “Pololu Servo”) |
| Port:: | Select the COM port assigned to the Maestro’s virtual serial port. |
| Addr: | This is the Maestro servo channel that the servo is connected to. |
| +Value: | Maximum pulse width value (I recommend 2000, which is the default for the “Maestro Servo” type) |
| -Value: | Minimum pulse width value (I recommend 992, which is the default for the “Maestro Servo” type) |
| Default: | Whatever pulse width you want the servo to start at (1500 is a good neutral value if you just want to get started for testing). |
| Color: | The color of the line displayed in the plot view. I recommend choosing a color that’s distinct from other tracks. |
As an example, here is a picture of the settings I used for my 6-channel Maestro:
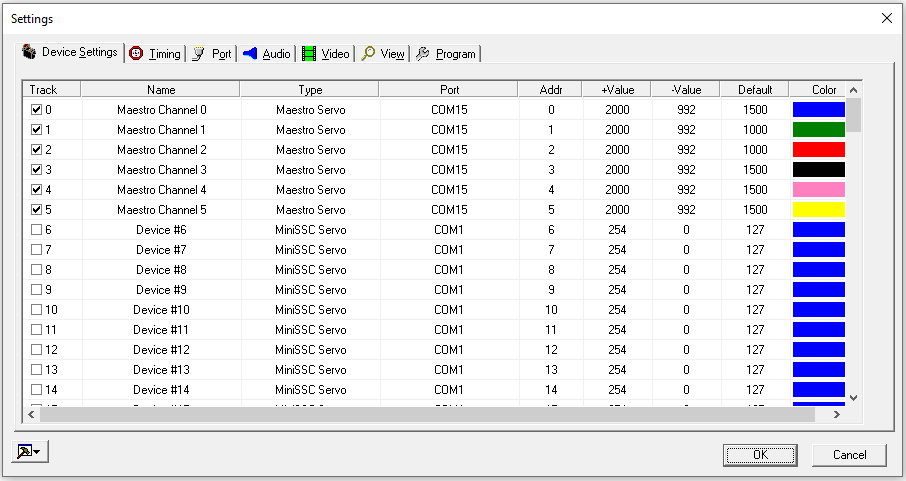
Please note that if you need to expand the range of motion for your servos, you will need to change the “Min” and “Max” values in the Channel Settings tab of the Maestro Control Center, as well as the +Value and -Value settings in the VSA software. Also, I recommend reading our Maestro FAQ about extending the range of your servos for some information about doing so safely, as it is possible to command some servos to a position beyond their physical limits and cause them to destroy themselves.
Brandon