Here is the code that my daughter is having issues with and gets the error code 0x0040 stack overflow/underflow
0000: – # Abbey’s Robot Sequence
0000: –
0000: – begin # Beginning of loop.
0000: 0310F4010000800F800F800F800F7C116017 – 500 0 3968 3968 3968 3968 4476
0012: 80 – 5984 frame_0…11 # Hand
0013: 030AC800C800AF01C800C800 – 200 # Wrist
001F: – 200 # Wrist 2
001F: – 431 # Elbow
001F: – 200 # Shoulder
001F: – 200 # Shoulder 2
001F: 060000 – repeat # Go back to beginnig of loop.
0022: –
0022: – sub frame_0…11
0022: 02062A – 6 servo
0025: 02052A – 5 servo
0028: 02042A – 4 servo
002B: 02032A – 3 servo
002E: 02022A – 2 servo
0031: 02012A – 1 servo
0034: 02002A – 0 servo
0037: 08 – delay
0038: 05 – return
Subroutines:
Hex Decimal Address Name
00 000 0022 FRAME_0…11
Hello.
It looks like after calling the frame_0..11 subroutine in your main loop, there are some extra values that are getting added to the stack and never being used (the ones labeled Wrist, Wrist 2, Elbow, Shoulder, and Shoulder 2 in the comments). This means that every time the code cycles, more values are getting added to the stack and never being removed, which causes it to eventually overflow (and trigger the error).
I cannot tell from the code what those values are supposed to be (e.g. they would not be valid servo target positions), but if you can post a description of what you want the code to do and what it is doing now, I might be able to help get it working.
Brandon
Brandon,
Thank you for the help. When she made the changes that you suggested the error went away but the servos didn’t move. Basically what she is trying to do with the robotic arm is to have it take a Kleenex out of a box and give it to someone. The purpose of the first go at this was to just get it to move so she can see how it works to work on changing to code to what she wants it to do. This is something that she hasn’t done before and is learning and trying new things. I hope this all make sense. Here is her script after her changes: Let us know if there are things for her to try. We really appreciate the help.
0000: – # Abbey’s Robot Sequence
0000: – begin
0000: 031AF4010000800F800F800F800F7C11601700000000000000000000 – 500 0 3968 3968 3968 3968 4476
001C: 80 – 5984 0 0 0 0 0 frame_0…11 # 1
001D: 02C808 – 200 delay # 2
0020: 02C808 – 200 delay # 3
0023: 01AF0108 – 431 delay # 4
0027: 02C808 – 200 delay # 5
002A: 030EC8000001000100010001EE01410281 – 200 256 256 256 256 494 577 frame_1…6 # 6
003B: 060000 – repeat
003E: –
003E: – sub frame_0…11
003E: 02062A – 6 servo
0041: 02052A – 5 servo
0044: 02042A – 4 servo
0047: 02032A – 3 servo
004A: 02022A – 2 servo
004D: 02012A – 1 servo
0050: 08 – delay
0051: 05 – return
0052: –
0052: – sub frame_1…6
0052: 02062A – 6 servo
0055: 02052A – 5 servo
0058: 02042A – 4 servo
005B: 02032A – 3 servo
005E: 02022A – 2 servo
0061: 02012A – 1 servo
0064: –
0064: –
Subroutines:
Hex Decimal Address Name
00 000 003E FRAME_0…11
01 001 0052 FRAME_1…6
That script does not look like it will do anything meaningful, and I suspect all of those values are not mapping to their corresponding commands the way you are intending them to. It looks like it will eventually trigger the same overflow error if you let it run long enough.
It looks like you might have started by trying to convert your sequence to a script, then edit the script from there. Since you are new to the Maestro scripting language (as you mentioned), I would recommend starting much slower, possibly even with only 1 servo until you get a better understanding of the commands and how they work. You might find the “A simple servo sequence” example script helpful as a good starting point. You can find it in the “Example Scripts” section of the Maestro User’s Guide. That example only uses one servo, but once you get the hang of that and how it works, it should be easy to add more. The “Step Script” button in the “Script” tab of the Maestro Control Center is very helpful for stepping through the code one line at a time to get a better understanding of what is happening.
By the way, note that the units for the SERVO command is quarter microseconds, but the values shown in the “Status” tab are in microseconds. Since the standard pulse width range is 1000-2000 microseconds, this means that the standard range of values for the SERVO command is actually 4000-8000 in your script.
Also, when you share your scripts, you can just copy/paste them from the “Script” tab directly, instead of sharing the compiled code (which is harder to parse).
Brandon
Brandon,
So we did copy the script in from what you sent and there is still no movement in the one servo it is set up too. What could we be missing?
Thanks
Aaron
Can you double check that you clicked the “Apply Settings” button to update the setting on the Maestro? Also, please note that you need to click the “Run Script” button in the “Script” tab for it to start.
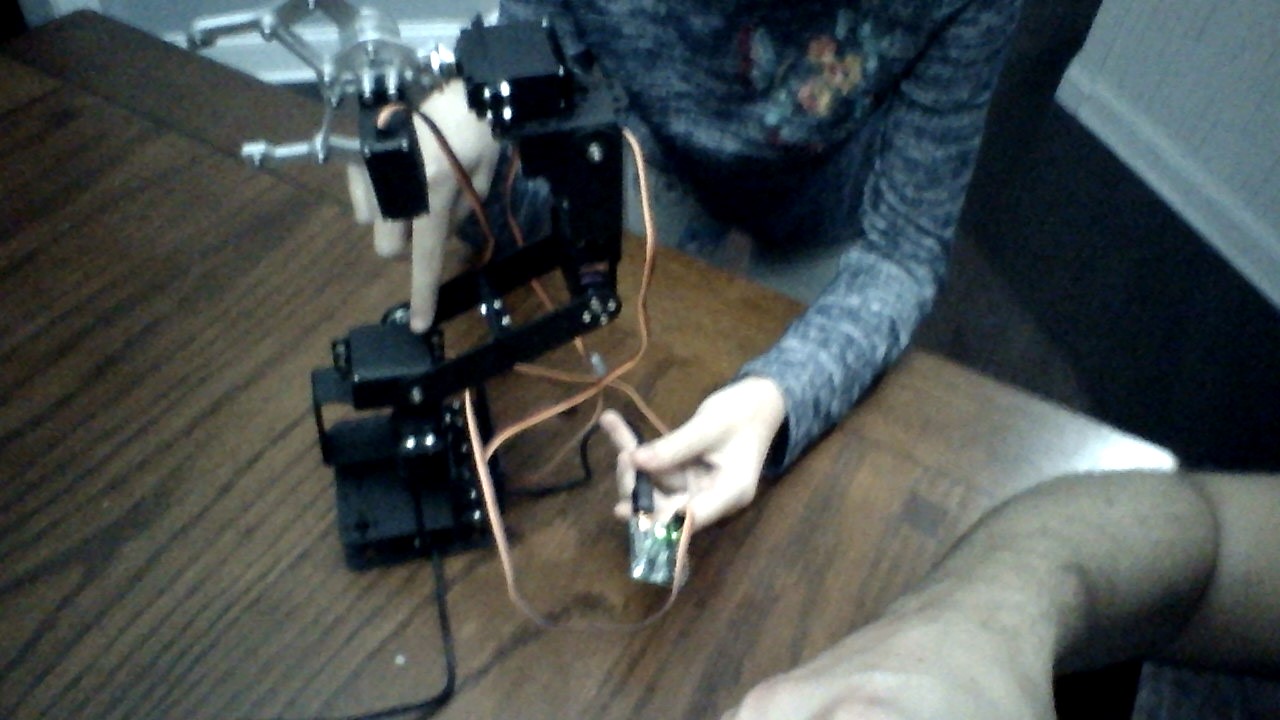
While the script is running, do you see the channel 0 slider moving in the “Status” tab? If so, how are you powering your servo and do you have it properly connected to channel 0? Could you post some pictures of your setup that show all of your connections? Also, can you post your Maestro settings file? You can save the settings file by selecting the “Save settings file…” option within the “File” drop-down menu of the Maestro Control Center while your Maestro is connected.
Brandon
We can click the apply settings and run the script and the little red arrow moves through the script. It is pluged into channel 0.
What do you mean about how are we powering our servo? The Maestro is plugged into the USB and it is plugged into the laptop.
maestro_settings aaron.txt (2.8 KB)
I now looked at the back and see where it says BAT on the Maestro. I guess, what do I use to power it?
She has 6 servos for this arm. I see you have battery holders, is that what we need?
If we need battery power to run the robot, is this script OK for running? It worked fine with no errors when we tested it.
# Move servo 1,5,6 in a loop.
begin
  5000 1 servo # 1.00 ms
  500 delay
  5000 5 servo # 1.00 ms
  500 delay
  5000 6 servo # 1.00 ms
  500 delay
  quit
repeat
The USB port on the Maestro powers the logic side of the board, but it is not connected to the servo power rail to provide power to the servos. You can find more information about this in the “Powering the Maestro” section of the Maestro’s user’s guide. Choosing an appropriate power supply for the servos will depend on the particular servos you are using. For example, you will need to consider the voltage rating and the potential current draw of the servos to choose an appropriate supply.
Most standard servos are rated for 4.8-6V nominally. If that is the case for your servos, you could probably use a battery pack in that range (e.g. a 5 pack of rechargable AA NiMH batteries). Excessive current draw could cause the voltage to drop and the servos to jitter when being used, so if your servos have a particularly high current draw, you might need to use a more powerful supply or separate the servos into 2 separate banks, each powered from its own supply.
That script looks like it should run fine, but note that it will only move each of those 3 servos to one position, with a half second pause between movements, then stop (e.g. it will not move them back and forth or loop through multiple positions).
Brandon
Brandon,
Thank you again for the help and being patient with this. She wants to learn, has really been into this and want to be learning how to code. You have to start somewhere and she picked just doing it on her own and teaching herself.
So we really appreciate the help and we picked Pololu because someone recommended it because the support was amazing. We are experiencing this. Thank you for that!
Thanks,
Aaron
Brandon,
My daughter and I tried it with the batteries and it worked!! Now all she has to do is program it to do exactly what she wants it to do. After she tested it a few times, smoke came out of a motor is that a bad sign? Also, is this script OK for running and sticking with?
Aaron
# My Project Sequence
begin
  500 0 256 0 0 0 256
  256 0 0 0 0 0 frame_0..11 # Frame 0
  500 576 frame_5 # Frame 1
  500 896 frame_1 # Frame 2
  500 256 frame_5 # Frame 3
  500 896 frame_6 # Frame 4
  500 569 frame_1 # Frame 5
  500 256 256 frame_1_6 # Frame 6
repeat

sub frame_0..11
  11 servo
  10 servo
  9 servo
  8 servo
  7 servo
  6 servo
  5 servo
  4 servo
  3 servo
  2 servo
  1 servo
  0 servo
  delay
  return

sub frame_5
  5 servo
  delay
  return

sub frame_1
  1 servo
  delay
  return

sub frame_6
  6 servo
  delay
  return

sub frame_1_6
  6 servo
  1 servo
  delay
  quit
Sorry for the delay. We spoke over the phone to figure out what was going on, but I figured I would update it here just in case it helps someone else.
The target position values being sent to the servos were outside of the servos operating range, causing them to shake and jitter when they were plugged in, even without a script running, Another possible cause of this symptom would be an insufficient power supply (e.g. one that cannot source enough current), but that was not a problem in this particular case.
Brandon