I have been thinking about simple designs for walking robots in the back of my mind for more than two years, ever since building a really simple walker out of LEGO bricks and a single DC motor for a competition (it lost.)
With the release of the Micro Maestro USB Servo Controller, I wanted to move up to a servo-based design, but keep the number of servos to a minimum. My goal was to design a hexapod that could be built in an afternoon without any special tools beyond what I usually use for electronics, and to demonstrate how the Maestro’s scripting capabilities could be used to sequence motion for an interesting, autonomous, walking robot.
There are a few three-servo designs out there (onetwothree), but these all require mechanical linkages that probably take a lot of difficult drilling and cutting. I wanted to have as few custom mechanical parts on the robot as possible.
I realized that if I was willing to let the feet slide along the ground a little, I could connect two legs to each servo, like this:
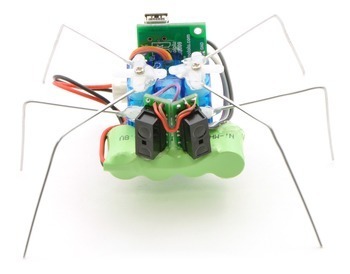
With tiny micro-servos forming the body, there is just enough room to glue on the Maestro, a battery, and two distance sensors. The hexapod is capable of forward and reverse motion as well as turning, and a script on the Maestro coordinates the motion, using the sensor readings to walk around and avoid obstacles.
Please take a look at the complete build tutorial and let me know what you think! I think this could be a great first walking robot project for anyone with decent soldering skills, and I am sure that you all can come up with some interesting variations.
That is brilliant and so simple, I reckon it wouldn’t be too hard to do with a PIC micro controller either. Can I ask where you get your servos? I’ve been keeping an eye out on the net but all I can find are pretty expensive.
Sure, you could do it with a PIC if you are good with C or assembly coding. But do you know of a decent PIC proto board that would fit onto this robot? Our 8-pin PIC prototyping board is twice the size of the Micro Maestro.
I got some servos for another project but first wanted to take a run at your hexapod. Pretty much straight from the tutorial, except I’m using one of your 5V 2xAA battery power supplies. Everything seems to work fine while the USB is connected (with Pololu Maestro Control not running) but without USB the servos jitter and twitch non-stop randomly. This is with the upgraded 6 servo controller firmware. Power problem?
It’s definitely a power problem. Powering multiple servos, especially if they aren’t micro servos, is not something I’d expect a small boost regulator to be able to handle. A good typical current requirement is 1A per servo; if you’re talking about the Bodhilabs boost regulators, those are good for only a few hundred mA.
I’ve viewed the video several times, and have read the tutorial, now I’m glad to have found the originating thread!
I realize that its pretty easy to fill a cart with the required components, but you guys should really kit this thing up (paperclips included ), give it a spiffy name (TriServoTick? ), and list it with the 3Pi as one of your robots for sale (assembly required).
I don’t believe I’ve ever seen a better first project for someone wanting to learn to make gizmos with microcontrollers. Truly a great design… Simple and forgiving (and inexpensive!), and easy to program as well. I plan to build a few of them (or a take on them) soon. I found some super cheap servos that are supposed to be pretty good for their money. They have been very slow in shipping, but we’ll see how they perform when they arrive. One of these little bots will be a great first test! I also hope to work with local schools and maybe a FIRST robotics team as this would make a great project for kids.
Anyway, thanks for creating this and posting the tutorial! Pololu has been an awesome Internet treasure so far; I’m so glad I found it!
Hello, and thanks for the compliments. I am glad that you are so enthusiastic about our hexapod tutorial!
As for packaging up a kit, we would love to do something like that, but we are simply not yet set up to be selling things like paperclips and pieces of wire. Step one is to at least have all of the parts that we do sell in stock at the same time, and we are working on that.
I am actually not so sure that this would be a good project for school groups, since it requires some pretty delicate work with wire cutters and the soldering iron - did you consider getting the assembled version of the Maestro instead and connecting the servos without cutting their cables? You would end up with a slightly larger robot, but all the parts could potentially be taken off and re-used by the next group.


 ), give it a spiffy name (TriServoTick?
  ), and list it with the 3Pi as one of your robots for sale (assembly required).