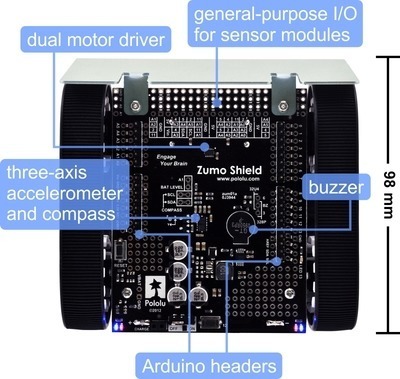
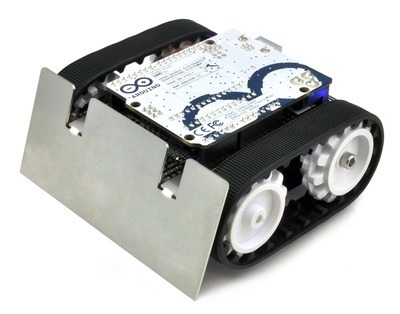
We are very happy to introduce the Zumo Robot Kit for Arduino, a low-profile, Arduino-controlled tracked robot that is small enough to qualify for Mini-Sumo but flexible enough to make your own. The kit includes a Zumo chassis, a Zumo blade, and our new Zumo Shield for Arduino, which acts as an interface between the Arduino and the chassis. The shield includes dual motor drivers, a buzzer for making simple sounds and music, and an LSM303DLHC 3-axis accelerometer and magnetometer that can be used for impact detection and, depending on the environment, basic navigation.
The Zumo Shield is somewhat different in that it sits on the bottom, mounted directly to the chassis, and the Arduino plugs into it, face-down. The shield itself offers convenient access to the Arduino reset button, user LED, and Arduino I/O lines, and it features an expansion area in the front for connecting additional sensors (e.g. QTR sensors for edge detection or line following). For more information, including links to the shield library and user’s guide, please see the Zumo Shield product page. Please don’t hesitate to ask if you have any questions, and we welcome your feedback!
How many pins are still available to add additional sensors?
Suggestions on target detection sensors we could use for Sumo? Doesn’t seem like it would be easy to physically mount sharp IR’s to this setup. A 2nd shield between the Zumo + Uno with target detection sensors pointing outwards might be nice! (hint hint!)
Also, wondering why it suggests using the digital vs analog versions of the IR line sensing modules???
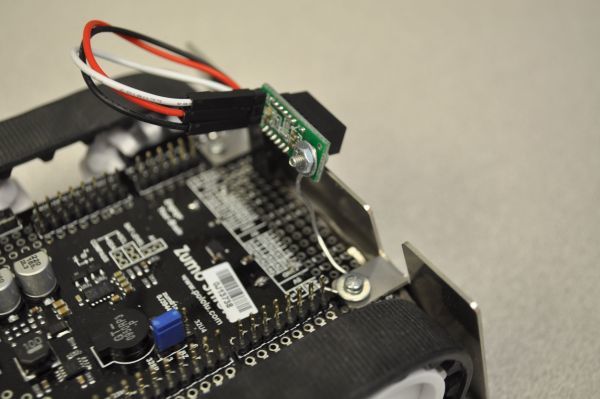
It looks like you could trim the top of the scoop off between the mounting tabs and expose sensors mounted to the prototyping area that’s on the board right there?
At least 8. More are available depending on the Arduino model used (i.e. pins 0 and 1 are free on the Leonardo) and the optional features you connect.
We are definitely looking into this. We’d like to make something that responds faster than the Sharp sensors do. Thanks for the suggestion of using another shield.
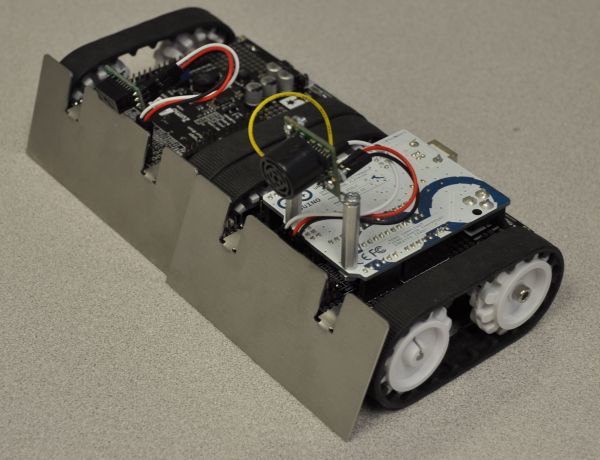
Here are some pictures of sensor mounting Kevin has tried:
A description of the benefits to using the digital QTR sensors over the analog ones can be found on the QTR-1RC product page.
Actually, looking at those pictures, I think a shield that would go on TOP of the Uno (well, under it, but on top of the stack, it would require you not to clip the header pins) would work awesome. You could put the sensors on the bottom side of the shield so they’d be on top and clear of the blade and the side tracks…
Or, if that’s high enough to clear the blade + tracks, then you could make the detection shield hang over the side tracks and blade and make an array of IR emitters+detectors, 360 degree coverage.
For sumo, those digital IR’s are too short range to be all that useful.
I built a mini sumo out of the Zumo chassis and blade, a pair of the 100:1 HC motors, an arduino Nano, a TB6612FNG, 2 of the QTR-1A’s, and 3 sharp IR mid-range sensors that’s done very well so far in competition.
Trying to remember if I had to solder on the headers on my Uno when I bought it… If you do, then you just don’t clip the leads after inserting+soldering… Now you have pins to plug a shield “under” the Uno…
But based on your question, I suspect that’s not the case, and they come pre-installed, so yeah, that wouldn’t work…
Actually, just looked, and they DO sell a Leo without the headers pre-installed. So if you install the headers, with the same length male side as your typical shield comes with, then you now have all the pins sticking up that you can stack a shield onto the “bottom” of the Leo. Follow me?
Yes, the headerless Leonardo along with those shield headers would work. I don’t think that board is too common though.
We are cutting the stainless steel Zumo blades here. We make a CAD file available on the resources tab of the sumo blade product page, so you could modify that and ask for a quote on a custom one.
We got a METABEAM 400 from Coherent last year, and that can cut metal (you can actually see it in the “warehouse exhaust ducts” picture in Jan’s blog post about trying to get our machines hooked up). We are not yet officially offering metal cutting as a service as far as I know, but if you email us about getting modified Zumo blades cut, we’d be happy to send you a quote.